In this article, we’re looking at a few commonly asked questions from our forums, about working with imported animations in Unity, to help you with tips and tricks on how to troubleshoot animations. Let’s dive in!
Animations can be imported directly from 3D modeling software, such as Maya or Blender, downloaded from the Unity Asset Store, or downloaded from animation libraries such as Mixamo or ActorCore.
The animation clips are Read-Only. How can I edit the animation clips?
If you’re importing animations from a third-party provider they will most likely be Read-Only.

You can only edit animation clips that use a generic animation type directly in the Unity Animation window. Animations that use a Humanoid animation type are edited in another application, such as Maya or Blender.
By default, when you import animation clips, they are embedded inside a container used for configuring the animation clip. This is why the animation clip is Read-Only. This file contains the animation clip (the green triangular icon in the screenshot below), and the Root object which is the skeletal structure of the character.

Click on the animation file (triangular icon) and duplicate it with the shortcut for Windows (Control and D), or for Mac (Command and D). Now that the file is duplicated outside of the container, you can now edit it.


Drag this file into the Animator Controller for that character.
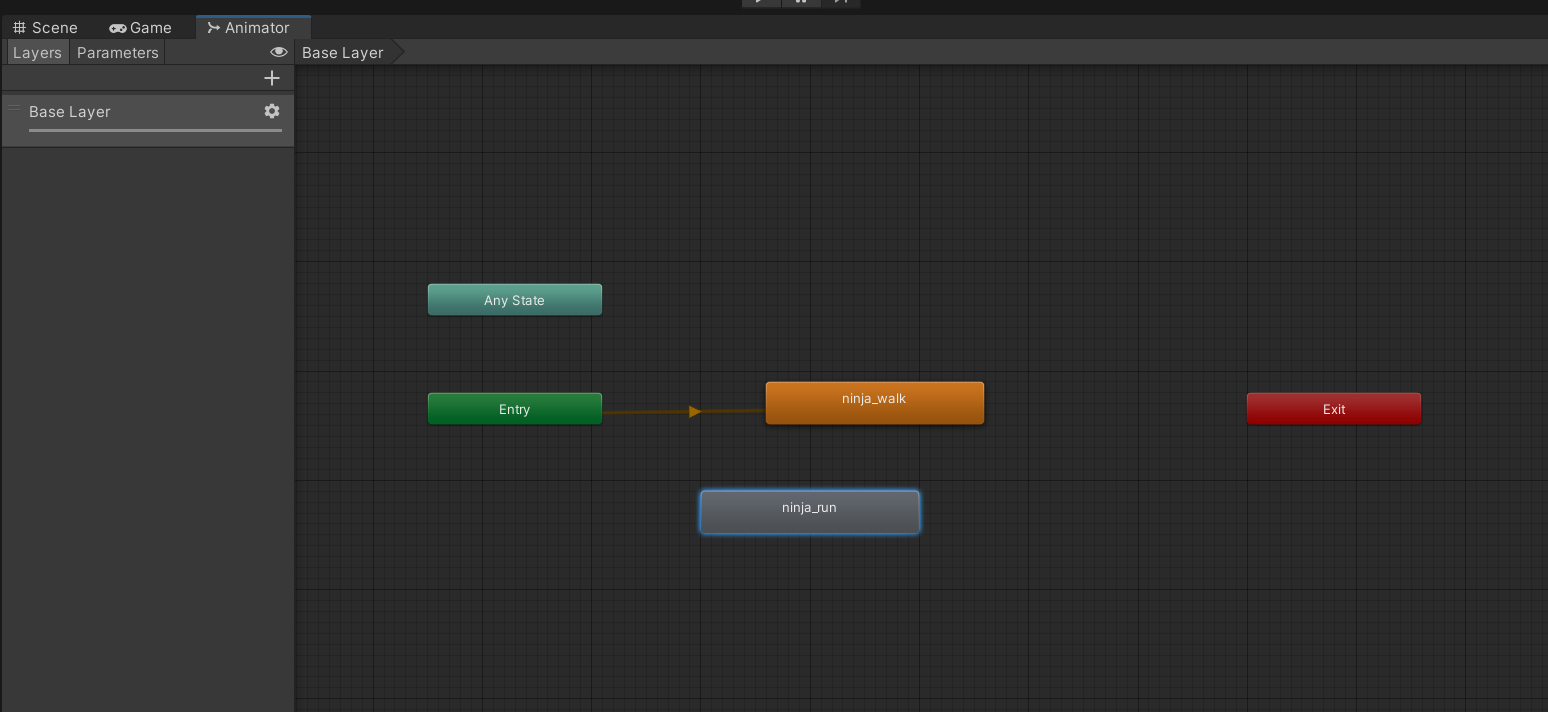
You can select that animation from the dropdown list in the Animation window and edit the keyframes.

How to convert a character animation type to Humanoid
A Humanoid animation type is useful as it allows animations designed for other characters to work on most biped characters. A humanoid should be set up from a character in a T pose to avoid any issues when configuring the avatar.
Find the FBX character file and click on the Animation tab. From the Animation Type dropdown list choose the Humanoid option.
Make sure that the avatar definition is set to Create From This Model and click Apply. This will now convert the character animation type to humanoid and also set up the avatar.

The avatar uses a series of bone locations to identify which bones control which body part. Unlike generic animations that require the bones to have the exact name specified in the animation, humanoid just refers to the bone location and uses the avatar to identify which bone to control. This is why humanoid animations can be applied to several characters.
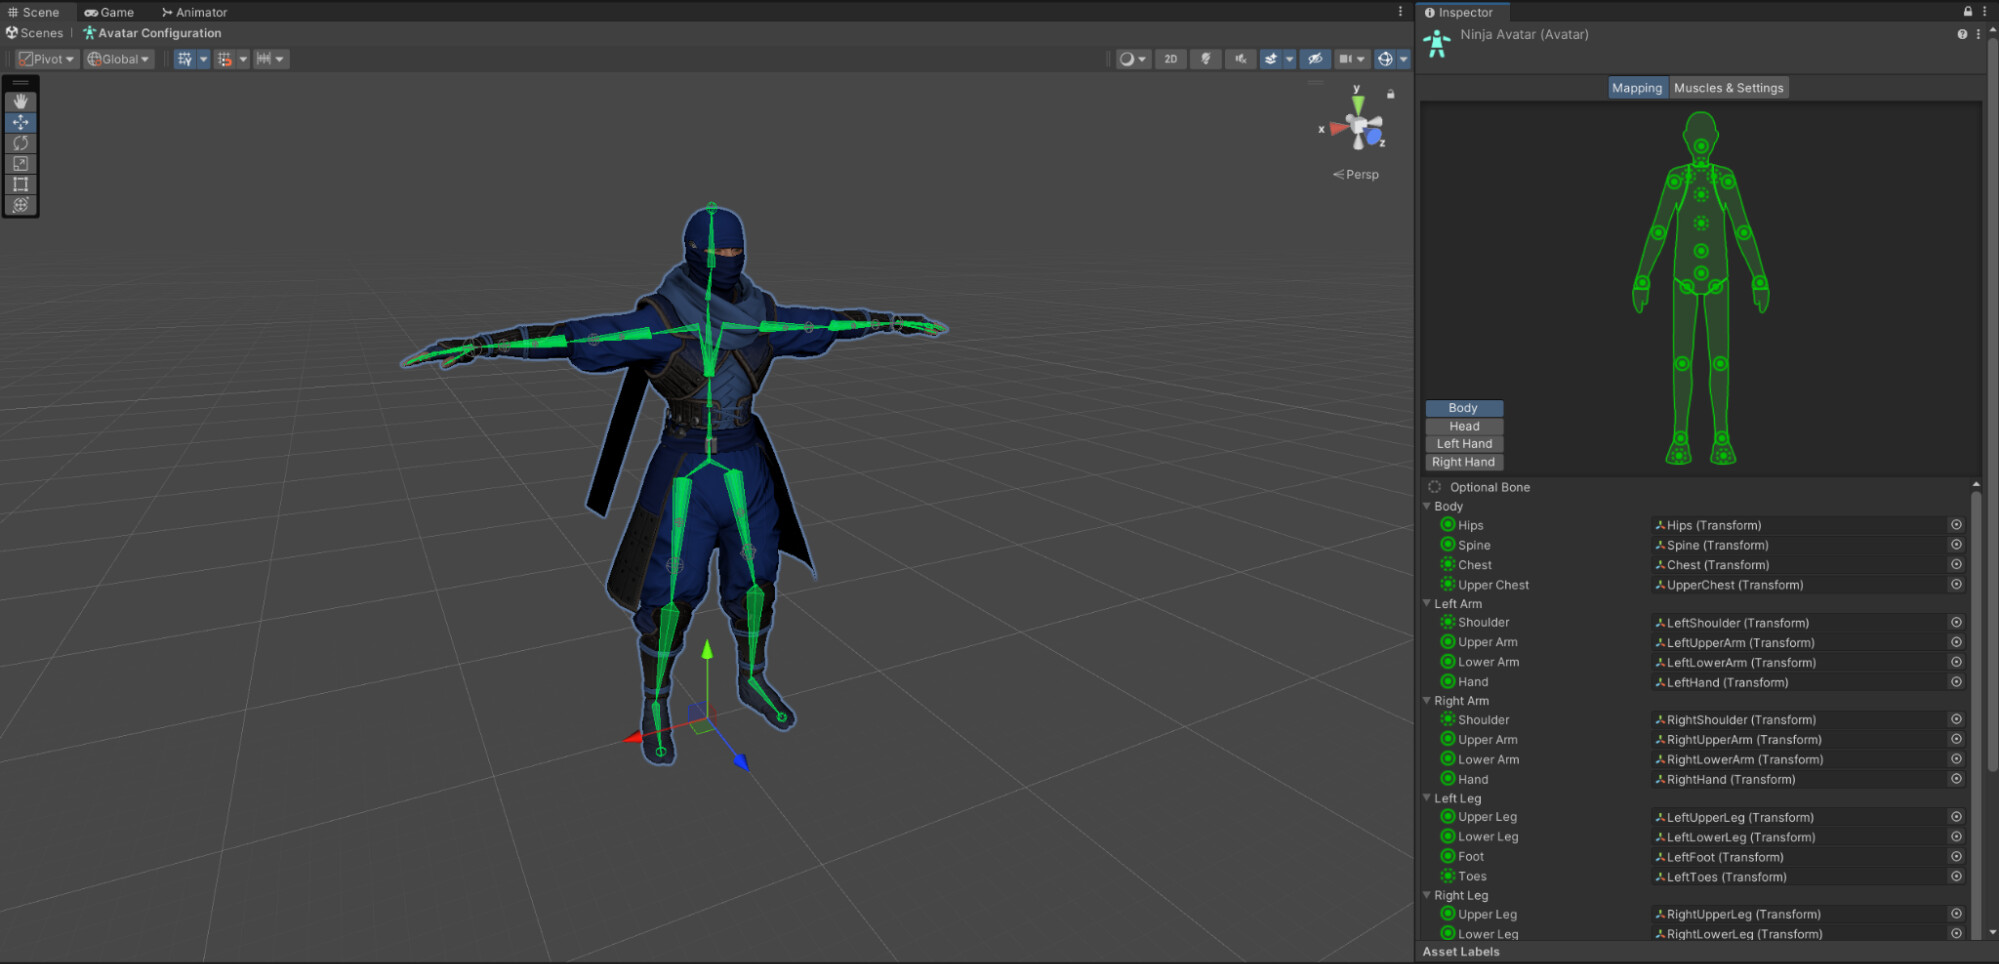
Make sure that the animation files you want to use are also set up as humanoid and, this time, instead of choosing the Create From This Model option, select the Copy From Other Avatar option. Select the avatar from the T pose character and press Apply. Now the animation will have an accurate description of the character’s skeletal layout.

If there are any binding issues when trying to match the animation to the character, you’ll notice yellow warning signs under the Import Messages section.
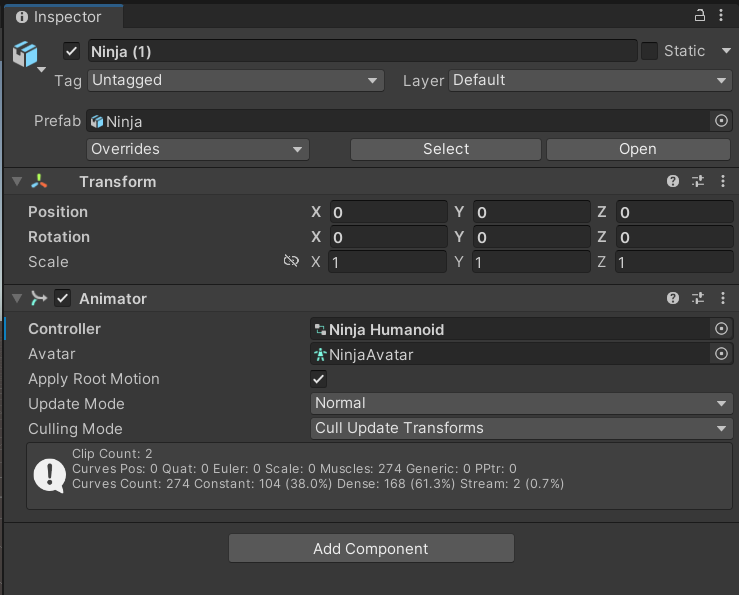
When the character is in your scene make sure that the avatar for that character is in the Animator Avatar slot. Otherwise, some humanoid animations might not work properly.
Why doesn’t my character animate when I press “play”?

This usually happens when the character is using a humanoid animation type, but the animation it’s trying to play is set up as a generic animation type. The two are not compatible. The character is assuming the base humanoid setup pose.
To fix this, ensure that your animations are correctly set up to use a humanoid animation type, as shown in the previous section.
How to fix your character’s feet after importing it into Unity
Sometimes the character’s feet may slide around on the floor, or hover above the ground, making the animations look unusual. This commonly happens when the character is not using Foot IK to firmly root the feet in position to the ground.
You can fix this by clicking on the Animation State, in the Animator window, and check the FootIK checkbox. You should do this for all the animation states that you want to fix.


Before and after checking the FootIK checkbox in the Animation window
Now the character’s feet should be more stable, with reduced sliding, and firmly placed on the ground.
How to fix the character’s floating after applying Root Motion
Root Motion is useful for allowing the keyframed motion inside the animation to move the character in the scene. However, if your character has a Rigidbody component that’s using physics, then the physics calculations and the Root Motion will be conflicting with each other, resulting in your character floating in the scene.

In the Animation tab, click on the original animation file, and check the Bake Into Pose checkbox under Root Transform Position (Y).
The Y position is no longer affecting the Root Motion, so now the character’s Y position is being controlled only by Rigidbody Physics.

How to combine two or more animations in Unity
If you want your character’s arms to be from one animation and the rest from a different animation, you can achieve that by using Avatar Masks.
Right-click in the Project tab and choose Create > Avatar Mask.
If your character is using the humanoid animation type, open the Humanoid window. The green body parts are affected by the chosen animation, and the red body parts aren’t affected by the chosen animation. This allows you to blend two or more animations together.

You can create as many Avatar Masks as you like.
In the Animator window, go to the Layers section and create a new Layer. By clicking on the options cog icon you can assign an Avatar Mask to this newly created layer. Now, only the green body parts will be driven by the animation on this layer.

Use the Weight slider to determine how strong the blend should be. At 0.5 it will blend the two animations halfway and at 1.0 it will completely override the base animations with this new animation for the green body parts.
How to adjust Humanoid animations in Unity
Generic animations can be directly keyframed in Unity, however, Humanoid animations can’t be keyframed in Unity. Using the Animation Rigging package allows you to control animations using Overrides.
In this example, a character’s arms are clipping into the legs during an idle animation:

To fix this, install the Animation Rigging package by going to Window > Package Manager and find it in the list under Unity Registry.

Select the character and go to Animation Rigging > Rig Setup.

It will add a rig sub object called “Rig 1” by default. To add modular rig components, add an empty GameObject to Rig 1. In this example, we called it Overrides.
You’ll need to set up targets at every position of the character bone that you want to adjust. The best way to do this is to right-click on a bone in the character’s skeleton, for example the left shoulder, and create an empty GameObject. Then click on the right shoulder and create an empty GameObject.

You can assign an effector for visualization and drag it down to the Rig section.
The Override Transform component is then added to each of these targets. The bone that’s modified is added to the Constrained Object slot and the target is added to the Override Source slot.


You can now animate these targets to make adjustments.

Watch this video about animation rigging to see this part in action.
How to import Mixamo animations into Unity and use them with your character
A commonly asked question on the Unity forums is how to use the free animations from Mixamo in your Unity project. In this section, we’ll guide you through the process of downloading animations from Mixamo and using them with your character and Animation Controller in Unity 2022 LTS.
Downloading animations from Mixamo

1. Select the animations
Visit the Mixamo website and create a free account or log in with your existing Adobe credentials or other specified login methods on Mixamo.
You can choose a character from the available selection or upload your own character mesh.
First, download the character mesh in a T pose position by clicking the Download button. Make sure to choose FBX for Unity (.fbx) from the Format dropdown. Choose T pose in the Pose dropdown and click Download. This will now save the character mesh in a T pose to your computer.

Click the Animation tab. Browse through the animation library and find the animation you want to use. You can filter by category, character type, and keywords. Note that Mixamo offers some bundles of animations grouped together (use the search word “Pack”) if you want to download multiple animations. This is denoted by a small icon with a number indicating how many animations are in the package.
2. Preview the animation
Use the Animation window to preview the animation. Click on the animation that you want to download. There is no need to upload your character here.

3. Download the animations
In the Download Settings window, make sure to choose: FBX for Unity (.fbx) in the Format field. This ensures the animation clip embedded in the .fbx file has the same name as the .fbx file.

In the Skin section you can choose “Without Skin” to save the animation file on its own. This reduces file size as it doesn’t have to download the entire character mesh. You’ve previously done this when downloading the character in T pose.
In the Frames per Second field you can select “30 frames”. That’s usually enough for most projects, but Mixamo supports up to 60 FPS if you want higher fidelity.
In the Keyframe Reduction field you can reduce the animation binary size, but you can choose “none” from the dropdown list.
Click Download to save the animation file.
You can also download packs of animation files. Type “Pack” in the search field and click on one of these to preview all the animations within it.

Click Download and make sure to choose: FBX for Unity (.fbx) in the Format field.

The Pose dropdown should be set to “Original Pose” to make sure that every animation is downloaded correctly. The Frames per Second and Keyframe Reduction fields can also be adjusted as needed.
Click Download and the file will be downloaded as a .zip file. This might take a few minutes.
Open the .zip file to view the list of animation clips and extract the files.

Importing animations into Unity
Drag and drop the downloaded FBX files into your project’s Assets folder or wherever you want to store them.
Unity will start importing the animation files. Depending on the animation’s complexity, this might take a few minutes.

Find the T Pose character and go to the Rig tab. By default this will be set to use a Generic Animation type.
Change the animation type to Humanoid and create the avatar from this model.
Select the downloaded animations in your project and go to the Rig tab.


Make sure that the animation type in the Rig tab is set to “Humanoid” for all your animations.

For the Avatar definition choose Copy From Other Avatar and choose the T Pose character avatar to ensure the animations are converted effectively to a humanoid type. Once you click Apply, it might take a little while as Unity sets everything up.

In the Animation section of the .fbx file, make sure to enable Loop Time in the Animation Clip Inspector window if the animation should be a loopable animation, such as walking or running.
![]()
If your animation isn’t facing correctly, check the Root Transformation Rotation settings.


Remember to click Apply once updated and repeat this process for every animation.
Setting up your Character and Animator
Before proceeding, ensure your character model has a properly configured Rig and Animation Controller. If your character uses a Humanoid rig, make sure the Rig component is set to Humanoid. If your character uses a generic rig, you might need to manually map the bones to the appropriate Humanoid bone names.
Linking animations to the Animator Controller
Create an Animator Controller by going to Menu > Create > Animator Controller. Name the controller appropriately (e.g., “CharacterAnimatorController”).
Then, select your character model in the Hierarchy. Drag and drop the imported animation file from the Assets folder into the Controller field in the Animator component. This will create a new animation state in the Animator Controller for the imported animation.

More helpful resources on animation in Unity
If you want to learn more about importing animations into Unity, the generic and humanoid animation types, animate and rig in the Editor, create animated cutscenes with Timeline, advanced animation option, make sure to check out The definitive guide to animation in Unity e-book.

Thanks for reading! We hope you found this article useful. As usual, if you have any feedback please let us know in the comments section below.