Hi! I’m Jemin Lee, a Partner Engineer at Unity. Our team works with game studios to help them streamline development in their Unity projects.
In this article, we’ll explore the fundamentals of asynchronous programming in Unity - from core concepts to practical applications.
You’ll learn:
- Why asynchronous programming is important
- The differences between synchronous and asynchronous
- How Unity’s Coroutines work
- How async & await simplify asynchronous code
- What’s new with Awaitable in Unity 6
Instead of diving into every syntax detail, this guide focuses on helping you build a clear, practical understanding so you can start writing asynchronous code with confidence.
What is Asynchronous Programming
Asynchronous programming allows a program to start operations and continue execution without blocking the current thread while waiting for tasks to complete. This keeps the program responsive, even during long-running operations such as asset loading, networking, or file I/O.
Synchronous Programming
In synchronous programming, code executes sequentially, line by line.
Each operation must be completed before the next one begins. This means that while waiting for the completion of the operation, the thread is blocked and cannot perform other tasks.
This sequential approach works fine for quick operations, but can cause serious problems in game development when operations take time. Consider a common scenario: a menu scene that downloads all game assets before displaying the UI:
private void LoadMainMenu()
{
    DownloadPlayerAssets();    // takes 5 seconds - game frozen!
    DownloadWorldAssets();     // takes 8 seconds - still frozen!
    DownloadAudioAssets();     // takes 3 seconds - still frozen!

    ShowMainUI(); // After 16 seconds of frozen game
}
In this example, the main thread runs each download one after another, waiting for each to complete before moving on. The UI and gameplay are completely frozen for 16 seconds.
Even if each operation could technically be divided into smaller steps or executed on another thread,
the current structure forces the main thread to stay blocked until everything is finished.

Asynchronous Programming - Move forward without blocking
In the synchronous example above, the main thread waits for every operation to finish before continuing.
But what if we separate starting a task from waiting for its completion? In other words, what if we wrote the code so that the start of each task doesn’t need to be synchronized with the completion of the previous one?
private void LoadMainMenu()
{
    StartDownloadPlayerAssets();   // takes time, but we don't have to wait
    StartDownloadWorldAssets();    // starts immediately after
    StartDownloadAudioAssets();    // starts right away

    ShowMainUI(); // The UI can appear immediately
}
Now, we’re not waiting for each operation to complete before moving on.
Instead, each StartDownloadXXX() method creates a task that begins its work independently, and the program continues executing other logic (such as rendering the UI or processing input) while those tasks are still running.

Each task can behave differently depending on its implementation:
- It might run on the same thread, spread across multiple frames (frame-sliced).

- Or it could run concurrently on another thread (background execution).

Either way, the key idea remains the same:
- Execute tasks without blocking. Let the program keep moving while work is still in progress.
You can also pause a method’s execution and wait for another operation to finish. This allows the method to temporarily suspend its work, while the thread itself remains free to handle other operations.

The key point is that waiting in asynchronous code doesn’t mean blocking - the thread itself remains free to perform other work while the method is paused, so the program keeps running smoothly without halting.
There are two main ways to implement asynchronous code in Unity: Coroutines and Awaitable.
Coroutines
Before Unity 6’s Awaitable, you would primarily depend on using Coroutines to achieve asynchronous behavior. A coroutine is a programming pattern that implements asynchronous behaviour by suspending and resuming execution.
Think of coroutines like cleaning your house in a smart way. In synchronous programming, you clean the entire house in one exhausting day.
private void CleaningHouse()
{
    Debug.Log("Start Cleaning House");

    CleanLivingRoom();
    CleanBedRoom();
    CleanBathRoom();

    Debug.Log("Finish Cleaning house");
}
But instead of cleaning the entire house in one exhausting day, you can split it.
- Day 1: Clean the living room and kitchen
- Day 2: Clean the bedrooms
- Day 3: Clean the bathrooms and finish up
This way, you’re not exhausted on any single day, and you can still do other important things like exercise, spend time with family, and play video games.
If we rewrite the CleaningHouse() as a coroutine, it would look like this:
private IEnumerator CleaningHouseRoutine()
{
    Debug.Log("Start Cleaning House");

    CleanLivingRoom();
    yield return new WaitForSeconds(10); // wait for 10 seconds
    CleanBedRoom();
    yield return new WaitForSeconds(10); // wait for 10 seconds
    CleanBathRoom();

    Debug.Log("Finish Cleaning house");
}
When CleaningHouseRoutine() coroutine is executed, here’s exactly what happens:
Step 1:
- Debug.Log(“Start Cleaning House”) prints immediately
- CleanLivingRoom() executes and completes
Step 2:
- The coroutine hits yield return new WaitForSeconds(10)
- The coroutine pauses here and exits - giving control back to Unity
- Unity continues do other things(rendering, handling input, running other systems, etc…)
- The coroutine waits for 10 seconds in the background
Step 3 (After 10 seconds):
- Unity resumes the coroutine from where it left off
- CleanBedRoom() executes and completes
Step 4:
- The coroutine hits the second yield return new WaitForSeconds(10)
- The coroutine pauses again and exits - control returns to Unity
- Another 10-second wait begins
Step 5 (After another 10 seconds):
- Unity resumes the coroutine again
- CleanBathRoom() executes and completes
- Debug.Log(“Finish Cleaning house”) prints
- The coroutine reaches the end and completes
The key to understanding coroutines is the yield statement. When a coroutine hits a yield statement, it pauses execution at that exact point and returns control back to Unity.
For example, when the code hits `yield return SomeTask()`, the program executes `SomeTask()` and the coroutine pauses until `SomeTask()` completes.
Similarly, when it encounters `yield return new WaitForSeconds(n);`, the coroutine pauses for n seconds. And while the coroutine is suspended, other codes can run.
And when the time or task being waited on via the yield statement completes, code execution resumes at the last point within the coroutine.
Now we can rewrite the synchronous code that paused the game for 16 seconds as a coroutine.
// Coroutine approach: pause and resume
private IEnumerator LoadMainMenuRoutine()
{
    // Day 1 : Start downloading player assets and
    // Take a break while waiting for the completion
    yield return DownloadPlayerAssetsRoutine();

    // Day 2: Start downloading world assets and
    // Take a break while waiting for the completion
    yield return DownloadWorldAssetsRoutine();

    // Day 3: Start downloading audio assets and
    // Take a break while waiting for the completion
    yield return DownloadAudioAssetsRoutine();

    ShowMainUI(); // Game stayed responsive throughout!
}
For a detailed explanation of coroutines, refer to the official Unity documentation:
Note: Asynchronous Single Thread
Asynchronous programming is related to multithreading, but it doesn’t necessarily require it. The core idea is to start a task without waiting for it to finish - meaning an asynchronous operation can still run on the same thread at different points in time.
In Unity, coroutines run on the main thread - the same thread that calls the StartCoroutine() method. However, because coroutines can pause and resume across multiple frames using the yield statement, the program remains responsive.
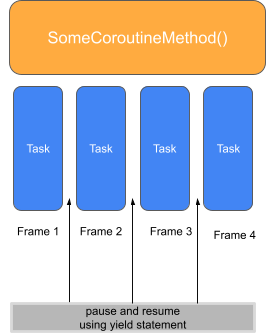
For example, this diagram shows how a coroutine method like SomeCoroutineMethod() splits its work across multiple frames using the yield statement. Each small task runs on the main thread, but by pausing and resuming between frames, the game stays responsive instead of freezing during long operations.
The Problems with Traditional Coroutine Approaches
While Coroutines have served us well, they often lead to unnecessarily complicated code. Let’s consider an example of loading an addressable asset using a coroutine.
// A coroutine that loads an addressable asset asynchronously
public IEnumerator GetAssetRoutine(string assetName, Action<GameObject> onAssetLoaded)
{
    // Start loading the asset and keep the handle so we can wait for it to finish
    var asyncOperationHandle = Addressables.LoadAssetAsync<GameObject>(assetName);    // Wait until the loading is finished
    yield return asyncOperationHandle;

    // Get the loaded asset from the handle
    var loadedAsset = asyncOperationHandle.Result;

    // Pass the result back through a callback
    onAssetLoaded(loadedAsset);
}


public void Start()
{
    // You might expect to write:
    // GameObject loadedAsset = StartCoroutine(GetAssetRoutine("boat"));
    // Debug.Log(loadedAsset);
    // but Coroutines can't directly return values.

    // Instead, you must use a callback to receive the loaded asset
    StartCoroutine(GetAssetRoutine("boat",(loadedAsset) => { Debug.Log(loadedAsset); }));
}
Note: Addressables is a package that lets you load assets easily by referencing them with their address (key) names. It simplifies your code by handling asset locations internally, so you don’t need to manage file paths or bundle structures yourself.
The code above is not intuitive because you cannot directly get loaded assets via ‘=’.
The fundamental issue is, Unity’s Coroutines return IEnumerator which is only an iterator used to control the execution flow, not to return actual data.
There’s no mechanism to pass a return value back to the caller. Therefore, to get results from a coroutine, you must use a callback or store the data in a shared variable. And this could fall us into complex callback patterns that are unnecessarily complex and non-intuitive.
public IEnumerator GetAssetRoutine(string assetName, Action<GameObject> onAssetLoaded)
{
    var asyncOperationHandle = Addressables.LoadAssetAsync<GameObject>(assetName);
    yield return asyncOperationHandle;
    var loadedAsset = asyncOperationHandle.Result;

    onAssetLoaded(loadedAsset);
}

public void Start()
{
    StartCoroutine(GetAssetRoutine("boat", (loadedAsset) => {
        DoSomething(loadedAsset, (result1) => {
            DoSomething2(result1, (result2) => {
                DoSomething3(result2, (result3) => {
                    // Welcome to callback hell!
                });
            });
        });
    }));
}
Additional Limitations of Traditional Approaches
Beyond readability issues, coroutines have several technical limitations:
- Memory Allocation Overhead: Each coroutine creates an IEnumerator object, causing GC pressure
- Main Thread Only: Coroutines execute exclusively on the main thread via Unity’s player loop
C# async/await: A Better Way
C#'s native async/await syntax offers a more elegant solution:
public async Task<GameObject> GetAssetAsync(string assetName)
{
   // Start loading the asset and keep the handle so we can wait for it to finish
    var asyncOperationHandle = Addressables.LoadAssetAsync<GameObject>(assetName);

    // .Task exposes the async operation as a Task, so it can be awaited
    // Wait until the loading task is finished (without blocking)
    await asyncOperationHandle.Task;
    // Return the loaded asset
    return asyncOperationHandle.Result;
}

public async void Start()
{
    // Wait for the asset to be loaded
    GameObject loadedAsset = await GetAssetAsync("boat");

    // Then run more async operations in sequence
    await DoSomethingAsync(loadedAsset);
    await DoSomething2Async(loadedAsset);
    await DoSomething3Async(loadedAsset);
}
Much cleaner!
The async keyword marks a method as asynchronous, while the await keyword pauses the method’s execution and creates a checkpoint. Once the awaited task completes, the execution resumes from that checkpoint, continuing the rest of the method seamlessly.
The async method returns a Task or Task<T>, where T is the type of the result.
When you await a Task<T>, the await expression completes only after the asynchronous operation finishes, and then automatically provides the result of type T.
This means you can write code like:
GameObject asset = await LoadAssetAsync("boat");
The await keyword unwraps the Task and gives you the actual result, so you can use it directly. This makes your code much cleaner since you can handle asynchronous results without relying on callbacks or shared variables.
However, Unity developers have historically avoided async/await due to several limitations.
Let’s check the following example code.
private async void Start()
{
    var task = SomeAsync(); // Task object is created each time
    await task;
}

private async Task SomeAsync()
{
    Time.timeScale = 2f;
    Debug.Log($"Time: {Time.time}");
    // Even with the game running at double speed
    // it still waits for 100ms of real-time.
    await Task.Delay(100);
    Debug.Log($"Time: {Time.time}");
}
You can see that the above code has the following issues.
- Memory Allocations
Every time you call an async method, it creates a Task object which causes GC pressure.
- No Unity Lifecycle Integration
Task method can’t await Unity’s Playerloop specific events like frame timing or FixedUpdate. Also you can’t wait for time differently depending on the time scale.
Introduction to Awaitable
By writing the async method using the Awaitable introduced in Unity 6, you can resolve the above problem while still using the async and await keywords. This is the recommended approach for asynchronous programming in Unity 6 and later.
The syntax looks like this:
public async Awaitable<GameObject> GetAssetAsync(string assetName)
{
    var asyncOperationHandle = Addressables.LoadAssetAsync<GameObject>(assetName);
    // .Task exposes the async operation as a Task, so it can be awaited
    // Wait until the loading task is finished (without blocking)
    await asyncOperationHandle.Task;
    // Once loading is done, return the loaded asset.
    return asyncOperationHandle.Result;
}

public async void Start()
{
    var loadedAsset = await GetAssetAsync("boat");
}
Awaitable is a type used in Unity to represent asynchronous operations, replacing the Task type.
Awaitable Pooling
One of Awaitable’s advantages over Task is its object pooling system. This eliminates the GC pressure caused by creating new Task objects for every async operation.
However, this comes with a critical limitation: you must never await the same Awaitable instance twice.
// INCORRECT
async Awaitable AwaitableExample()
{
    var awaitableInstance = SomeAwaitableMethod();
    await awaitableInstance; // First await - completes normally
    // At this point, awaitableInstance returns to the pool!
    await awaitableInstance; // Second await - UNDEFINED BEHAVIOR!
}
Why this happens
After the first await completes, the Awaitable instance returns to Unity’s object pool and may immediately be reused by another async method.
Your second await might actually be waiting for a completely different operation!
Here’s a concrete example that illustrates this:
async void Start()
{
    Awaitable awaitable1 = TestAsyncMethod();
    await awaitable1;
    Awaitable awaitable2 = TestAsyncMethod();

    // This will likely be true due to pooling!
    if(awaitable1 == awaitable2)
    {
        Debug.LogError("Same Awaitable instance reused from pool!");
    }

    // awaitable1 might now represent awaitable2's operation
    // Potential deadlock or unexpected behavior
    await awaitable1;
}

async Awaitable TestAsyncMethod()
{
    await Awaitable.WaitForSecondsAsync(1f);
}
Because Awaitable is recycled via a pool, awaitable1 and awaitable2 are the same instance. This means that awaiting awaitable1 will effectively be the same as awaiting awaitable2. This potentially leads to unintended behaviour.
- Best Practice: Always await Awaitable instances immediately and never store them for later reuse.
async void Start()
{
    // Don't : Don't store Awaitable instance and await later
    Awaitable awaitable = TestAsyncMethod();
    await awaitable;

    // Do : await immediately
    await TestAsyncMethod();
}
Unity Player Loop Integration
Unlike Task.Delay(), Awaitable methods respect Unity’s time management:
public class TimingComparison : MonoBehaviour
{
    async void Start()
    {
        Debug.Log($"Starting at Time: {Time.time}");
        Time.timeScale = 2f; // Double game speed

        // Real-world time delay (unaffected by timeScale)
        await Task.Delay(2000); // Always 2 real seconds
        Debug.Log($"Task.Delay completed at Time: {Time.time}");

        // Game time delay (affected by timeScale)
        await Awaitable.WaitForSecondsAsync(2f); // 1 real second at 2x speed
        Debug.Log($"Awaitable completed at Time: {Time.time}");

        Time.timeScale = 1f;
    }
}
Additionally, Awaitable provides Playerloop-specific Await methods.
// Time-based waits
await Awaitable.WaitForSecondsAsync(1.5f);        // Respects Time.timeScale

// Frame-based waits
await Awaitable.NextFrameAsync();                  // Wait one frame
await Awaitable.EndOfFrameAsync();                 // End of current frame
await Awaitable.FixedUpdateAsync();                // Next FixedUpdate

// Background processing
await Awaitable.BackgroundThreadAsync();           // Switch to background thread
await Awaitable.MainThreadAsync();                 // Switch back to main thread
Thread Switching
Most Unity Object APIs (such as creating GameObjects, modifying Transforms, or accessing scene data) must be called on the main thread. Still, running heavy computations directly on the main thread can cause frame drops or stuttering, so it’s often beneficial to offload such work to a background thread using Awaitable.
Awaitable provides built-in methods to switch between threads:
await Awaitable.BackgroundThreadAsync(); // Switch to background thread
await Awaitable.MainThreadAsync();       // Switch back to main thread
Here’s an example that performs heavy mathematical calculations on a background thread and then continues on the main thread automatically:
public class ThreadSwitchExample : MonoBehaviour
{
    async void Start()
    {
        var results = await DoHeavyComputationAsync();

        // Automatically resumed on the main thread - safe to use Unity APIs
        foreach (var position in results)
        {
            var go = new GameObject("ComputedObject");
            go.transform.position = position;
        }
    }

    async Awaitable<Vector3[]> DoHeavyComputationAsync()
    {
        // Switch to background thread to avoid blocking the main thread
        await Awaitable.BackgroundThreadAsync();

        // CPU-intensive calculations
        var results = new Vector3[10000];
        for (int i = 0; i < results.Length; i++)
        {
            results[i] = new Vector3(
                Mathf.Sin(i * 0.1f),
                Mathf.Cos(i * 0.1f),
                Mathf.Tan(i * 0.1f)
            );
        }

        // No need to call Awaitable.MainThreadAsync()
        // continuation automatically resumes on the Main Thread
        return results;
    }
}
Note that within that DoHeavyComputationAsync, you must not call any Unity Object APIs while on the background thread, as they are not thread-safe.
The effects of Awaitable.MainThreadAsync and Awaitable.BackgroundThreadAsync are local to the current method only. Because Start() runs on the main thread, the continuation after await DoHeavyComputationAsync() also resumes on the main thread.
- Note : For extreme performance needs, consider Unity’s Job System and Burst Compiler instead of async threading.
One-frame delay rule
Switching between threads introduces a one-frame delay because Unity queues the continuation for the next update cycle.
- Switching to the same thread does not incur a delay.
- Switching too frequently can cause unnecessary overhead.
async Awaitable PerformanceExample()
{
    await Awaitable.MainThreadAsync();      // No delay (already on main thread)
    await Awaitable.BackgroundThreadAsync(); // One frame delay for next line

    DoBackgroundWork();

    await Awaitable.MainThreadAsync();       // Another one frame delay

    DoMainThreadWork();
}
So avoid frequent thread switching in performance-critical code.
// Don't do this : Excessive thread switching
for (int i = 0; i < 100; i++)
{
    await Awaitable.BackgroundThreadAsync(); // Too much overhead!
    DoSmallWork();
    await Awaitable.MainThreadAsync();
}
Summary
Asynchronous programming in Unity allows you to run operations without blocking the main thread, keeping your game responsive even during long-running tasks.
Traditionally, Unity developers relied on Coroutines to implement asynchronous behavior. While effective, coroutines can be verbose, cannot directly return values, and often lead to complex callback chains.
The C# async/await pattern offers cleaner, more intuitive asynchronous code with direct return values, but standard Task objects introduce garbage collection overhead and lack integration with Unity’s player loop and time scaling.
Unity 6’s Awaitable type bridges this gap by:
- Eliminating GC pressure via object pooling
- Integrating with Unity’s lifecycle and time scaling
- Providing Unity-specific await methods for frames, updates, and threads
- Allowing seamless thread switching between main and background threads
Best Practices:
- Always await Awaitable instances immediately; never reuse them after completion
- Minimize thread switching in performance-critical code
- Use coroutines for simple sequential delays, async/await with Awaitable for complex asynchronous workflows
- Switch back to the main thread before interacting with Unity objects
By understanding coroutines, async/await, and Awaitable, you can choose the right tool for each scenario, write cleaner asynchronous code, and keep your Unity games running smoothly without unnecessary blocking.
What’s Next?
In this article, we focused on the mechanics of asynchronous programming in Unity - using Coroutines, async/await, and Unity 6’s Awaitable.
However, we did not cover one important underlying concept: SynchronizationContext.
Key points to keep in mind:
- Asynchronous programming is closely related to multithreading, but it is not the same thing.
- In asynchronous programming, async/await handles pausing and resuming code execution.
- SynchronizationContext represents where (on which thread or environment) an asynchronous task will continue after resumption.
- Unity uses a special UnitySynchronizationContext to ensure that most async continuations run on the main thread, making it safe to interact with Unity APIs.
If you want to dive deeper into this topic, I’ve written a follow-up article that focuses specifically on SynchronizationContext and Unity’s implementation:
