Section 2 - Making our first world
Hey guys! I’m finally back at you with section two of our tutorial. Hopefully, this one can be as good, or hopefully better than the last! In this section we talk about transfering our one hexagon into a hexagon grid, with a full chunking system in place. Sounds fun!
A. WorldManager:
WorldManager is going to be our base and starting class for our project. This will hold all of the world values, cache values, and spawn our chunks.
1. Basic Setup:
So what do we need? First we need to spawn our chunks, which will then in turn spawn their hexagons within them.
Lets make a new script to spawn these chunks and hold our world values. “WorldManager” sounds nice.
using UnityEngine;
using System.Collections;

public class WorldManager : MonoBehaviour
{
    #region fields

    #endregion

    #region GetHexProperties

    #endregion

    #region GenerateMap

    #endregion

    #region NewChunk

    #endregion
}
Here’s the outline for our script. Here is a quick warning before we really start. Things are going to get very long, very quickly. I’m going to be moving over points more quickly as we have a LOT to cover in a little amount of post.
Lets dump all the fields we need into the fields region:
#region fields
public Mesh flatHexagonSharedMesh;
public float hexRadiusSize;

//hexInstances
[HideInInspector]
public Vector3 hexExt;
[HideInInspector]
public Vector3 hexSize;
[HideInInspector]
public Vector3 hexCenter;
[HideInInspector]
public GameObject chunkHolder;

public Texture2D terrainTexture;

int xSectors;
int zSectors;

public HexChunk[,] hexChunks;

public Vector2 mapSize;
public int chunkSize;

#endregion
Starting to see what I mean? This is probably more code than in the whole last section and it’s only the first region! The fields region! I’m not going to be going over what each one is right now, I think it will explain themselves throughout, and the name should point you in the right direction.
2. Start up
So when we first start off what do we want to happen? Well we need to spawn the chunks, but first make a hexagon and cache all it’s size information so that we can spawn them out correctly later with correctly spaced chunks.
#region awake
public void Awake()
{
    //get the flat hexagons size; we use this to space out the hexagons and chunks
    GetHexProperties();
    //generate the chunks of the world
    GenerateMap();
}
#endregion
So whenever we fire up the scene, we shall call GetHexProperties() and then GenerateMap(). Now the fun part - making those methods.
3. Caching Hexagon Dimensions
What we need to do is spawn one hexagon and store its dimensions. We know what we need to do, so lets get to work.
#region GetHexProperties
private void GetHexProperties()
{
    //Creates mesh to calculate bounds
    GameObject inst = new GameObject("Bounds Set Up: Flat");
    //add mesh filter to our temp object
    inst.AddComponent<MeshFilter>();
    //add a renderer to our temp object
    inst.AddComponent<MeshRenderer>();
    //add a mesh collider to our temp object; this is for determining dimensions cheaply and easily
    inst.AddComponent<MeshCollider>();
    //reset the position to global zero
    inst.transform.position = Vector3.zero;
    //reset all rotation
    inst.transform.rotation = Quaternion.identity;
Ok, this is the first part of the method. Here we create a new GameObject and assign the basic stuff to it that is needed. We also, create a MeshCollider since we will use that component to retrieve our dimension(size, extents, center). Then we make sure everything is at zero to prevent any confusion in local/world math conversion later on.
Vector3[] vertices;
int[] triangles;
float floorLevel = 0;
//positions vertices of the hexagon to make a normal hexagon
vertices = new Vector3[]
{
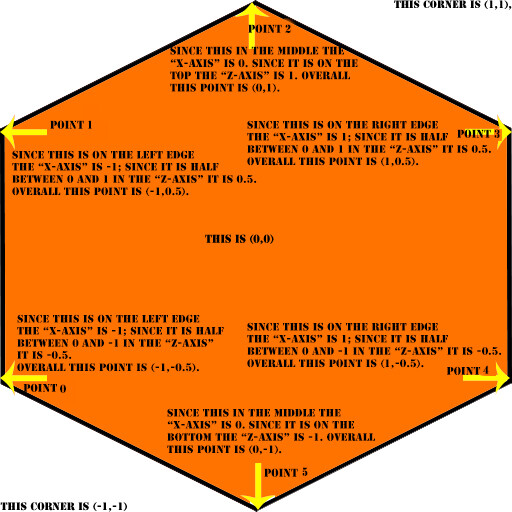
/*0*/new Vector3((hexRadiusSize * Mathf.Cos((float)(2*Mathf.PI*(3+0.5)/6))), floorLevel, (hexRadiusSize * Mathf.Sin((float)(2*Mathf.PI*(3+0.5)/6)))),
/*1*/new Vector3((hexRadiusSize * Mathf.Cos((float)(2*Mathf.PI*(2+0.5)/6))), floorLevel, (hexRadiusSize * Mathf.Sin((float)(2*Mathf.PI*(2+0.5)/6)))),
/*2*/new Vector3((hexRadiusSize * Mathf.Cos((float)(2*Mathf.PI*(1+0.5)/6))), floorLevel, (hexRadiusSize * Mathf.Sin((float)(2*Mathf.PI*(1+0.5)/6)))),
/*3*/new Vector3((hexRadiusSize * Mathf.Cos((float)(2*Mathf.PI*(0+0.5)/6))), floorLevel, (hexRadiusSize * Mathf.Sin((float)(2*Mathf.PI*(0+0.5)/6)))),
/*4*/new Vector3((hexRadiusSize * Mathf.Cos((float)(2*Mathf.PI*(5+0.5)/6))), floorLevel, (hexRadiusSize * Mathf.Sin((float)(2*Mathf.PI*(5+0.5)/6)))),
/*5*/new Vector3((hexRadiusSize * Mathf.Cos((float)(2*Mathf.PI*(4+0.5)/6))), floorLevel, (hexRadiusSize * Mathf.Sin((float)(2*Mathf.PI*(4+0.5)/6))))
};
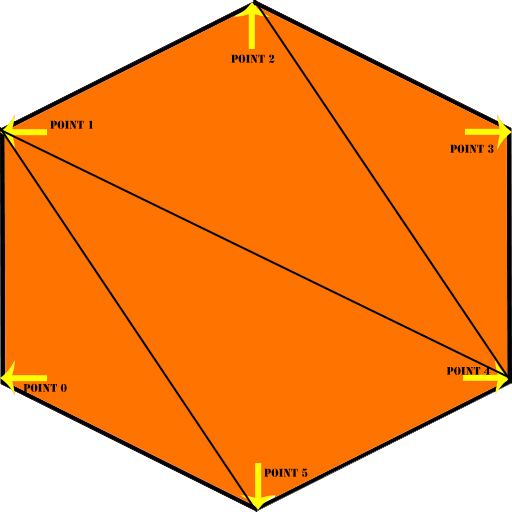
//triangles connecting the verts
triangles = new int[]
{
1,5,0,
1,4,5,
1,2,4,
2,3,4
};
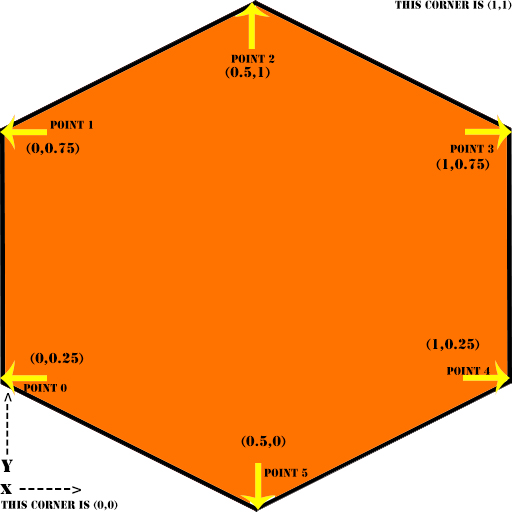
uv = new Vector2[]
{
new Vector2(0,0.25f),
new Vector2(0,0.75f),
new Vector2(0.5f,1),
new Vector2(1,0.75f),
new Vector2(1,0.25f),
new Vector2(0.5f,0),
};
This is the next part. Actually making the hexagon. I’ve gone over this in full in the last section so I’ll make it quick. However, this time we use an algorithm to generate our vertex positioning. See below posts for more details on the math side from our friend, MrPhil. Check this post.
//create new mesh to hold the data for the flat hexagon
flatHexagonSharedMesh = new Mesh();
//assign verts
flatHexagonSharedMesh.vertices = vertices;
//assign triangles
flatHexagonSharedMesh.triangles = triangles;
//assign uv
flatHexagonSharedMesh.uv = uv;
//set temp gameObject's mesh to the flat hexagon mesh
inst.GetComponent<MeshFilter>().mesh = flatHexagonSharedMesh;
//make object play nicely with lighting
inst.GetComponent<MeshFilter>().mesh.RecalculateNormals();
//set mesh collider's mesh to the flat hexagon
inst.GetComponent<MeshCollider>().sharedMesh = flatHexagonSharedMesh;

//calculate the extents of the flat hexagon
hexExt = new Vector3(inst.gameObject.collider.bounds.extents.x, inst.gameObject.collider.bounds.extents.y, inst.gameObject.collider.bounds.extents.z);
//calculate the size of the flat hexagon
hexSize = new Vector3(inst.gameObject.collider.bounds.size.x, inst.gameObject.collider.bounds.size.y, inst.gameObject.collider.bounds.size.z);
//calculate the center of the flat hexagon
hexCenter = new Vector3(inst.gameObject.collider.bounds.center.x, inst.gameObject.collider.bounds.center.y, inst.gameObject.collider.bounds.center.z);
//destroy the temp object that we used to calculate the flat hexagon's size
Destroy(inst);
#endregion
Alright, now this is another massive code block. Lets once again break it down.
        //create new mesh to hold the data for the flat hexagon
        flatHexagonSharedMesh = new Mesh();
        //assign verts
        flatHexagonSharedMesh.vertices = vertices;
        //assign triangles
        flatHexagonSharedMesh.triangles = triangles;
        //assign uv
        flatHexagonSharedMesh.uv = uv;
This part we create a new mesh and assign it to flatHexagonSharedMesh, this field will be used in the future as the mesh for all the HexInfo scripts instead of them remaking each hexagon. We simply plug in all of our data into this new mesh.
        //set temp gameObject's mesh to the flat hexagon mesh
        inst.GetComponent<MeshFilter>().mesh = flatHexagonSharedMesh;
        //make object play nicely with lighting
        inst.GetComponent<MeshFilter>().mesh.RecalculateNormals();
        //set mesh collider's mesh to the flat hexagon
        inst.GetComponent<MeshCollider>().sharedMesh = flatHexagonSharedMesh;
Here we start to assign our temporary hexagon, the one in which we will use to pull our dimensions from, the flatHexagonSharedMesh. We have it create a mesh collider from it and recalculate our normals on this mesh. To put it in layman’s term : "We made a hexagon from our flatHexagonSharedMesh and are about to get some value from this.
//calculate the extents of the flat hexagon
hexExt = new Vector3(inst.gameObject.collider.bounds.extents.x, inst.gameObject.collider.bounds.extents.y, inst.gameObject.collider.bounds.extents.z);
//calculate the size of the flat hexagon
hexSize = new Vector3(inst.gameObject.collider.bounds.size.x, inst.gameObject.collider.bounds.size.y, inst.gameObject.collider.bounds.size.z);
//calculate the center of the flat hexagon
hexCenter = new Vector3(inst.gameObject.collider.bounds.center.x, inst.gameObject.collider.bounds.center.y, inst.gameObject.collider.bounds.center.z);
//destroy the temp object that we used to calculate the flat hexagon's size
Destroy(inst);
#endregion
Now we finally get to do what the whole point of this method was. We get to cache some values. We assign our three Vector3’s to the temporary collider’s values. I don’t know how to explain it better. It should be pretty self-explanatory. After we have gained what we wanted, we dispose of the source. (Like all good thugs)
So now we have completed that method. We have all the needed values to start on spawning some chunks!
4. Spawning meh some chunks baby!
Finally we are ready to start spawning the chunks(which btw we haven’t made yet)! Chunks are GameObjects that group other objects into one, while still giving the look and functionality of separate parts. Here, we are going to have a chunk that will contain many hexagons, yet combine them into one mesh and read from only one texture. We will still have all of the functionality of separate GameObjects for each hexagon, yet with vastly improved performance with one mesh/texture. Here is more information on chunks, in this case a voxel engine. However, the concepts still apply. CHUNK INFO
Lets dive right in and I’ll try to explain as we go.
#region generateMap
    /// <summary>
    /// Generate Chunks to make the map
    /// </summary>
    void GenerateMap()
    {

        //determine number of chunks
        xSectors = Mathf.CeilToInt(mapSize.x / chunkSize);
        zSectors = Mathf.CeilToInt(mapSize.y / chunkSize);
Here we calculate the number of chunks we are going to have to make, in both x/y. We do this by taking the number of total hexagons in a direction and dividing it by the chunk size; its then rounded up to the nearest int. For example: if our mapSize is 512x256 and our chunkSize is 8 it would be: xSectors = (512/8) = 64, and ySectors = (256/8) = 32.
//allocate chunk array
        hexChunks = new HexChunk[xSectors, zSectors];
Here we allocate all the memory and create the necessary amount of HexChunks in an array. We use a two-dimensional array for clarity.
//cycle through all chunks
        for (int x = 0; x < xSectors; x++)
        {
            for (int z = 0; z < zSectors; z++)
            {
                //create the new chunk
                hexChunks[x, z] = NewChunk(x, z);
                //set the position of the new chunk
                hexChunks[x, z].gameObject.transform.position = new Vector3(x * (chunkSize * hexSize.x), 0f, (z * (chunkSize * hexSize.z) * (.75f)));
                //set hex size for hexagon positioning
                hexChunks[x, z].hexSize = hexSize;
                //set the number of hexagons for the chunk to generate
                hexChunks[x, z].SetSize(chunkSize, chunkSize);
                //the width interval of the chunk
                hexChunks[x, z].xSector = x;
                //set the height interval of the chunk
                hexChunks[x, z].ySector = z;
                //assign the world manager(this)
                hexChunks[x, z].worldManager = this;
            }
        }
We cycle through all of our chunks in memory and then actually create the chunk. Note that we use another uncreated method NewChunk(), this will be next. We set the position of the chunk using the following method: (x(the current array position of the chunk)*(chunkSize * hexSize.x)). For example if we are at the third chunk sector, a chunkSize of 8, and a hexSize.x of 1, then we would place the object in the x axis at 24. Since each chunk is 8 wide and we are the third. Next, we set the hexSize field in our chunk so that we can use it again for placing the individual hexagons. We set the size of the chunk so that it generates the amount we want(in this case 8x8). We then set the chunks sector location. Last, we tell it who we are and cache the worldManager.
//cycle through all chunks
        foreach (HexChunk chunk in hexChunks)
        {
            //begin chunk operations since we are done with value generation
            chunk.Begin();
        }
}
To finish our method we start chunk operations on all of our newly created chunks.
5. New Chunk
/// <summary>
    /// Creates a new chunk
    /// </summary>
    /// <param name="x">The width interval of the chunks</param>
    /// <param name="y">The height interval of the chunks</param>
    /// <returns>The new chunk's script</returns>
    public HexChunk NewChunk(int x, int y)
    {
        //if this the first chunk made?
        if (x == 0 && y == 0)
        {
            chunkHolder = new GameObject("ChunkHolder");
        }
        //create the chunk object
        GameObject chunkObj = new GameObject("Chunk[" + x + "," + y + "]");
        //add the hexChunk script and set it's size
        chunkObj.AddComponent<HexChunk>();
        //allocate the hexagon array
        chunkObj.GetComponent<HexChunk>().AllocateHexArray();
        //set the texture map for this chunk and add the mesh renderer
        chunkObj.AddComponent<MeshRenderer>().material.mainTexture = terrainTexture;
        //add the mesh filter
        chunkObj.AddComponent<MeshFilter>();
        //make this chunk a child of "ChunkHolder"s
        chunkObj.transform.parent = chunkHolder.transform;

        //return the script on the new chunk
        return chunkObj.GetComponent<HexChunk>();
    }
If this is the first chunk to be made, we make a new GameObject to hold all of them. We then create a new GameObject to be the chunk and add the HexChunk script to it, along with calling the method AllocateHexArray() on the new chunk. This will just create all the HexInfo classes in memory so that we can go through and edit them later. We add a MeshRenderer and assign a texture to the chunk. Last, we add a MeshFilter, so that later we can assign a mesh to the chunk. We parent it to the create chunkHolder object. Last, we return the newly created HexChunk.
Checkup
Finally! … We are done with the first half. Disappointed or excited that we have so much more to do?
Here is the full WorldManager source below to make sure you are following along.
using UnityEngine;
using System.Collections;

public enum Tile { Main, Ocean }

public class WorldManager : MonoBehaviour {

    #region fields
    public Mesh flatHexagonSharedMesh;
    public float hexRadiusSize;

    //hexInstances
    [HideInInspector]
    public Vector3 hexExt;
    [HideInInspector]
    public Vector3 hexSize;
    [HideInInspector]
    public Vector3 hexCenter;
    [HideInInspector]
    public GameObject chunkHolder;

    public Texture2D terrainTexture;

    int xSectors;
    int zSectors;

    public HexChunk[,] hexChunks;

    public Vector2 mapSize;
    public int chunkSize;

    #endregion

    #region awake
    public void Awake()
    {
        //get the flat hexagons size; we use this to space out the hexagons
        GetHexProperties();
        //generate the chunks of the world
        GenerateMap();
    }
    #endregion

    #region getHexProperties
    private void GetHexProperties()
    {
        //Creates mesh to calculate bounds
        GameObject inst = new GameObject("Bounds Set Up: Flat");
        //add mesh filter to our temp object
        inst.AddComponent<MeshFilter>();
        //add a renderer to our temp object
        inst.AddComponent<MeshRenderer>();
        //add a mesh collider to our temp object; this is for determining dimensions cheaply and easily
        inst.AddComponent<MeshCollider>();
        //reset the position to global zero
        inst.transform.position = Vector3.zero;
        //reset all rotation
        inst.transform.rotation = Quaternion.identity;


        Vector3[] vertices;
        int[] triangles;
        Vector2[] uv;

        #region verts

        float floorLevel = 0;
        //positions vertices of the hexagon to make a normal hexagon
        vertices = new Vector3[]
            {
                /*0*/new Vector3((hexRadiusSize * Mathf.Cos((float)(2*Mathf.PI*(3+0.5)/6))), floorLevel, (hexRadiusSize * Mathf.Sin((float)(2*Mathf.PI*(3+0.5)/6)))),
                /*1*/new Vector3((hexRadiusSize * Mathf.Cos((float)(2*Mathf.PI*(2+0.5)/6))), floorLevel, (hexRadiusSize * Mathf.Sin((float)(2*Mathf.PI*(2+0.5)/6)))),
                /*2*/new Vector3((hexRadiusSize * Mathf.Cos((float)(2*Mathf.PI*(1+0.5)/6))), floorLevel, (hexRadiusSize * Mathf.Sin((float)(2*Mathf.PI*(1+0.5)/6)))),
                /*3*/new Vector3((hexRadiusSize * Mathf.Cos((float)(2*Mathf.PI*(0+0.5)/6))), floorLevel, (hexRadiusSize * Mathf.Sin((float)(2*Mathf.PI*(0+0.5)/6)))),
                /*4*/new Vector3((hexRadiusSize * Mathf.Cos((float)(2*Mathf.PI*(5+0.5)/6))), floorLevel, (hexRadiusSize * Mathf.Sin((float)(2*Mathf.PI*(5+0.5)/6)))),
                /*5*/new Vector3((hexRadiusSize * Mathf.Cos((float)(2*Mathf.PI*(4+0.5)/6))), floorLevel, (hexRadiusSize * Mathf.Sin((float)(2*Mathf.PI*(4+0.5)/6))))
            };

        #endregion

        #region triangles

        //triangles connecting the verts
        triangles = new int[]
        {
            1,5,0,
            1,4,5,
            1,2,4,
            2,3,4
        };

        #endregion

        #region uv
        //uv mappping
        uv = new Vector2[]
            {
                new Vector2(0,0.25f),
                new Vector2(0,0.75f),
                new Vector2(0.5f,1),
                new Vector2(1,0.75f),
                new Vector2(1,0.25f),
                new Vector2(0.5f,0),
            };
        #endregion

        #region finalize
        //create new mesh to hold the data for the flat hexagon
        flatHexagonSharedMesh = new Mesh();
        //assign verts
        flatHexagonSharedMesh.vertices = vertices;
        //assign triangles
        flatHexagonSharedMesh.triangles = triangles;
        //assign uv
        flatHexagonSharedMesh.uv = uv;
        //set temp gameObject's mesh to the flat hexagon mesh
        inst.GetComponent<MeshFilter>().mesh = flatHexagonSharedMesh;
        //make object play nicely with lighting
        inst.GetComponent<MeshFilter>().mesh.RecalculateNormals();
        //set mesh collider's mesh to the flat hexagon
        inst.GetComponent<MeshCollider>().sharedMesh = flatHexagonSharedMesh;
        #endregion

        //calculate the extents of the flat hexagon
        hexExt = new Vector3(inst.gameObject.collider.bounds.extents.x, inst.gameObject.collider.bounds.extents.y, inst.gameObject.collider.bounds.extents.z);
        //calculate the size of the flat hexagon
        hexSize = new Vector3(inst.gameObject.collider.bounds.size.x, inst.gameObject.collider.bounds.size.y, inst.gameObject.collider.bounds.size.z);
        //calculate the center of the flat hexagon
        hexCenter = new Vector3(inst.gameObject.collider.bounds.center.x, inst.gameObject.collider.bounds.center.y, inst.gameObject.collider.bounds.center.z);
        //destroy the temp object that we used to calculate the flat hexagon's size
        Destroy(inst);
    }
    #endregion

    #region generateMap
    /// <summary>
    /// Generate Chunks to make the map
    /// </summary>
    void GenerateMap()
    {

        //determine number of chunks
        xSectors = Mathf.CeilToInt(mapSize.x / chunkSize);
        zSectors = Mathf.CeilToInt(mapSize.y / chunkSize);

        //allocate chunk array
        hexChunks = new HexChunk[xSectors, zSectors];

        //cycle through all chunks
        for (int x = 0; x < xSectors; x++)
        {
            for (int z = 0; z < zSectors; z++)
            {
                //create the new chunk
                hexChunks[x, z] = NewChunk(x, z);
                //set the position of the new chunk
                hexChunks[x, z].gameObject.transform.position = new Vector3(x * (chunkSize * hexSize.x), 0f, (z * (chunkSize * hexSize.z) * (.75f)));
                //set hex size for hexagon positioning
                hexChunks[x, z].hexSize = hexSize;
                //set the number of hexagons for the chunk to generate
                hexChunks[x, z].SetSize(chunkSize, chunkSize);
                //the width interval of the chunk
                hexChunks[x, z].xSector = x;
                //set the height interval of the chunk
                hexChunks[x, z].ySector = z;
                //assign the world manager(this)
                hexChunks[x, z].worldManager = this;
            }
        }

        //cycle through all chunks
        foreach (HexChunk chunk in hexChunks)
        {
            //begin chunk operations since we are done with value generation
            chunk.Begin();
        }

    }
    #endregion

    #region NewChunk
    /// <summary>
    /// Creates a new chunk
    /// </summary>
    /// <param name="x">The width interval of the chunks</param>
    /// <param name="y">The height interval of the chunks</param>
    /// <returns>The new chunk's script</returns>
    public HexChunk NewChunk(int x, int y)
    {
        //if this the first chunk made?
        if (x == 0 && y == 0)
        {
            chunkHolder = new GameObject("ChunkHolder");
        }
        //create the chunk object
        GameObject chunkObj = new GameObject("Chunk[" + x + "," + y + "]");
        //add the hexChunk script and set it's size
        chunkObj.AddComponent<HexChunk>();
        //allocate the hexagon array
        chunkObj.GetComponent<HexChunk>().AllocateHexArray();
        //set the texture map for this chunk and add the mesh renderer
        chunkObj.AddComponent<MeshRenderer>().material.mainTexture = terrainTexture;
        //add the mesh filter
        chunkObj.AddComponent<MeshFilter>();
        //make this chunk a child of "ChunkHolder"s
        chunkObj.transform.parent = chunkHolder.transform;

        //return the script on the new chunk
        return chunkObj.GetComponent<HexChunk>();
    }
    #endregion

}
B. HexChunk
The main point of the HexChunk script is to house all of our HexInfo’s and to combine them into one efficient mesh for runtime.
Leggo!
1. Setup to chunk
using UnityEngine;
using System.Collections;

public class HexChunk : MonoBehaviour
{
    #region fields
    [SerializeField]
    public HexInfo[,] hexArray;
    public int xSize;
    public int ySize;
    public Vector3 hexSize;

    //set by world master
    public int xSector;
    public int ySector;
    public WorldManager worldManager;

    private MeshFilter filter;
    private new BoxCollider collider;
    #endregion
Here is all of our fields for this class. Once again they should explain themselves as we go.
public void SetSize(int x, int y)
    {
        xSize = x;
        ySize = y;
    }
This is just a little helper method to set the size of the chunk. Say 8x8 like in our example.
public void OnDestroy()
    {
        Destroy(renderer.material);
    }
This method is called from Unity’s internals when the object, in this case a chunk, is destroyed. We just want it to clean up behind itself and delete it’s material.
public void AllocateHexArray()
    {
        hexArray = new HexInfo[xSize, ySize];
    }
This simply sets up the array for modification later of all of our hex’s. Remember xSize/ySize? Here they are now; they are used to determine the size of the arrays.
public void Begin()
    {
        GenerateChunk();
        for (int x = 0; x < xSize; x++)
        {
            for (int z = 0; z < ySize; z++)
            {
                if (hexArray[x, z] != null)
                {
                    hexArray[x, z].parentChunk = this;
                    hexArray[x, z].Start();
                }
                else
                {
                    print("null hexagon found in memory");
                }
            }
        }
        Combine();
    }
This method is called from our WorldManager and starts all the operations on our HexChunk. First we call GenerateChunk(), which we will make next. Then, we cycle through all of the hexs and sets the parentChunk to the chunk that is creating it.(this) Then we start operations on the hex. Last, once all the hex’s are done with their thing we call Combine() which will combine all our hex meshes into one.
2. Chunking those mofos
We combine the hexagons into chunks instead of rendering each hexagon separately to conserve drawcalls and multiple other overheads. If we had each hexagons its own GameObject the overhead for each transform, texture, and mesh would be insanely high.
public void GenerateChunk()
    {
        bool odd;

        for (int y = 0; y < ySize; y++)
        {
            odd = (y % 2) == 0;
            if (odd == true)
            {
                for (int x = 0; x < xSize; x++)
                {
                    GenerateHex(x, y);
                }
            }
            else
            {
                    for (int x = 0; x < xSize; x++)
                    {
                        GenerateHexOffset(x, y);
                    }
            }
        }
    }
This is handling the offsets of hexagons on odd rows. Each calls a GenerateHex(int, int) method that generates a new hex for the specific location(x,y). GenerateHexOffset() is the same method, just with a little bit of positioning difference to account for offset rows.
3. Actually making a new hex
public void GenerateHex(int x, int y)
    {
        //cache and create hex hex
        HexInfo hex;
        Vector2 worldArrayPosition;
        hexArray[x, y] = new HexInfo();
        hex = hexArray[x, y];

        //set world array position for real texture positioning
        worldArrayPosition.x = x + (xSize * xSector);
        worldArrayPosition.y = y + (ySize * ySector);

        hex.CubeGridPosition = new Vector3(worldArrayPosition.x - Mathf.Round((worldArrayPosition.y / 2) + .1f), worldArrayPosition.y, -(worldArrayPosition.x - Mathf.Round((worldArrayPosition.y / 2) + .1f) + worldArrayPosition.y));
        //set local position of hex; this is the hex cord postion local to the chunk
        hex.localPosition = new Vector3((x * (worldManager.hexExt.x * 2) + worldManager.hexExt.x), 0, (y * worldManager.hexExt.z) * 1.5f);
        //set world position of hex; this is the hex cord postion local to the world
        hex.worldPosition = new Vector3(hex.localPosition.x + (xSector * (xSize * hexSize.x)), hex.localPosition.y, hex.localPosition.z + ((ySector * (ySize * hexSize.z)) * (.75f)));

        ///Set Hex values
        hex.hexExt = worldManager.hexExt;
        hex.hexCenter = worldManager.hexCenter;
    }
Like always, lets break it down.
void GenerateHex(int x, int y){
bool odd;
for (int y = 0; y < ySize; y++)
{
    odd = (y % 2) == 0;
    if (odd == true)
            {
                 for (int x = 0; x < xSize; x++)
                 {
This simply checks if we are in an offset row or not. Don’t be intimidated. If we are - we take the first path, otherwise we take the second. We begin to cycle through all of our hex’s in memory and start doing something with them!
//cache and create hex hex
HexInfo hex;
Vector2 worldArrayPosition;
hexArray[x, y] = new HexInfo();
hex = hexArray[x, y];
We create a new HexInfo in memory and cache it for later use. Also notice worldArrayPosition.
//set world array position
worldArrayPosition.x = x + (xSize * xSector);
worldArrayPosition.y = y + (ySize * ySector);
This is setting worldArrayPosition to the location of the HexInfo in memory of the world hexArray. Basically the indexes to find this hex in the world array.
hex.CubeGridPosition = new Vector3(worldArrayPosition.x - Mathf.Round((worldArrayPosition.y / 2) + .1f), worldArrayPosition.y, -(worldArrayPosition.x - Mathf.Round((worldArrayPosition.y / 2) + .1f) + worldArrayPosition.y));
//set local position of hex; this is the hex cord postion local to the chunk
hex.localPosition = new Vector3(x * ((worldManager.hexExt.x * 2)), 0, (y * worldManager.hexExt.z) * 1.5f);
//set world position of hex; this is the hex cord postion local to the world
hex.worldPosition = new Vector3(hex.localPosition.x + (xSector * (xSize * hexSize.x)), hex.localPosition.y, hex.localPosition.z + ((ySector * (ySize * hexSize.z)) * (.75f)));
This sets all of our hex’s internal positioning. I’m NOT going to go into the math behind this, however feel free to investigate as it should be pretty easy to figure out. CubeGridPosition is the hex’s coordinates in the Cube coordinate system. This is not a positional location, more of a representative location. localPosition is the location of the hex local to the chunk. If the chunk is at (10,10,10) and the hex is at (12,12,12); then the localPosition of the hex would be (2,2,2) as it is relative to the chunk. This is useful for calculations working in the chunk. worldPosition is what it seems and is the global position of the hex.
///Set Hex values
hex.hexExt = worldManager.hexExt;
hex.hexCenter = worldManager.hexCenter;
}
The only difference with the method GenerateHexOffset() is the one line:
hex.localPosition = new Vector3((x * (worldManager.hexExt.x * 2)) + worldManager.hexExt.x, 0, (y * worldManager.hexExt.z) * 1.5f);
This is due to the fact that these rows need to be offset so, they are shifted half a hex over by adding hexEct.x to the x axis.
Finally done with GenerateChunk(). We start on Combine() from the Begin() method of earlier.
4. Combining those hexes
private void Combine()
{
    CombineInstance[,] combine = new CombineInstance[xSize, ySize];

    for (int x = 0; x < xSize; x++)
    {
        for (int z = 0; z < ySize; z++)
        {

            combine[x, z].mesh = hexArray[x, z].localMesh;
            Matrix4x4 matrix = new Matrix4x4();
            matrix.SetTRS(hexArray[x, z].localPosition, Quaternion.identity, Vector3.one);
            combine[x, z].transform = matrix;
        }
    }

    filter = gameObject.GetComponent<MeshFilter>();
    filter.mesh = new Mesh();

    CombineInstance[] final;

    CivGridUtility.ToSingleArray(combine, out final);

    filter.mesh.CombineMeshes(final);
    filter.mesh.RecalculateNormals();
    filter.mesh.RecalculateBounds();
    MakeCollider();
}
Break down #351616545654:
private void Combine()
{
    CombineInstance[,] combine = new CombineInstance[xSize, ySize];
CombineInstance is a cool little class that are object that get combined in a mesh.CombineMeshes() method. They are pretty cool.
for (int x = 0; x < xSize; x++)
{
    for (int z = 0; z < ySize; z++)
    {

        combine[x, z].mesh = hexArray[x, z].localMesh;
        Matrix4x4 matrix = new Matrix4x4();
        matrix.SetTRS(hexArray[x, z].localPosition, Quaternion.identity, Vector3.one);
        combine[x, z].transform = matrix;
     }
}
Here we cycle through all of the hexs in our chunk and assign the localMesh to the CombineInstance mesh. We make a new Matrix4x4 which is a complex topic. Plenty of other resources. SetTRS() is basically setting a transform component with (position, rotation, and scale). We assign our hex’s world position to the matrices position, no rotations, and a scale of one. We then assign the matrix to our CombineInstance’s trasnform. Essentially setting the hex’s mesh to it’s worldLocation.
filter = gameObject.GetComponent<MeshFilter>();
filter.mesh = new Mesh();

CombineInstance[] final;

CivGridUtility.ToSingleArray(combine, out final);

filter.mesh.CombineMeshes(final);
filter.mesh.RecalculateNormals();
MakeCollider();
We get the MeshFIlter and create a new mesh on it. We shift all of the CombineInstance[,] into a single array using a helper method we will create soon. We then combine all of meshes in CombineInstance[ ] into one using the CombineMeshes() method in the mesh class. We recalculate the normal to place nicely with lighting and then call MakeCollider().
5. Making those colliders
void MakeCollider()
{
    if (collider == null)
    {
        collider = gameObject.AddComponent<BoxCollider>();
     }
     collider.center = filter.mesh.bounds.center;
     collider.size = filter.mesh.bounds.size;
}
Ahh, thank whoever is close to you that this method is short. If this chunk doesn’t have a collider we make a BoxCollider and assign it’s size to our meshes’. Simple and short.
using UnityEngine;
using System.Collections;
using System.Collections.Generic;

public static class CivGridUtility
{
    public static void ToSingleArray(CombineInstance[,] doubleArray, out CombineInstance[] singleArray)
    {
        List<CombineInstance> combineList = new List<CombineInstance>();

        foreach (CombineInstance combine in doubleArray)
        {
            combineList.Add(combine);
        }

        singleArray = combineList.ToArray();
    }
}
Here is our helper class to combine the two-dimensional array into an one-dimensional array. I don’t think this tutorial should be covering this and I’m pretty tired. So figure it out yourself! 
C. HexInfo
Last, part guys! I promise. You’re a trooper for making it this far, you don’t have much longer to go.
HexInfo is simply a hexagon that stores some extra data. We are going to start fresh from last section so delete your version, but don’t worry, all that work increased our knowledge and a lot of it made it into WorldManager.
using UnityEngine;
using System.Collections;

public class HexInfo
{
    private Vector3 gridPosition;//cube cordinates stored(x,y == axial)
    public Vector3 localPosition;
    public Vector3 worldPosition;

    public Vector3 hexExt;
    public Vector3 hexCenter;

    public HexChunk parentChunk;

    public Mesh localMesh;


    //basic hexagon mesh making
    public Vector3[] vertices;
    public Vector2[] uv;
    public int[] triangles;

    //get axial grid position
    public Vector2 AxialGridPosition
    {
        get { return new Vector2(CubeGridPosition.x, CubeGridPosition.y); }
    }
    //get/set cube grid position
    public Vector3 CubeGridPosition
    {
        get { return gridPosition; }
        set { gridPosition = value; }
    }
All of our fields and two properties.Axial coordinates are simply cube coordinates without the z axis, therefore the contained property.
public void Start()
    {
        MeshSetup();
    }
This method is called by our parentChunk as soon as everything else is ready for us to start generating. We call MeshSetup().
void MeshSetup()
    {
        localMesh = new Mesh();

        localMesh.vertices = parentChunk.worldManager.flatHexagonSharedMesh.vertices;
        localMesh.triangles = parentChunk.worldManager.flatHexagonSharedMesh.triangles;
        localMesh.uv = parentChunk.worldManager.flatHexagonSharedMesh.uv;

        localMesh.RecalculateNormals();
    }
We reset the localMesh to a new mesh and assign vertices, triangles, and uv from the cached hexagon in WorldManager, flatHexagonSharedMesh. Basically, we copy the base hexagon from earlier so that we don’t waste time recalculating data that is constant and already done. We then make it place nicely with lighting with RecalculateNormals().
D. Conclusion
Finally! I really hope I didn’t lose you guys or drop in quality anywhere. It was a pretty epic tutorial section and I forced myself to write it up in two sections. So let me know if I moved too fast over a part or any mistakes. It’s been fun, and let me know what you guys think and if it helped you at all.
Here are source files for anyone having trouble : Files
Time to flipping enjoy your new (chunked) procedural hexagon grid. Have fun guys, and thanks for being an awesome community. Once again, any feedback is amazing. (“Your a f***ing moron” is valid feedback and pretty ironic. )
Best Regards!
Landon