I have done the following steps, but the difference between the Editor and the visionOS is still significant. How can I reduce this discrepancy?
Use pbr materials for all scene materials
Change the scene environment ambient light to pure white and remove skybox
Set dynamic light and ignore static scenes objects
Enable “Image Based, Dynamic Lights, and Shadows”
I also tried to bake the complete color map through 3dmax and then use the lit material in unity;
I also tried to bake in the unity editor and use the shadergraph material with “PolySpatial Lighting Node”;
None of these attempts have resulted in lighting effects in the visionOS that are similar to those in the editor.
If we use subjective scores, in the editor is 90 points, and in the visionOS are only about 70 points.
As far as I understand, it is because the rendering engines are different and do not support post-processing effects, so the desired effect must be achieved in one go through direct rendering or pre-baking. But now the final display effect in the device is completely uncontrollable. How can we make the entire production process smoother and the visual effect more controllable?
I am not a qualified TA technician, if anyone knows how to arrange this production process I would be very grateful.
The only way to make the lighting exactly the same in visionOS builds as it looks in the Unity editor is to use shader graphs with Unlit targets (so that they don’t include visionOS image-based or dynamic lighting) and use the PolySpatial Lighting node (avoiding features that it doesn’t support, like dynamic shadows). Or use Metal mode, which uses the Unity renderer for visionOS builds (but has some limitations, such as lack of dynamic foveation and gaze-based hover).
Most MR RealityKit apps tend to want visionOS lighting, because that incorporates the actual lights/reflections of the real world scene. But visionOS’s lighting is entirely handled by RealityKit, and thus it can’t be reproduced in the Unity editor.
Hello, I am trying to achieve this as well, or at least reduce the effects of the ambiant light on my models.
What do you mean by this ? Is there an example somewhere I can use as a reference ?
Also, do you think there would be a way to ignore (or neutralize) tint change effect, but keep the luminosity change effect from the ambiant lighting on my materials?
The best reference for shader graphs is the shader graph documentation, combined with (for visionOS RealityKit projects) the PolySpatial documentation. In this case, I mean that the Material property of your shader graph target is set to Unlit, like this:
In newer versions of PolySpatial, however, there is a simpler way to control whether the shader graph uses RealityKit lighting, Unity lighting, or both: the PolySpatial Lighting data extension.
Assuming that you mean the RealityKit ambient lighting, the best way to do this would probably be to use an unlit target along with the Environment Radiance node, which outputs colors that you can process (for example, by desaturating to remove tint) before connecting to the output.
Yeah, we are using using Unity 2022, so MaterialX and the PolySpatial Lighting data extension are not options for now.
Thanks for your response. After reading the documentation, I am having trouble understanding the Environment Radiance Node. Is the output a cubemap of the image-based lighting, like hinted here, or the expected material diffuse/specular after the effect of this cubemap ?
Also, what are the expected inputs ?
In my case, we would want to convert all our existing materials (mostly using URP/Lit) to use this shader instead, so they would have to keep their configured basecolor, metallic and smoothness properties.
What would you suggest in this case ? Using a combination of Env. Radiance, Polyspatial Lighting, with an Unlit target ?
I guess that’s where I’m at, but I dont know how to combine the Polyspatial Lighting output with the Env. Radiance’s result.
It might help to look at Apple’s documentation, since our node is just a direct proxy for theirs: Environment Radiance. That also has some additional documentation for the inputs and outputs.
It is the per-pixel diffuse and specular components after computing the lighting based on the inputs. In other words, it’s what you’d get if you used a Lit target with the same normal, smoothness, etc., except that you can process the results further (and they’re split into the diffuse and specular components, which you can just add together). The Discussions post you linked attempts to find the original value of the cubemap by manipulating the inputs, but that’s not the primary purpose of the Environment Radiance node; the purpose is to get access to the post-lighting colors in order to process them after lighting.
As I mentioned, the Apple documentation explains them a little further, but they’re basically just the normal inputs that you would provide to a lit target pixel. Roughness is (1.0 - Smoothness), which just happens to be Apple’s convention.
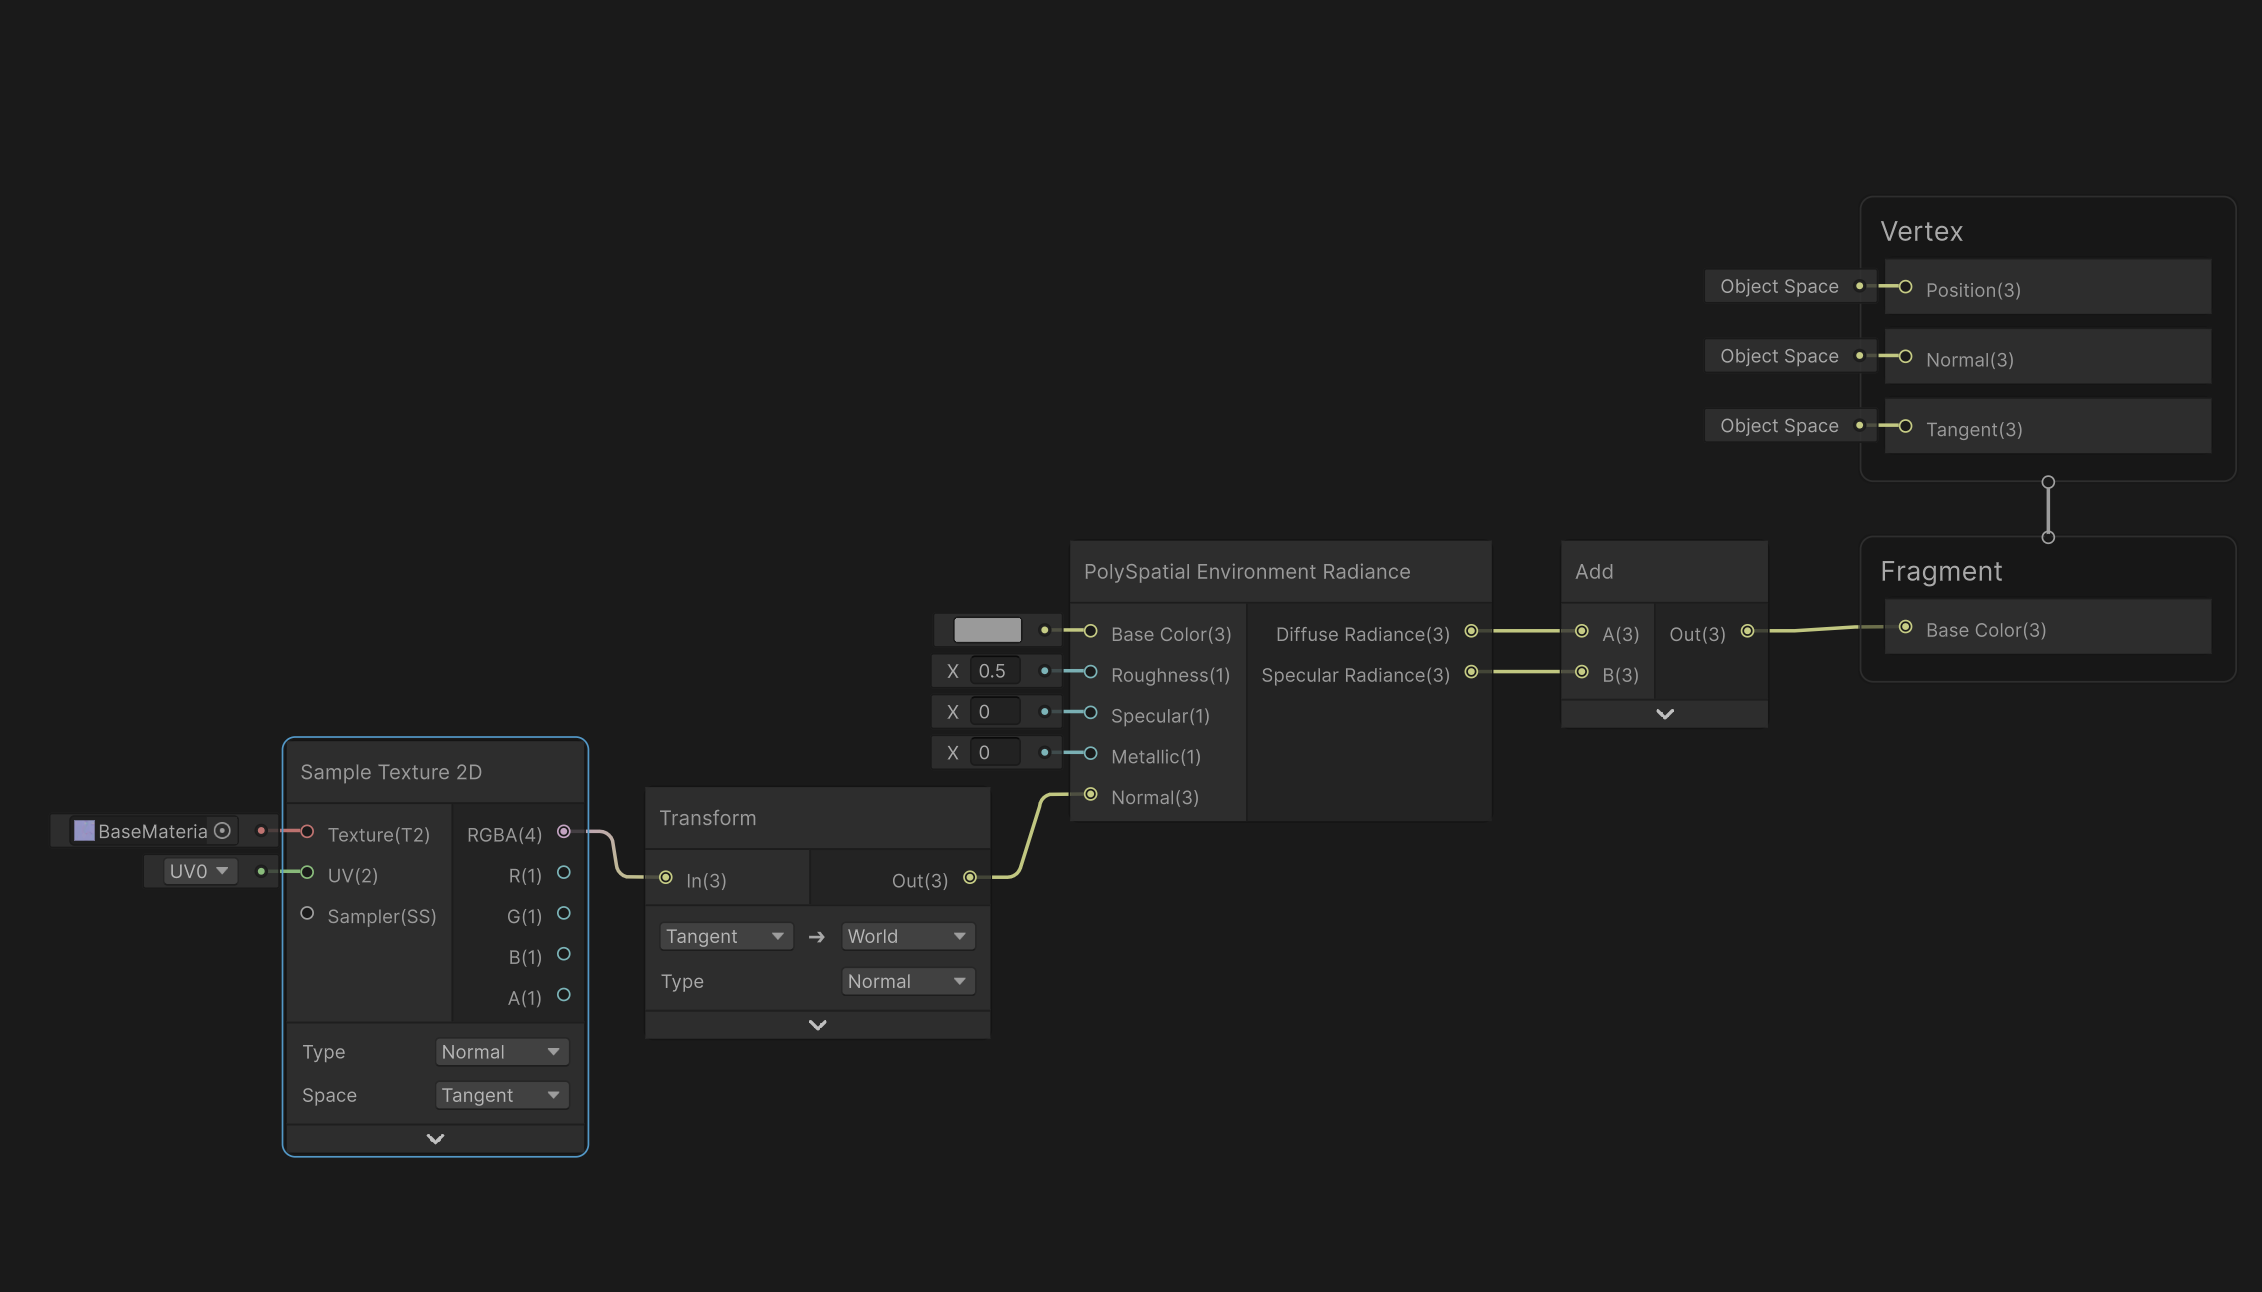
You can use the PolySpatial Lighting node if you want Unity’s (directional, e.g.) lighting as well, yes; you can just add the components together. It sounds like that’s what you want: just add the outputs of the Add node and the PolySpatial Lighting node together and route them to the Fragment’s Base Color node. Also, you’ll want to connect the material inputs (BaseColor, Metallic, etc.) to the Environment Radiance node as well as the PolySpatial Lighting node (with the appropriate processing: e.g., using 1.0 - Smoothness for the Roughness input).
Thanks for your detailled explanations, it really helps.
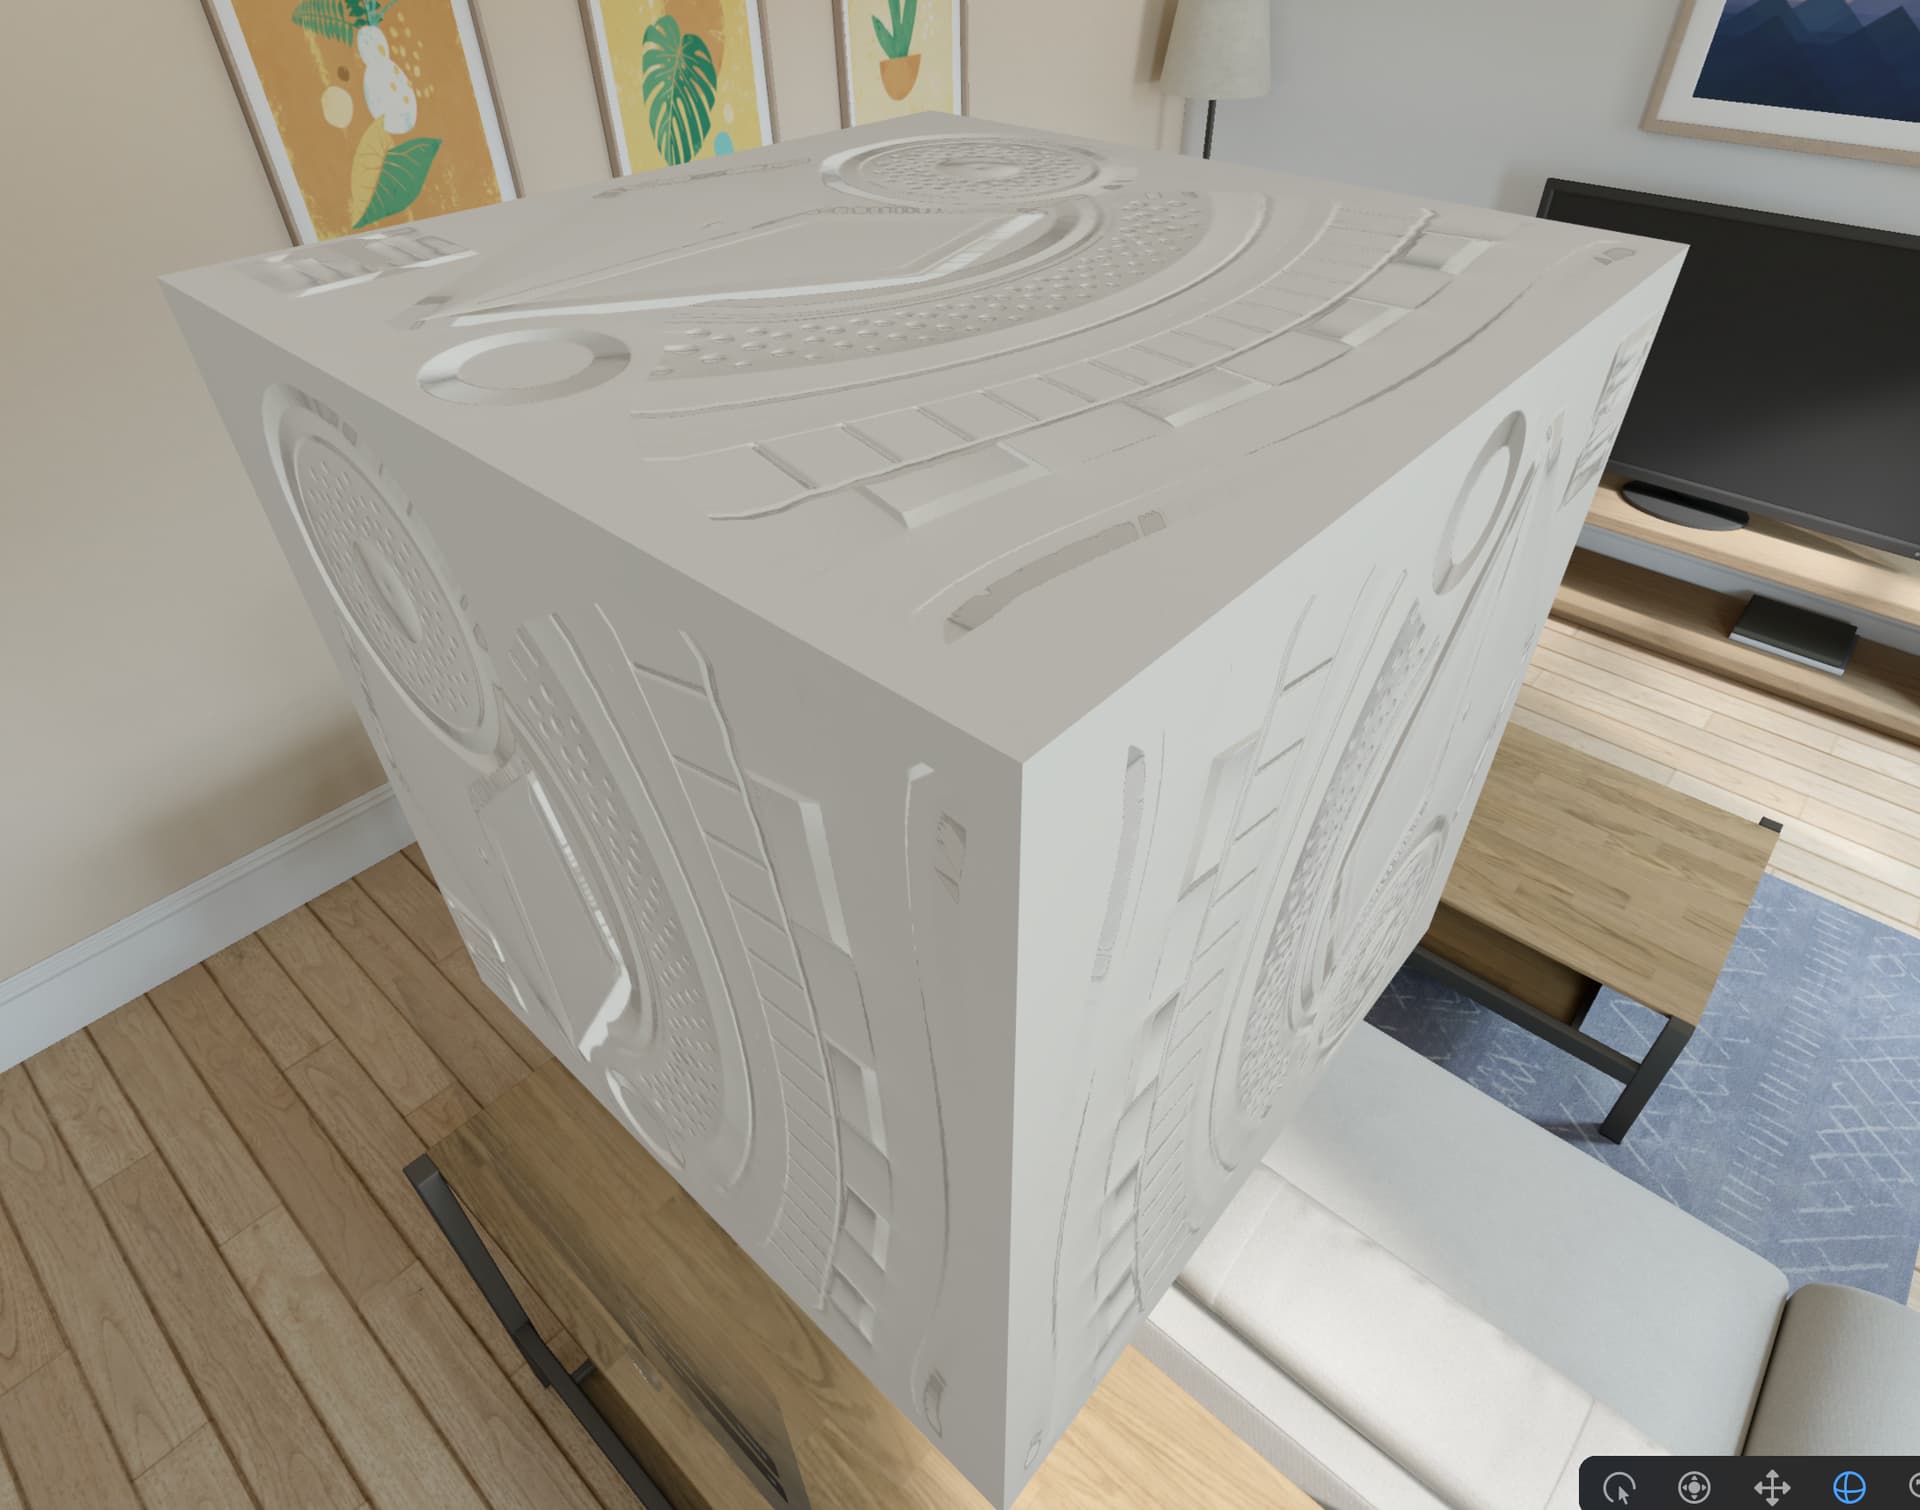
I created the shader and tested in the headset - however I do not obtain the expected result.
Right now I am not even trying to include Unity Lighting, nor to desaturate the effect of the Image-based Light. I’m just trying to validate that statement :
/ UPDATE /
I found why my shader didnt work. I had the following error :
Warning: Non shader graph shader ‘XXXXXX’ not supported or MaterialX encoding missing
I created the shader in a project that is ultimately built as an Asset Bundle, then loaded into another project… Turns out this doesnt work. @AndrzejUnity , I guess even if my shadergraph exist in the ‘‘Asset Bundle Loader’’ project, with same meta file, it wont work. Hence a runtime substitution would be the solution.
I’m not sure what you’re trying to achieve with the “Normal Strength” node, but the normal should be unit length.
One thing to be aware of when using Environment Radiance with normal maps is that it expects the normal in world space, whereas the normal maps are typically in tangent space. Here’s an example of how to transform the normal:
Yeah, the shader has to be the same exact instance as the one in the base build. It might be possible to force that by including the shader in a scene in the base build (even if on a disabled GameObject), or as a resource, but I’m not sure. A runtime substitution sounds like the most reasonable workaround at the moment.