Hi there! During this weekend I’ve created a game for the Ludum Dare #29 with the super talented Sebastian Lague. The response to the game has been super positive on the ludum dare community and a lot of people wrote praises about the art of it, so I’ve decided to write this more detailed postmortem on how I created everything in under 72 hours ![]()
After working on a few jams I picked up some tricks to work faster and get more assets out in less time, so I’ll be talking a bit more about those tricks. Also thinking of doing a few video tutorials on the creation of those kind of assets later.
So, in every Jam the first thing I create is the Character. It usually takes the longest out of all the assets so I like to get it out of the way first. I also try my best to be able to use the same rig and basic animations for all the characters in the game, as rigging and animation take a longer time.
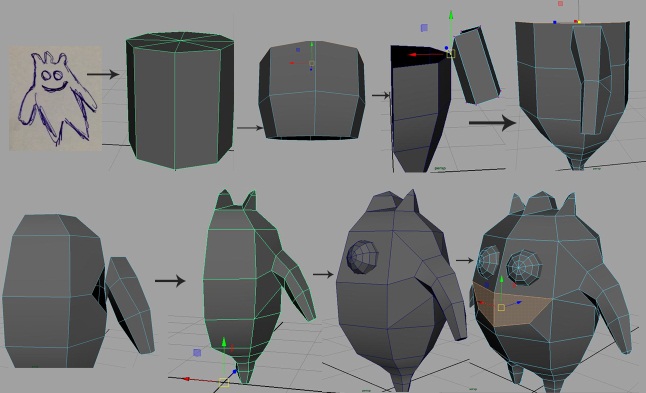
I’ve created the basemesh out of an 8 sided cylinder, using another cylinder for it’s arms and extruding the legs out of each side of the cylinder. That gave me a quick lowpoly basemesh to work with, and make all my characters out of. For the main character I’ve included a little smile on his basemesh, and big round eyes, because it’s cute. The eyes are higher poly than the rest of the body (I really wanted them to be round haha). I took it to ZBrush to give it a more natural organic format (I like the Move Topological tool to move things around until they look right, wish maya had better sculpting tools.) then went on to UV the Character.

When doing art for Game Jams I usually try my best to make my UVs Mirrored, so both sides of the character are occupying the same space. That way I only have to paint half the character and the other half will already be painted as well, and I have to worry less about seams. As you can see on this picture, since all characters share the same Basemesh and the same UVs, it’s pretty easy to adapt the textures from one to the other, creating variation without spending much time. For extra enemy variation I also played with Hue Saturation in each of the textures to have a bunch of color variations, with almost no extra developing time.
For the Big Fat guy with all the teeth I wanted to have a bit more detail (He would be bigger than the others in the game, with more health and slower, so I wanted him to stand out) I subdivided the basemesh and Pulled a lot of spikes out of his back with the extra topology.

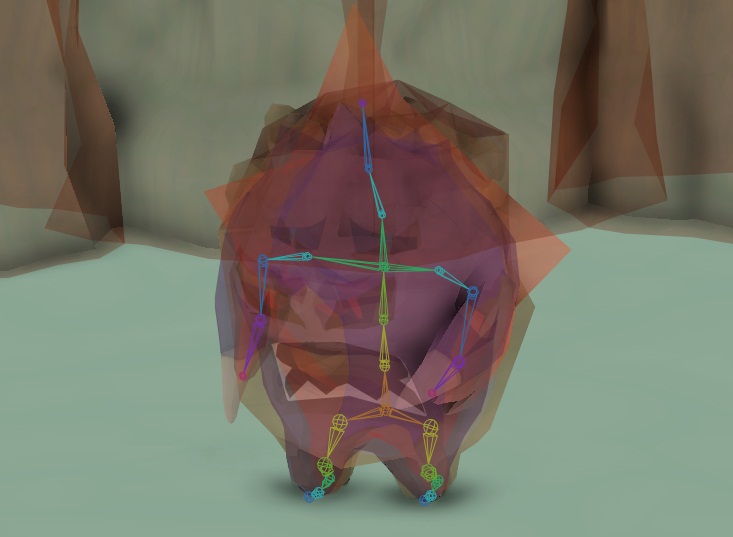
With that basemesh ready to go, went on to pull it around creating enemy variations, you can see on the picture above how all of these are created from the same basic mesh. I took extra care to not move their arms and legs out of place. That way I was able to recycle the rig and the animations. I actually exported the Rig with all the meshes together animating at the same time, and let Sebastian just Tick on and Off the meshes he wanted for each character.
So with the rig working, I started to do the animations. Before getting involved with Game Design, I studied to be an Animator, so to me that’s one of the most fun parts to do and I love to experiment with it. For Game Jams there are also a few tricks I do to make the process quicker.

The first thing I do is creating a walk forward animation. There is a really great and detailed tutorial about creating walk cycles here. With the animation working, I’ll select all the frames of the copied animation, go into the Dope Sheet and scale them by -1. The animation will then be playing backwards. I’ll then select the COG controller, select the curve on the right rotation for the whole animation and drag it until the character is tilted backwards. With that I already have a Walk forward and walk backwards animation.


From there I make a new copy of the walk forward animation. This time I’ll pick the main controller (the controller that moves the WHOLE CHARACTER at once) and I’ll rotate it so he’ll almost face totally to the side. Then I’ll pick the COG controller, select the whole yaw rotation curve and drag it until the character is facing more to the front, while his legs are moving to the side. I’ll do that to the other spine controllers until he is doing a nice strafe. I’ll then do the same to the arms to make sure the weapon hand is still pointing forward and the other one is not crashing into the body.
And that’s how I take 1 walk-cycle and turn it into 4 walk cycles without having to re-do the whole thing.


Next thing I do is the Idle. The Idle is really important since most of the other animations should have it’s first pose being the idle pose, for better transitions. Usually for Game Jams I just keep the idle simple, using a moving hold with a few rotations on the spine to simulate breathing. After the Idle is done I’ll go on to do the Hurt animation, starting from the idle pose and finishing in the idle pose.
I’ll then Duplicate the hurt animation, delete the part where it ends back in the idle pose and make it end into a pose with the character on the ground dead. I’ll usually also add a little pop after falling for a nice extra detail. Lastly attack animations, starting from the idle and ending back on the idle. I usually do at least 2 so it doesn’t feel like only 1 attack.
With that, I finished the basic characters (It took from 8AM to 12:45PM according to my time lapse screenshots, so about 5 hours). I only made 3 characters at first, and made the other 3 in the last day when I realized I had some extra time for details.
Now it’s time to start creating the assets for the level.

Usually the first thing I do for a level is a floor texture. To speed up stuff, I didn’t want to proper painting with properly blended colors and gradients and all that stuff, so I decided to just try and do my textures with the Pen tool in Photoshop, Vector drawings! ![]() Started with the plain color, added some random shapes with a brighter color, then created smaller shapes inside those shapes with a even brighter color. Lastly I used a filter offset to check how well it was tiling, then fixed the tiling by changing some of the shapes, and added some shapes in darker color between the big shapes to make them pop out even more.
Started with the plain color, added some random shapes with a brighter color, then created smaller shapes inside those shapes with a even brighter color. Lastly I used a filter offset to check how well it was tiling, then fixed the tiling by changing some of the shapes, and added some shapes in darker color between the big shapes to make them pop out even more.
I did the same for pretty much all the other assets, with some assets getting an extra AO multiplier here and there for extra pretty shadowing just because.

After getting the floor done, it’s time for the walls. I started with a subdivided cube, deleted everything but the front and top. I then created the uvs for it and wrinkled it up taking EXTRA CARE for the vertices on the side to be in the same Y and Z position, so they would match. It’s also important to note that they were perfectly aligned to the grid. That way we can easily snap the walls together to create levels. In this case, we used an old procedural level generator script I wrote that does that job creating a level with the modular walls we feed it.
With the Half-wall done, UV’d and Wrinkled, I would mirror geometry so we would have a wall that’s front and back with it’s sides free. I did a couple of different variations of the wrinkled wall so they wouldn’t all look the same in the game, and look less like a modular piece and more like a regular wall.
Now that I have a proper wall, and it connects to other walls perfectly like a good modular wall should, I need some curved walls, so I can curve my levels, otherwise my level will end up being composed of all straight walls XD


For that, deformers in maya help me a lot. I can use the bend deformer to create a start for my curved wall (it won’t just magically be modular by just using the bend deformer, but it’ll give you a good place to start. From there I would position a wall on the adjacent grid from it and Snap the vertices so it matches that wall


From there I’ll usually put 4 Curved walls together to form a column. Columns are awesome to hide imperfections and to place in the middle of the map to create branched paths. One last thing is creating a more diagonal/less curved corner wall. So it can form straight walls in a diagonal pattern in the map. I would select the middle edge with a soft select making sure the vertices that I need to stay in place for the modularity of the asset stay untouched and punch it inside.
Now we have all the assets we need to get our levels being generated.

I imported those assets into Unity and brought with it my old Procedural Level Generator, that I created for another project, based off the C# example on this [Cellular Automata Method for Generating Random Cave-like Levels on Rogue Basin.](http://www.roguebasin.com/index.php?title=Cellular_Automata_Method_for_Gener ating_Random_Cave-Like_Levels)
In almost no time I had a LITERALLY INFINITE variety of interesting base level shapes for me to pick from and start decorating my level. Kept pressing the space bar until I saw a shape I liked, copied it over to a new level. Now I needed some nice decoration assets for it. At this point it was about 5pm of my first day (I started working 7am). So right now I’m 10 hours of work into the project.

At this point I’m thinking what the hell kind of decoration one would find inside the human body, first thing that came to mind are red blood cells and white blood cells. Created a red blood cell out of a cylinder (again using half uv for quicker textures, and same flat vectorial texture painting). In the interest of having more assets in less time created a variation of the red blood cell “damaged” by pushing one of it’s sides in. I also created a white blood cell out of a sphere, by using the SAME TEXTURE as the floor, but tiling it more and changing it’s color with photoshop’s Hue Saturation tool.

Next I figured I could make some sort of vein-arteries thing and rig it, with that I was able to do a lot of asset variation just by contorting it into different positions. I shifted the to have one red and one blue in the same texture. Then I figure I could take it one step further and use other deformers to create more interesting assets with the same model in seconds. You can see there an example of using the Rig (Joints), Twist Deformer, Twist + Flare, Twist + Flare + Squash, and Twist + Flare + Bend. As you see we can combine several deformers for even more variation of results/assets.
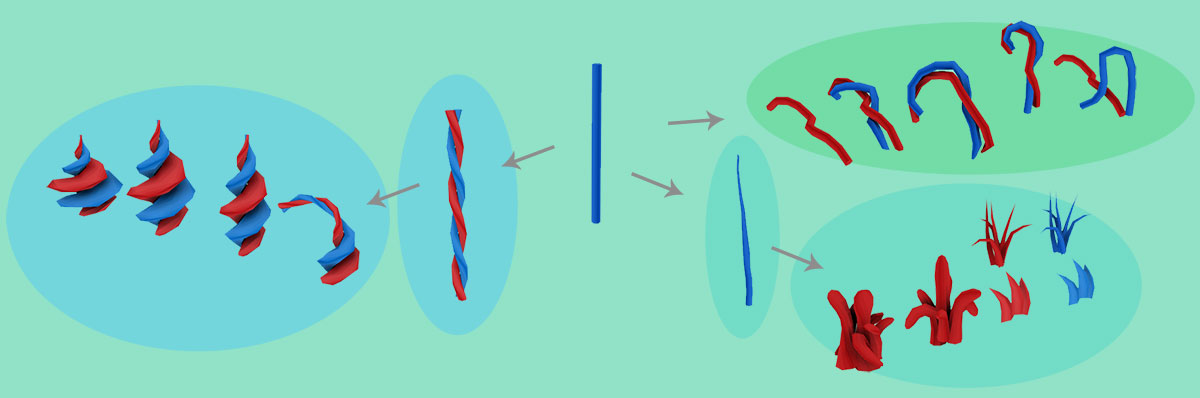
So out of that one cylinder and a few deformers I created a whole bunch of different assets. For the grass I actually ended up cutting the bottom part of the cylinder and using only the tip, also edited the mesh a bit by merging some vertices.
From there I built a kind of Geiser thing (I have lots of those around the map with bubbles and goo popping out of) starting from a Red Blood Cell (It was there already and kinda had the upper topology I wanted so… why not?). I did have to Redo the UV for it though.

This one asset became SOOOO many others, using same UVs too. So I saved A LOT of time of doing UVs and Textures.

Cutting the bottom half it became the entrances for the enemies spawn and objective. With Bend Deformer, Flare Deformer and Squash Deformer it became a lot of Goo Cauldrons and Goo Droppers. With Inverted Flare Deformer and some extrusions it became a base Tower Body, from which applied Twist Deformer, Flare Deformer and Inverted Flare Deformer became 4 Tower Body Variations.
Closing it off at the bottom and adjusting the mesh it became a Tower Head. With sometimes mesh adjustment, sometimes Deformers, it became 8 tower head variations (Even though we only have 3 Towers in the game lol, talk about overdoing!) I made Body and Head separated to give Sebastian more freedom to choose how to mix and match those, and for it to be easier for him to make the head turning towards enemies without me having to rig the towers.
And lastly, From the tower heads I pulled a handle from the bottom and fitted some extra entrances in there for the guns.

I also made a rock of fat (or random gooey thing) and made variations out of it by using deformers/soft selection and by deleting the bottom and using only the top on the case of the smaller ones. The gooey light thingie is the same mesh as the white blood cell (pretty much a sphere with ends fixed so there is no star) but more squashed. I also put some Veins on top of the Floor texture and added some Alpha to it. I got the Fat Rock mesh and squashed it into the ground, and used it as a decal in several spots of the level, Sebastian later used it in the back of the Shop. Since I was in an alpha kinda mood. I made that green goo texture to put in a Quad with alpha. I barely used it, but it’s there somewhere.
And that’s pretty much every 3D Asset used in the levels. All of the other looks is Hue Saturation adjustments and Color Balance in Photoshop to achieve different looks through colors. Since I was doing pretty well on time and I already had plenty of assets at this point, I decided to do some extra details and animate some assets.


I didn’t even properly rig those assets, just placed some random joints and animated them directly to the joints. Also some of the Arteries/Veins that are standing up have a little script that constantly rotates them, so it’s kinda like those barber shop things… It’s some really small details, and probably no one will notice them in the game, but they make me happy to look at, so I think it was worth it XD
So I set up the level, I populate it with nice decoration and send it to Sebastian. Once he gets the game working he sends it back to me and this is how it looks like:

So yeah… The assets are all in there… Why doesn’t it look good? Time to do some lighting! And change that camera, that camera is not cool D: Can’t see almost anything of all the cool assets! let’s show off those assets!

So at first I just changed the directional light a bit, it did look better than it was looking before, but I realized quick enough that it wouldn’t make much sense to have a sun inside the human body. I turned it down to get a more darker vibe and decided to fiddle around with point lights.
Now the thing with lighting, is IT HAS TO MAKE SENSE. You don’t just throw a point light in there and that’s it. You need a logical explanation for that light to be there. So I started to go through the assets in the scene that could be emitting light and positioning some point lights at them. The game instantly looked better. (Also helped that I found a better camera angle that showed the assets a little more). So I started positioning more and more of those assets that could be emitting light and filling the level with different colored point lights.
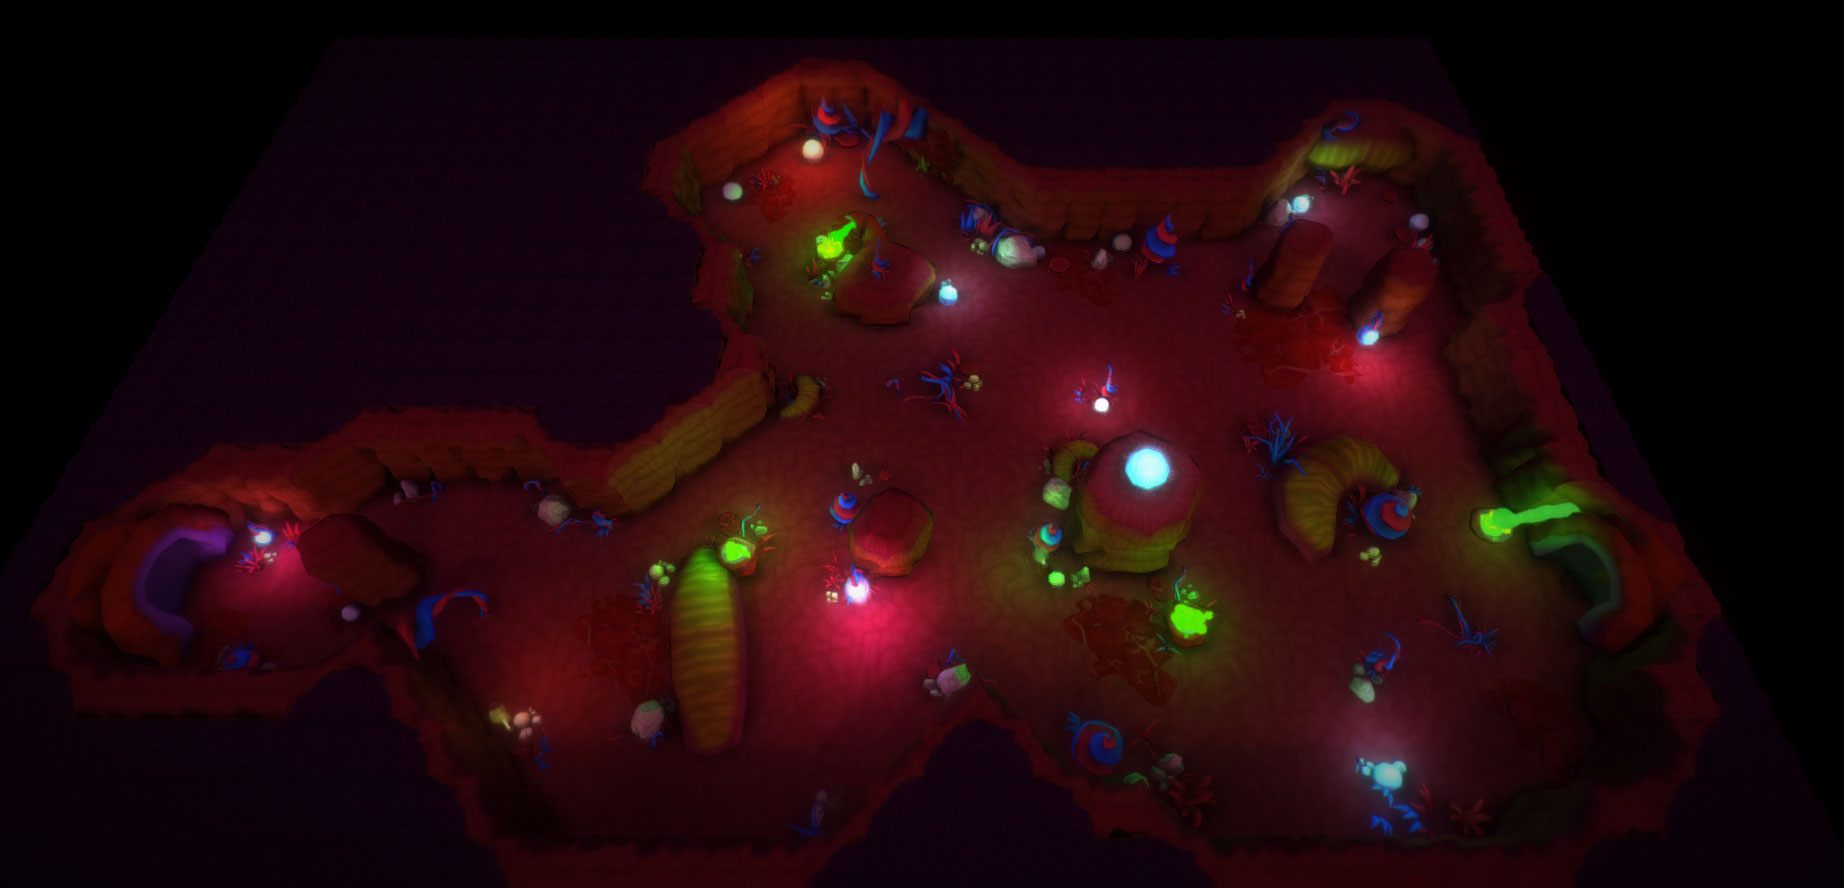

After it was all populated with cool lights,I started messing with some Unity Pro Post-processing effects, and I was pretty happy with the results. On this screenshot it looks slightly darker because it’s farther away, but you can see the whole scene in there. You can click the picture to see it in it’s full resolution.


Now we needed a Menu Scene and a Game Over Scene. We knew we wanted to make it outside the body, so it would be something completely different. Since the game is beneath the surface… we need at least to start outside! Even though it’s a completely different scene, I still manage to reuse some of the assets. The grass in the cemetery is the same “arteries/veins” grass that are inside the body. The tubes that connect to those bags are that first tube I rigged to create the veins/arteries. The thing that hangs the bags also come from that first rigged tube. The bags, bed, pillow, monitor and tray all come from a Subdivided Cube. The guy I did have to model it from scratch, I pulled up a cylinder and modeled his face. He doesn’t have a body at all, just a piece of shirt and that’s it. The sheet is a plane that I pulled the mesh around to cover him.
With all that done Sebastian asked if he could have some animation for those scenes, so I dropped some joints in there and animated directly without properly rigging, since it’s not much motion.
Now we had 3 hours until the end of the jam, and I was pretty much free, the only heavy workload was with Sebastian since there was still a lot of bugs to squash and new features to add. So we decided it would be a good idea for me to work on a Second level.
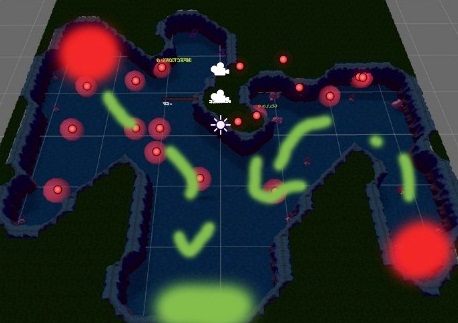
I started by doing some Hue Saturation changes on the walls and floor, and found a cool blueish/purpleish point that looked good in the level generator. We wanted this level to be bigger, and have 2 opposite enemy spawn points, for extra difficulty.
Sent him this quick painting over the generated level and he liked the shape so I started working on it.
Since I had the first level already with all those cool pieces put together I just copied it over, moved it to the right of the level, deleted all the walls and floor to leave only the decoration. Then I started pulling pieces out of there and placing them in the level, it went by WAAAAY quicker than doing it for the first time. But of course I also added some new combinations of things to make things more interesting. The result is that the level 2 looks even better than level 1 (at least to me). Which is a funny thing, because when you see how good the level 1 looks, you might think it’ll just look the same from there on, but you get to level 2 and it looks so different, and better! So it’s a cool little surprise for the people who make it this far ![]()


And that’s it, that’s how the art for this game was made ![]() Sorry for all this text, and all the heavy images. I thought this would be some nice/fun information to share.
Sorry for all this text, and all the heavy images. I thought this would be some nice/fun information to share.
If you would like to know more be sure to check Sebastian’s Behind the Scenes video.

Also there are my Art Creation Timelapses where you can see me actually doing everything I talked about here:


And of course, if you haven’t already, please play Infection \o
http://www.ludumdare.com/compo/ludum-dare-29/?action=preview&uid=37445