At 1:11 it shows that the render Texture has a Depth Buffer Option and at 1:22 that there is a Color Format named DEPTH_AUTO. Both of these are missing in 2021.3.4f1 and I’m wondering how I would go about rendering the Depth into a Texture.
I don’t know when the change happened but int the 2020.3 version the Render Texture Option still looks like the Tutorial.
The option probably moved to another place but I don’t know where to find it.
Oh and btw I’m using URP so it’s not due an HDRP project.
Hello. I am also struggling with this tutorial. There is no “DEPTH_AUTO” option for a color format in a render texture. One of the comments said to use “None” instead, but that didn’t work.
I vaguely recall playing around with this a couple of years ago. If you download the source code provided in the link you can play around with the example scene and and see how it works. Also note that it was kinda using a hacky workaround that might not even be supported by the current implementation of URP anymore.
I’m pretty sure the developer came to the same conclusion that I eventually did. It’s just easier to render the objects to a render texture and then map that to a billboarded quad. It allows you to use any shader you like, the depth buffer just works. And the pixel resolution is independent of the distance from the camera. The only downside is that having lots of cameras rendering each object separately is really expensive. I solved this by sacrificing the ‘use any shader’ thing and writing one that transforms and rotates objects in the vertext shader and maps each object to a tiled section of a giant render texture for a single camera and then assigning that tile region to the billboard quad. The guy int he video solved it by switching to Godot where you can just render to a small rectangular region of a texture
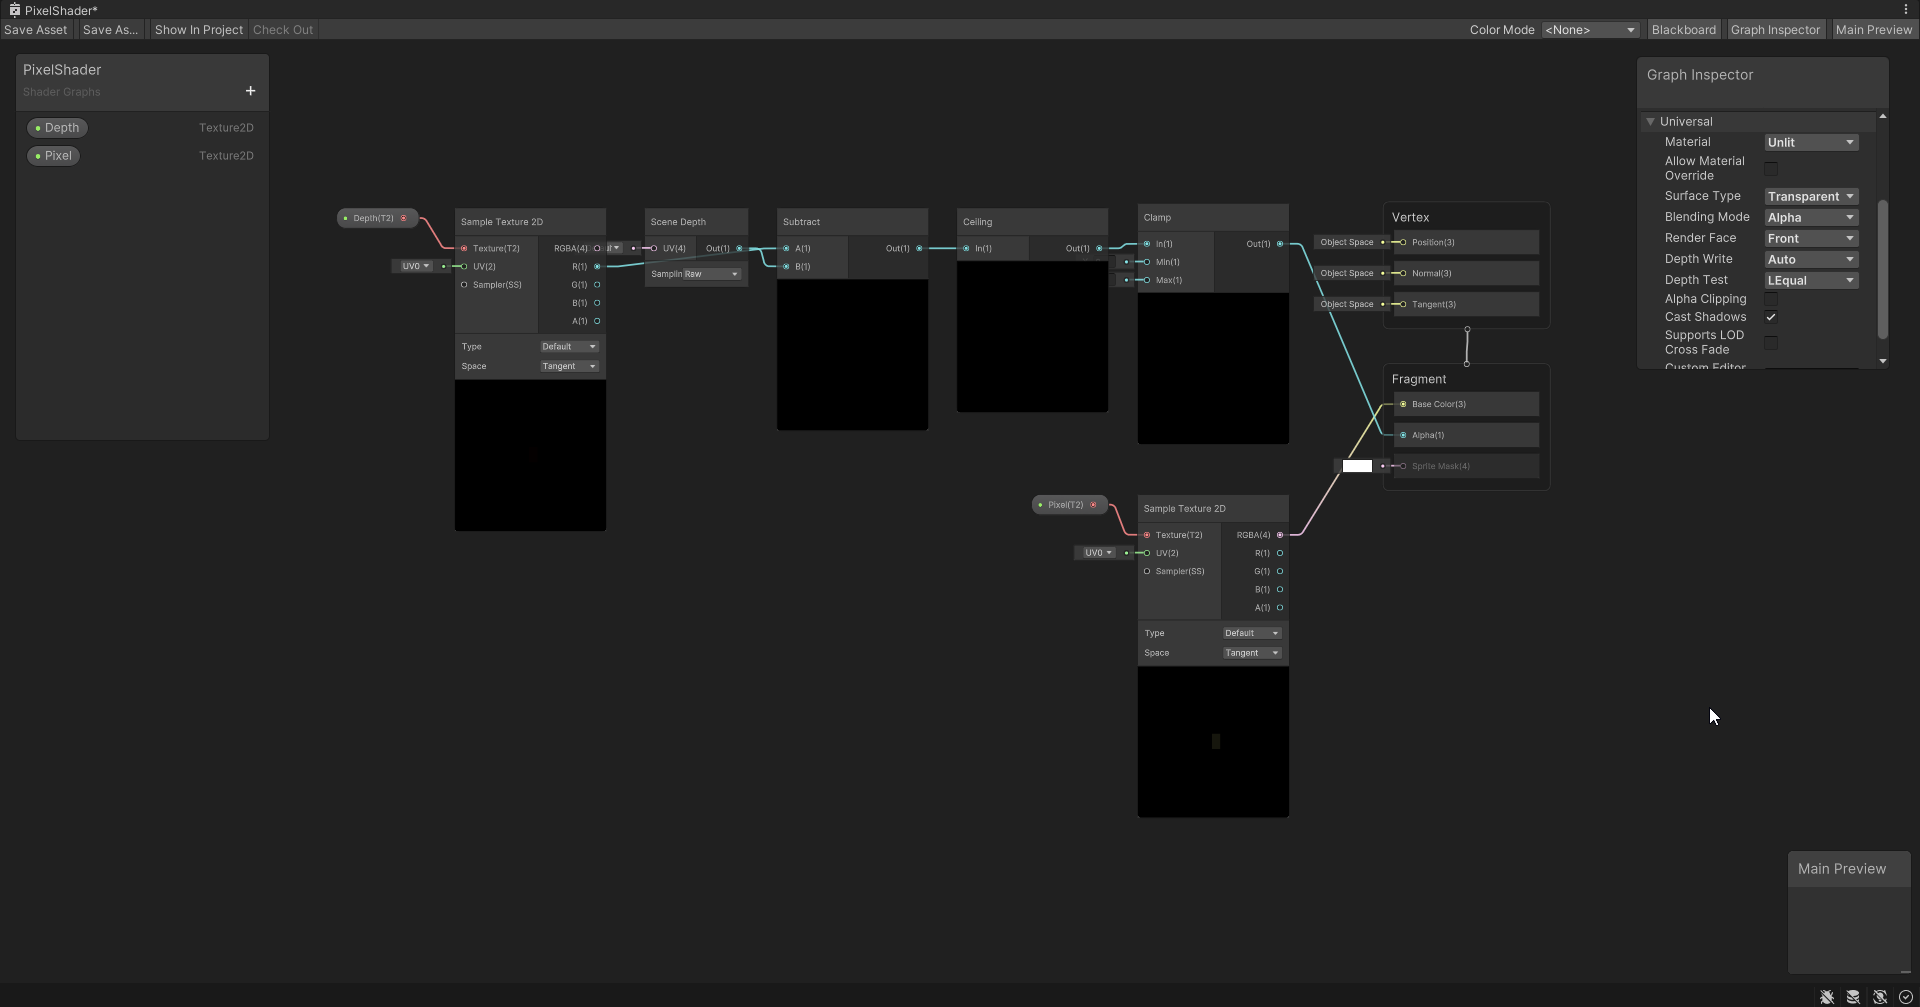
Haha, that is funny. I have eventually found the solution to my issue. I’ll leave screenshots for everyone who is also following this tutorial and is struggling.
I believe that surface type has to be set to “Transparent” for the shader to work.
The render texture for depth has to have color format set to “None”.
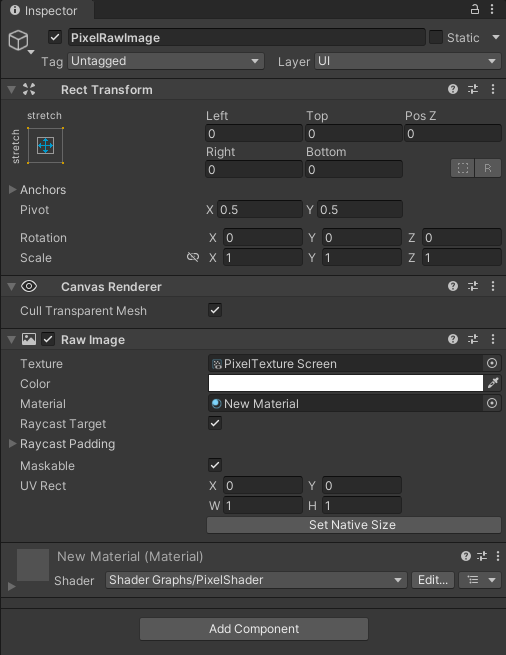
Those are the settings for the final render texture, which is displayed on the screen.
Canvas has to have render mode set to “Screen Space - Camera” and plane distance to the lowest possible number, I found out that “0.25” works pretty well.
The raw image attached to the canvas has to have texture set to the final render texture, and material set to a material that is linked to the shader.
I think that the guy in the video did a poor job at making a tutorial, because he didn’t show none of those steps in the video, and skipped a lot of how he was doing things. For example, he just says “do this and that” and then a bunch of new nodes appear on a screen, some of them are beyond the screen and are never shown.
It’s a really nice effect, I like it. And it’s simple, so my head doesn’t blow up. But I do wish, it had an ability to make it so that the count of pixels doesn’t get higher as you get closer to an object.
I think that using a separate camera for each object is absurd. May you share your solution with me?
To be fair, the video was based on an ongoing series so it might be that some of the vital information was contained in other previous video? Also, personally I think a tutorial functions better as such when it requires the observer to actually apply some critical thinking rather than just copy-pasting. But if you’re in a hurry and not really watching for the sake of learning then I can see how it would be quite frustrating. Anyway, his final follow-up came very close to my own solution but due to the way godot works it seems much more flexible and probably a good bit more performant (maybe? depends on what you are going for and what you are willing to sacrifice.)
It seems additional cameras probably aren’t super expensive in godot but in unity’s URP if you get above 8 to 12 you’re game is basically going to come screeching to a halt. Which is why my own solution makes a TON of sacrifices and has a whole huge mess of a management system to work around that fact. It’s a bit much to explain in this post so I’ll make another one shortly along with a link to the github repo.
So let me say right off the bat that if you don’t like interwoven sets of classes and systems then you’re not going to like my approach because it’s far from elegant or straight forward. In principle it’s actually pretty simple but the devil is always in the details and a lot of what I do is for the sake of performance since I wanted to be able to get thousands of characters onscreen at once.
The basic overview is that a series of cameras and render textures are created dynamically as demand requires. Each render texture is 2048x2048 (a good split between performance of rendering a single camera and many cameras plus that resolution for textures seems to be pretty universally supported these days). This texture is then split into logical tiles (by default they are 32x32 pixels) which can be allocated in square chunks to any given sprite. The bounding corners of these tiles are then are assigned to the UVs of a billboarded quad so that effectively that section of the render texture becomes a window representing that sprite. When more tiles are needed, new cameras and render textures are generated. When fewer are needed un-used cameras are disabled. Crucially, when sprites are deactivated I use a swap-back method to ensure that sprites are contained in as few render textures as possible to help reduce active camera count. I make heavy use of LoDs to disable these sprites as soon as possible.
The trick then is that I actually move the 3D model from its entity’s world position to a position relative to its assigned camera so that it is placed within the allocated tile space of that camera’s render target. This means that at the end of the frame during rendering I can effectively draw several characters to a single texture all for the cost of a single camera rendering. Much more cost effective than a separate camera for each entity.
The translation of the models from entity-space to camera space was originally via scripts but I got tired of having to manage parenting and de-parenting and ended up moving all of that logic to the shader. Note that this didn’t really help performance and was mostly just to make my life easier when looking at the scene hierarchy while debugging. Rotation is another issue but can be solved fairly easily by taking the relative angle between the entity and the main camera’s position and direction. In my case I also quantized it to 45 degree angles to give more of a sprite look. This has some caveats and depending on what you are willing to sacrifice you can have better or worse performance and have more or less features. For example, in my case I didn’t care about environmental lighting so moving the models around didn’t matter. The shader I wrote had a single light baked directly into it that used a form of toon shading to get the effect of hand-drawn sprites. If you want point and directional lights to work then you’re going to have to write a custom shader to handle that, or perhaps a render feature.
One last thing: I made HEAVY use of LoDs. The ‘Three Dee Sprites’ as I call them are only visible for a very short range. After that I actually swap out for a real 3D model that is using a special shader that simple flattens the perspective and quantizes the rotation. At a distance it looks very similar to the sprite and you can’t really tell that it’s rendering at a much higher resolution based on the actual screen (at least on 1080p you can’t tell).
Here’s the github link. It’s still very much a work in progress and I haven’t bothered with documentation or even cleaning up old files just yet. https://github.com/Slugronaut/ThreeDeeSprites
I’m also stuck on this tutorial with getting the depth to work. I tried changing to the settings to match what was mentioned in this thread but still no luck. I’ve checked my URP settings to make sure depth is enabled and a bunch of other things, been stuck on this for past two days very frustrating. If anyone knows a tutorial that achieves the same affect that explains things in a little more detail that would be hugely appreciated!