Flocking that avoids objects

I’m trying to create a VFX Graph effect that imitates flocking behavior but also avoids objects. Imagine a school of fish swimming in a river and moving around river rocks that are in their path.

I imagine this will require a SDF field for the rocks, but all the examples I find using SDF are using the mesh to attract the particles, I’d like the particles to be in a flow, but they move to avoid the SDF shapes. I have a single mesh that represents all of the rocks, and I can convert that to a SDF.

I also would love to use flocking behaviors as demonstrated in this post , and move the emitter around and through the rocks so that it appears as if the particles are going around the river rocks when the emitter is moved into the area of the rocks.

Can anyone point me to an example that is doing something similar? I know I could do this with a navmesh and agents, but I prefer the movement and increased particle count that i know I would get if this could be done using the VFX Graph.

Morning Sir.
If you want your particle to avoid an SDF (signed distance field) representation of a mesh, I can see two solutions.
The first one relies almost purely on built-on blocks.

  • Be sure to have SDF representation of the Mesh your particles to avoid.
    If you don’t have one, take a look at this tool provided by the VFXGraph team to bake an SDF.

  • Place your object and your VFX to the Scene.

  • Make sure to create an exposed transform property in your VFX.

  • Bind your Exposed property to your Mesh transform in the Scene.

  • Set your particle’s initial positions and velocities.

  • Now in VFXGraph, in the update Context, add a ‘Collision Shape’ / ‘Collide with SDF’ block (depending on your unity version).

  • Make sure to put your Collision Block after any block that is affecting velocity.*

  • Set the Distance field to your baked SDF and wire the exposed Transform to the “Field transform” port.
    9778287--1401906--upload_2024-4-18_10-24-43.png

  • Set the Bounce to 0.

  • Set the Friction to the desired value. 0 will make the particles slide along the SDF, while friction will make them slow down.

  • From here, the Radius Mode and Size of the particles can help you determine when to collide with the SDF.
    9778287--1401918--Unity_F2yFxPN3Tb_0046-0133_800x584.gif

Another approach would be to create a custom solution. Here’s an example.
All the steps until step 5 are the same. The idea is to use the cross-product between the “SDF normal” and the normalized velocity. This will give you a “flow” vector. With this and the distance to the SDF surface, you should be able to modulate the velocity so that it flows/avoids the SDF.
9778287--1401945--houdini_R3K3SBt61F.gif

For this, we will be using two cross-products between the particle velocity and the SDF normal. The formula could be the following:
Flow vector= CrossProduct(sdfNormal, CrossProduct(sdfNormal, Normalize(particles.velocity)))

Now we want to lerp between the particle velocity and this “Flow vector” that we can multiply by the length/magnitude of the particle’s current velocity. The lerp factor will be the distance to the SDF Surface.

Velocity= Lerp(particle.velocity, flowVector* length(particle.velocity), remapDistancetoSDF)

Here, I’ve applied this idea in VFXGraph:
9778287--1401948--upload_2024-4-18_11-26-1.png

The results of this solution are pretty similar to the first solution but might be a little bit cheaper to compute.
We’re missing a DotProduct between the current velocity and the closest surface Normal. This would allow modulating the influence of the FlowVector so that particles can escape the SDF more naturally.
You can change the “X” value of the Smoothstep to change the influence of your Flow Vector. And you can multiply the Length of the current Velocity to slow down or accelerate particles that are getting closer to the SDF Surface.

I hope this will help you with what you’re trying to achieve. I’m joining this post with a small package with a VFXGraph, a very simple scene with a Mesh, and a Baked SDF of this mesh.

Also, you can take a look at this nice Unity Let’s Dev episode that covers SDF in VFXGraph.

Have a fantastic day.

9778287–1401951–FlowSDF.unitypackage (553 KB)

Wow! I will have a fantastic day now, thanks so much! This is doing pretty much exactly what I was looking for, I had not found the Collision SDF! Also, thanks for both examples, it’s helpful to see the two approaches.

One question I have is how did you align the Mesh in the scent with the SDF? Also, I am getting this warning that the binding is not set up properly:

9779124--1402092--Screenshot 2024-04-18 at 11.59.45 AM.png

If I check the ‘Expose’ option in the graph, the error goes away but the effect no longer works. I believe it still might work, but the SDF is not located where the mesh is anymore, so it appears that the particles go through the hand. I tried to correct this in 17.0.3/6000.0.0b15 and VFX 16.0.5/2023.2.18f1

Can you explain how I might correct this in the collision SDF example so that the Mesh in the scene aligns with the SDF?

I found the Demo Team’s project on Github, and the SDF Texture script seems to help with visualizing what’s going on. I can generate a SDF and use that in the VFX graph, so I think I am on my way to getting this done.

The documentation is pretty sparse though, and I’m struggling to understand how the generated SDF relates to the mesh. Ideally, I’d like to just place a mesh in the scene, convert it to a SDF texture that matches the scene placement and the particles will go around it.

But, I can see that I need to adjust the scale in a non-uniform way and also offset the position to get the particles to look like they are going around the mesh. I also am a bit confused why some settings in the VFX graph are Local, while most are World.

What I don’t understand is why and how much to adjust the scale and position. Is this based on the meshes anchor point? And, I assume the resolution of the generated SDF texture? I think the resolution of the texture is probably what’s throwing off the scale, meaning if the texture shape is not a perfect cube, the resulting SDF shape is distorted. If I generate my own SDF and use the Visual Effects>SDF Bake Tool>Fit Cube to Mesh option, will that negate the need for scaling in the VFX Graph?

Morning.
I just wanted to let you know that I found an old post of mine that explains, in more detail, how to bake an SDF using the SDF Bake tool and also how to bind the properties.
You don’t need to use the external Tool from the GitHub repo for static baking, as VFXGraph provides a tool for this.

So take a look at this post and tell me If you still have questions:

Kill particle with custom form or object ?

The Tool bakes thanks to the object in the editor. This means that by default it will use the default Size and pivot position of your mesh at import. Sadly, the Baked SDF doesn’t store the information needed by the transform. So you need it to save them somewhere.
9780144--1402368--upload_2024-4-19_9-25-40.jpg

But the calculated bounding box or Size isn’t always squared or centered depending on your mesh as it’s trying to find the optimal box scale and center. This means that often, this SDF setting need to be added to your object scene transform.

Let’s take an example:

Here, I’ve baked this mesh of a human form. As any human, the Bounding box isn’t squared, and the pivot isn’t centered either, as we often put the pivot at feet level.
9780144--1402395--upload_2024-4-19_9-42-29.jpg

So by default, with the Mesh and VFX at world coordinate {0,0,0}, this means that our particle’s position won’t properly match. We need to adjust the SDF field transform by setting the Box Center and Box Size information.
By putting the correct Size and box center information it should now work more properly:
9780144--1402407--upload_2024-4-19_9-52-27.jpg

But what if the Mesh isn’t at {0,0,0} ?
In this case, we need to get the transform of the Mesh and apply this to our Initial SDF Bounding Box transform.

  • Create an exposed Transform property and set it to WorldSpace.

  • In your Scene, select the VFX and add a VFX property binder component.

  • In the Property Binding section, click the “+” button.

  • Navigate in the Transform section > Transform
    9780144--1402410--upload_2024-4-19_10-2-11.png

  • Select the transform property

  • Set the property and target.

  • Set the Space to World like your exposed property.

  • If everything is properly done, the square should be Green.
    9780144--1402413--upload_2024-4-19_10-4-8.png

With this properly setup, we can now our Mesh Scene transform to our initial Bounding Box SDF transform.

For this:

  • Drag and drop your Exposed transform property from the Blackboard to your graph.

  • Create a transform operator.

  • Set this operator with the SDF information (Bounding box center and Scale).

  • Create a Transform(Matrix) operator.

  • Wire the Exposed property transform in the Transform port of the Transform(Matrix) operator.

  • Wire the Transform operator in the Matrix port.

  • Finally, wire the Transform(Matrix) output to the SDF Field Transform port.

  • Make sure that every transformation is in WorldSpace.


    9780195--1402419--Unity_SYPjggErTM.gif

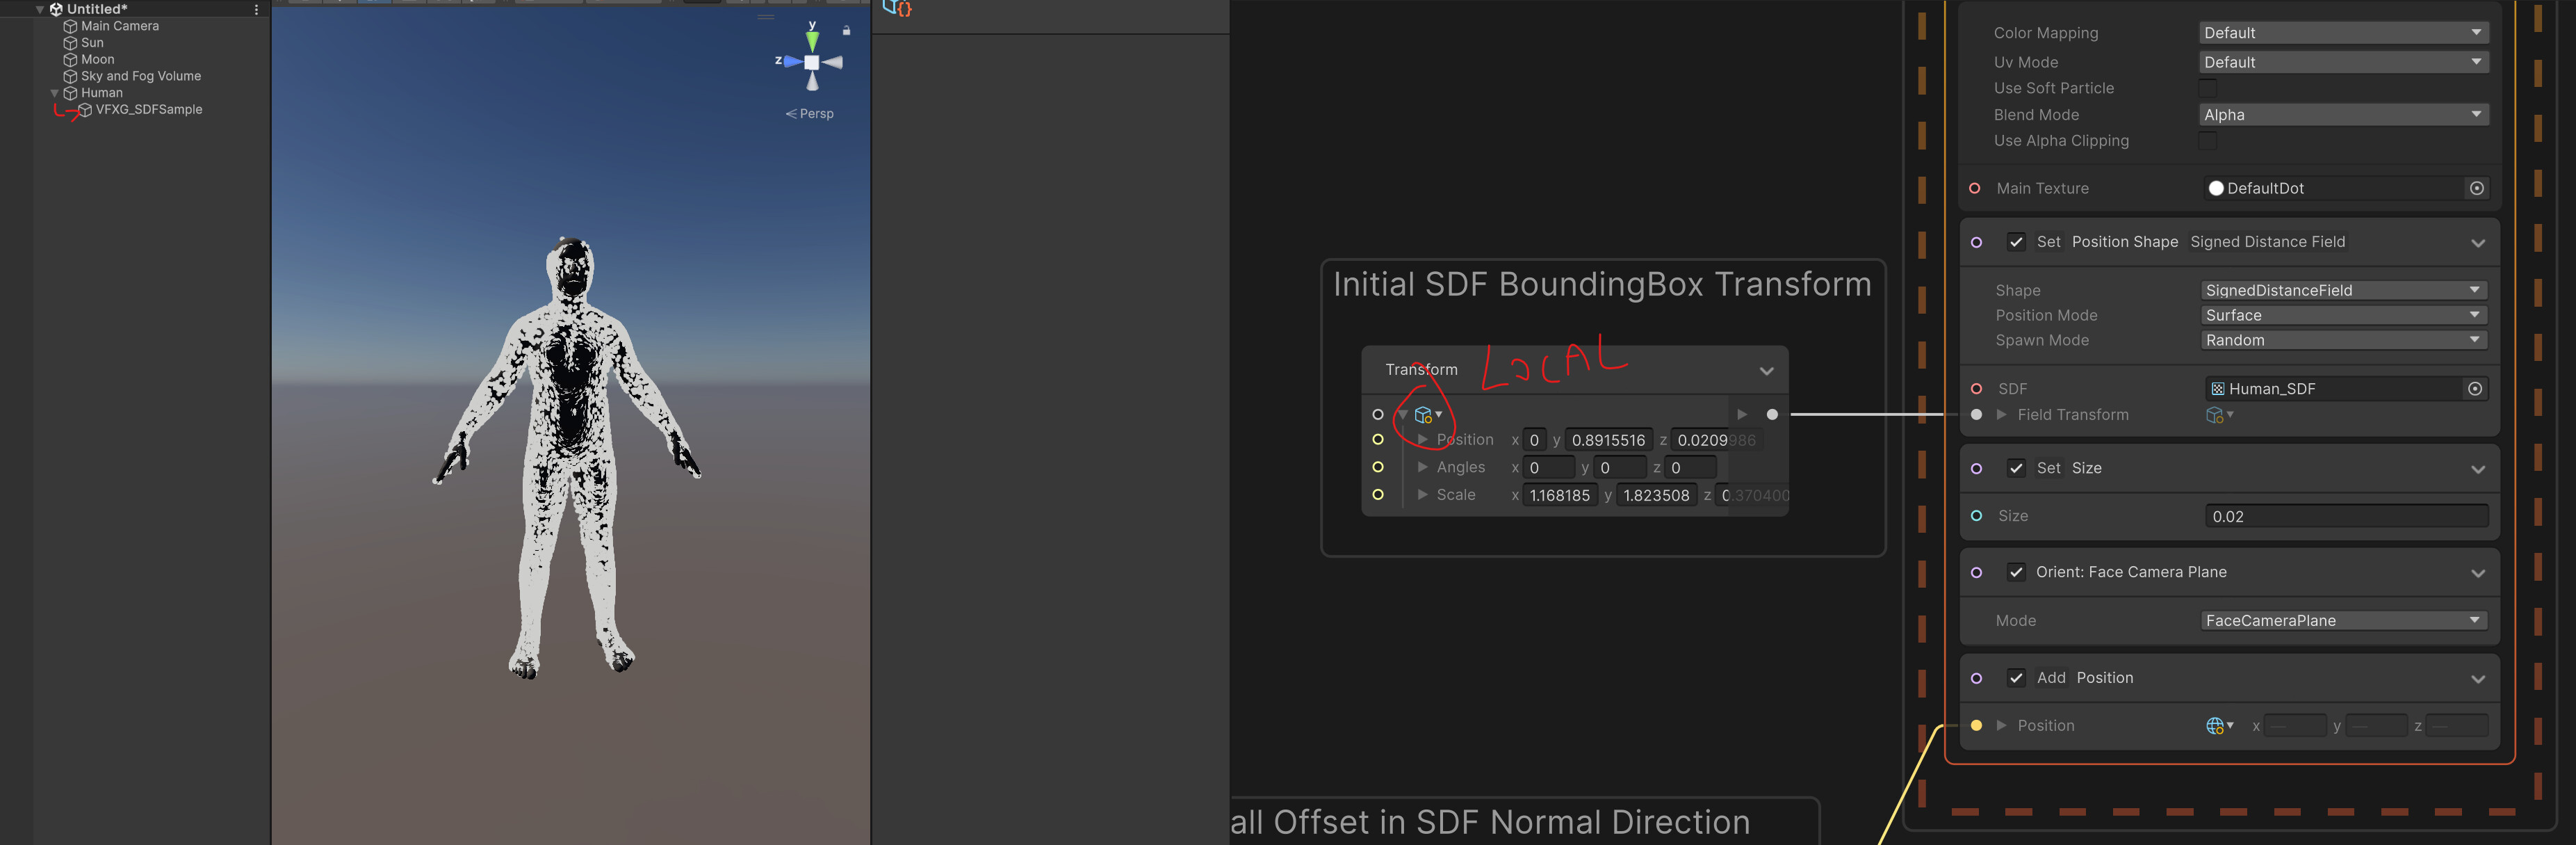
With this in place, the transform should match. Note that I’ve used a Position Shape (SDF) in the output (to Show you a live interaction), but the concept is the same as what we’ve previously discussed.

Now, there’s another method to make it work…
Sometimes, it makes sense for a VFX to be attached to a Mesh. In this case, the setup would be more simple. Indeed, no exposed transform is needed or the necessity to “apply” the Mesh Transform.
For this just use the SDF Bounding Box transform in Local Space and attach your VFX to your scene Mesh.

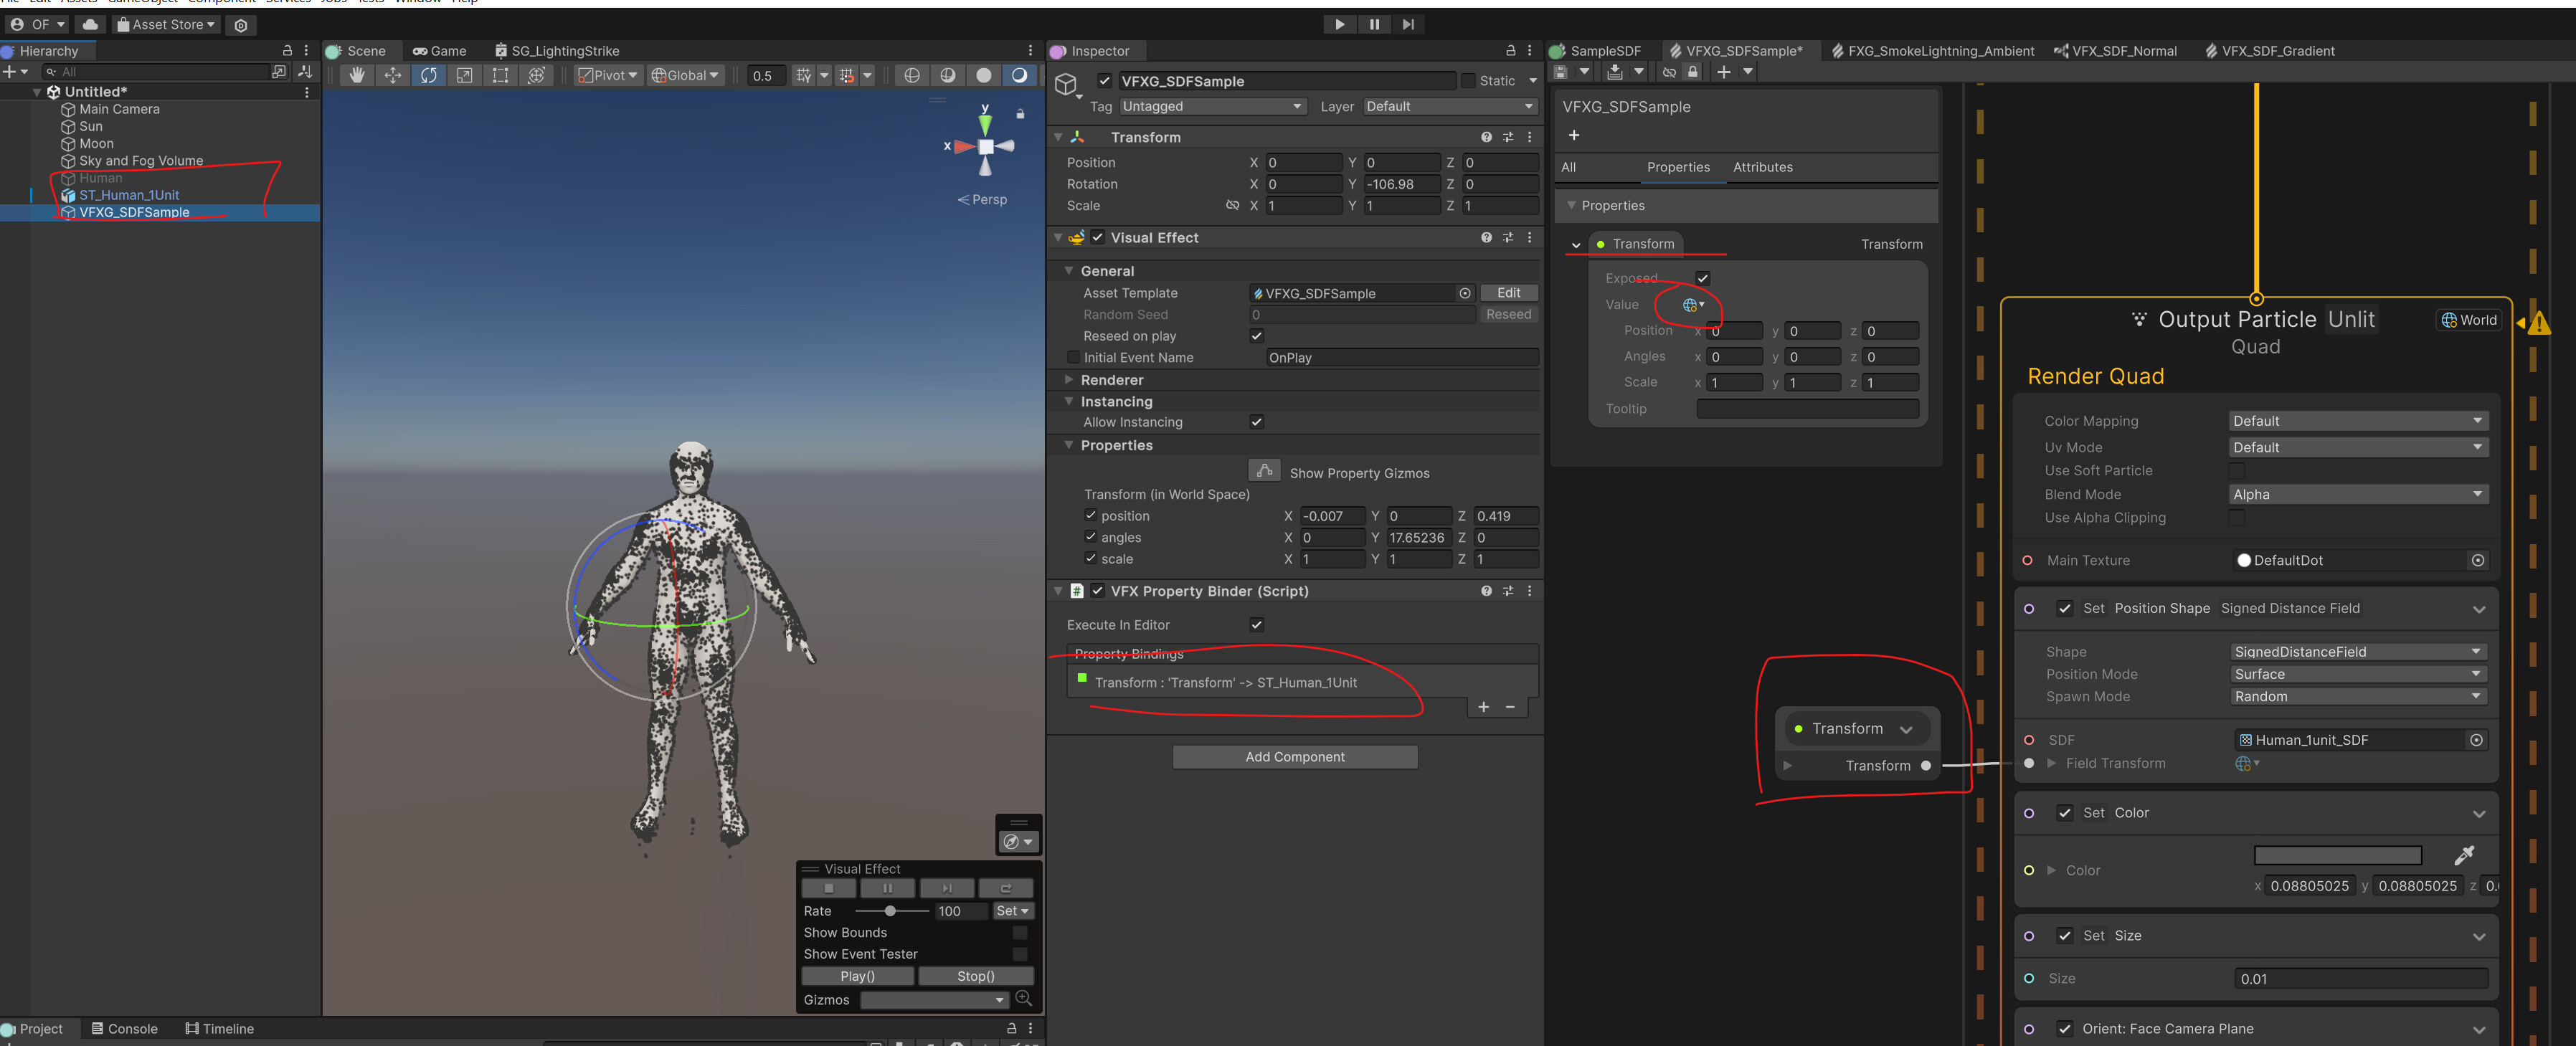
And finally, another solution that I sometimes use, is to make sure to center the Mesh in my DCC application and also scale it so that it’s 1 unit size (Fitting in a 1,1,1 Bouding Box). It’s not often possible to do this in production, as VFX artist tends to use meshes from other teams that cannot be edited this way. But let’s take a look.

I’ve reimported another Human mesh of 1 unit size and centered on (0,0,0).
By doing so, when I want to bake it with the SDF tool I can change the Box Center to (0,0,0), and Size to (1,1,1).
This also means, in this case, that a lot of space is wasted. as my mesh isn’t uniformly scaled at all. But this waste space could be okay for a “roundish” rock for example.

When your baked SDF is a perfect Box like this you can just take your Scene Mesh transform directly. This also means that you don’t need to memorize or store the information from the SDF bake tool.

I hope that this will bring some clarity and help you understand the delta between your Scene Mesh and Particles.
I do hope that in the future, I will try to revisit this workflow to simplify it a bit, especially the transform part.
Have a wonderful day and don’t be shy share your results :slight_smile:

This is super helpful, thank you! The Set Position on Shape is very helpful to check my results. It makes sense, and yes, it’s a shame the SDF Bake tool does not save the scale data. If that dialogue had a ‘copy position’ function like the Editor, it could be simple copy/paste into the shader graph.

I will post results when something looks good! I got everything to work as I planned on my model, but the scale and behavior is not looking quite what I want. I may use the Set Postion on the SDF and then ‘wipe away’ the particles to get a better look. My project is to projection map on a building and I wanted the particles to interact with the building’s architecture.