As you said it depends on the tonemapper and with ACES Tonemapper you will always get this result. It’s how it’s supposed to function so gotta do some manual work for a custom look. You will have to mess around with the Neutral or Custom tonemapper or even a LUT.
Believe me I have tried. The only options are to crank emissive intensity so high it breaks the engine’s colour representation, or crank bloom intensity so high it turns the image to mush.
Haven’t had the same experience as you. I only use ACES tonemapper so can’t really speak about the other methods but I can control how the emissive is.
Low Emissive

High Emissive

1 Like
Here’s the problem I see with new bloom:
(open images in tabs and alternate between them to see differences better)
Screenshots
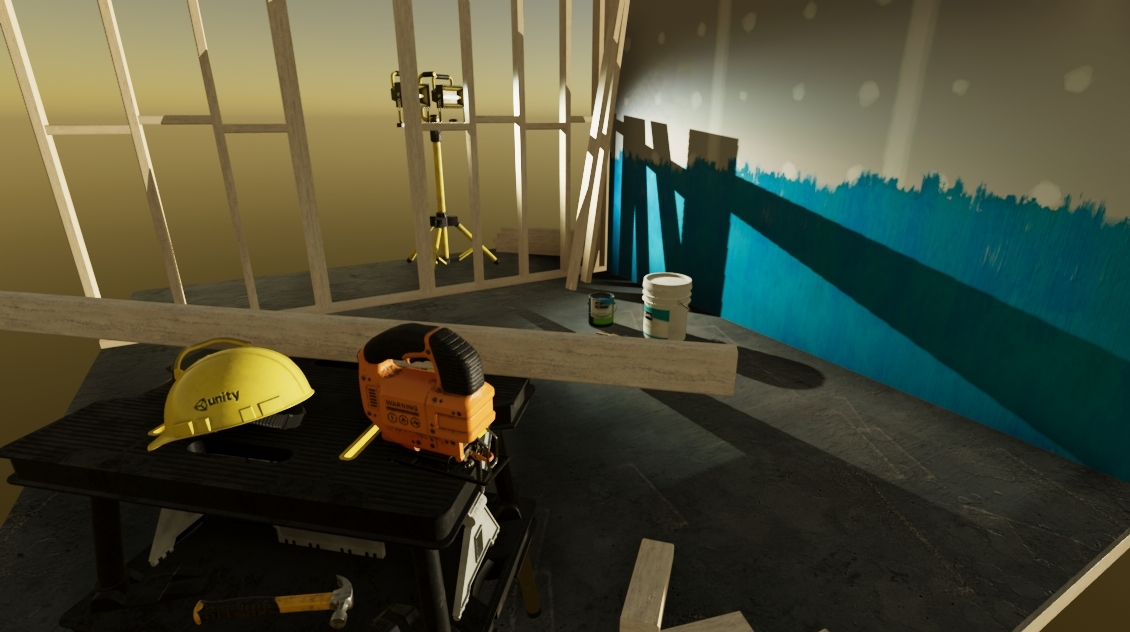
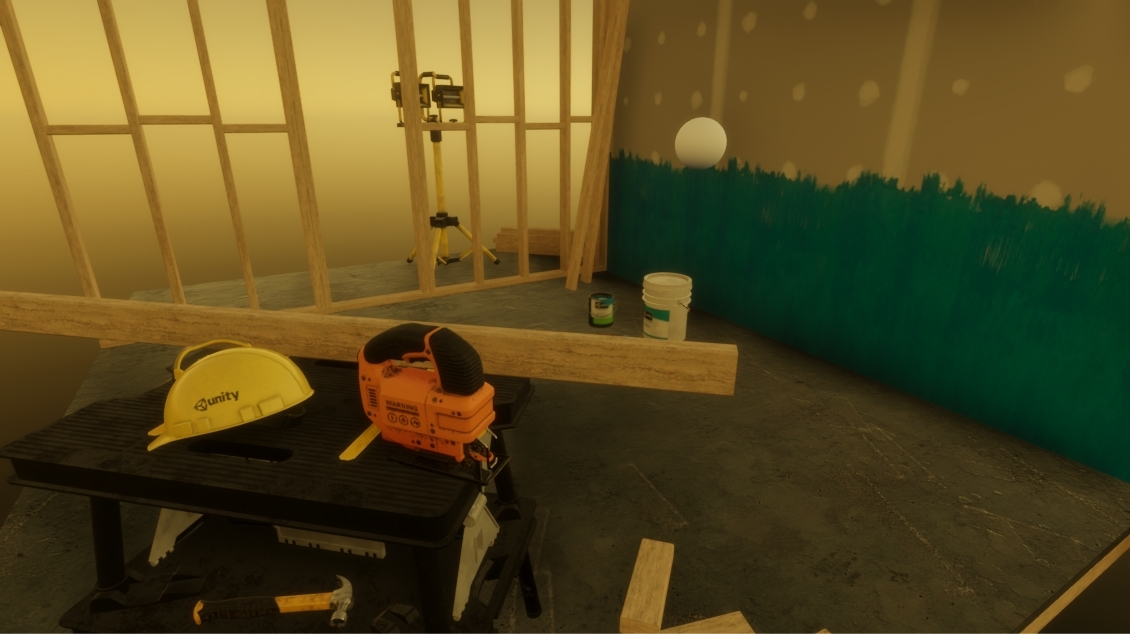
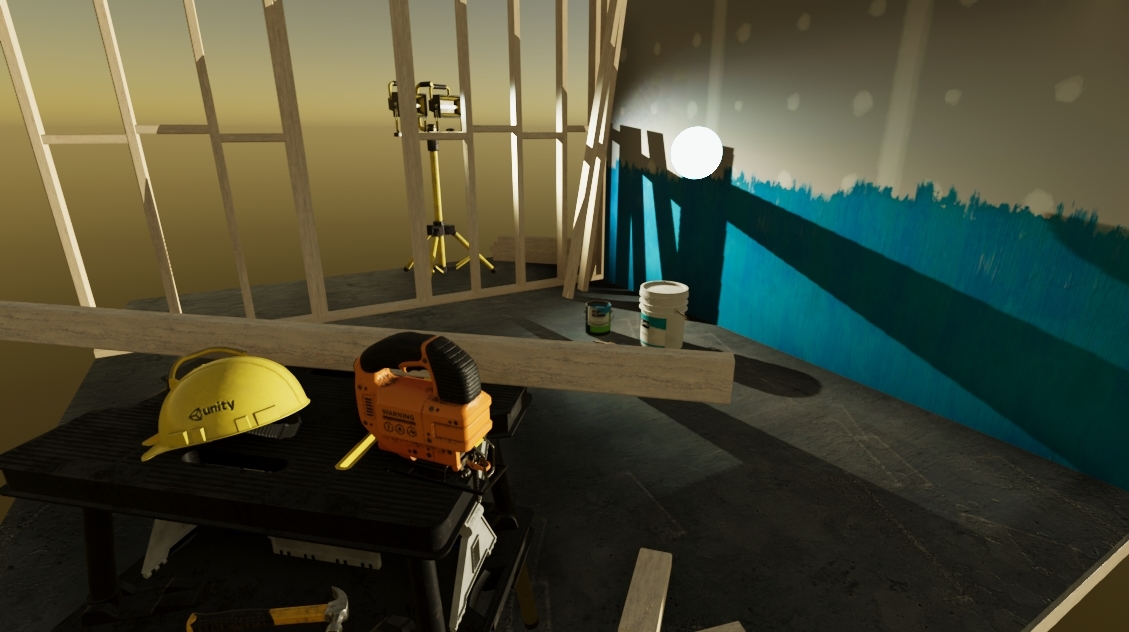
1- Bloom Disabled:
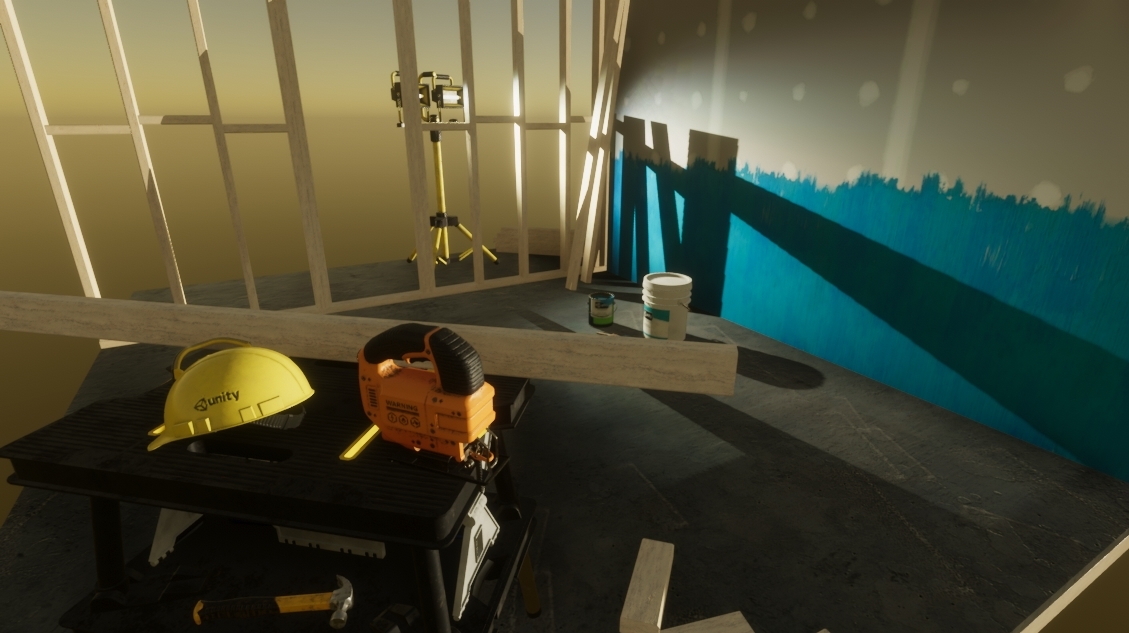
2- Bloom Enabled:
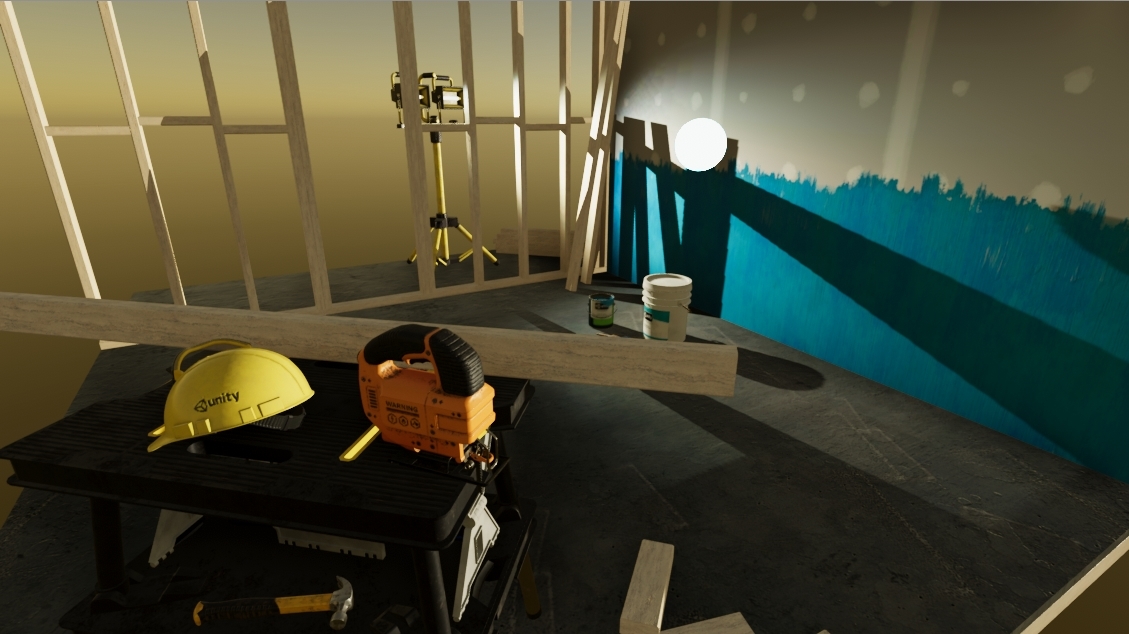
3- Bloom Disabled + emissive sphere:
4- Bloom Enabled + emissive sphere:
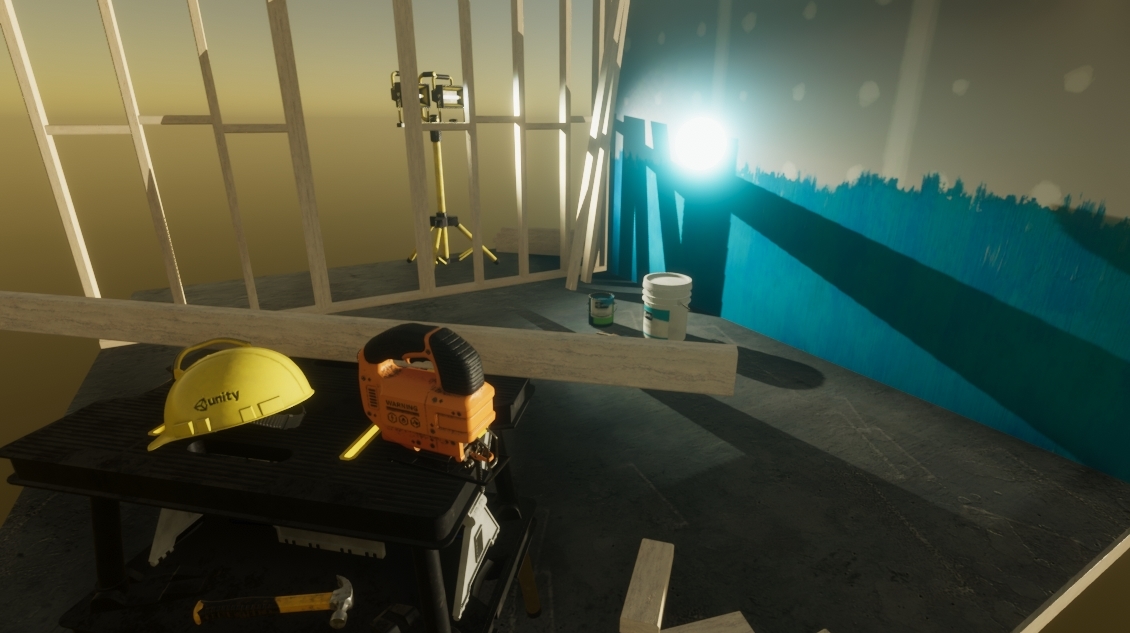
Look closely at the yellow hat and orange saw. In image 1 and 3 they look sharp, and in image 2 and 4 they look blurry (because bloom is activated, with intensity of 0.2).
What I’d really want here as a final result is my glowy sphere to look like in image 4, but the hat & saw to look like in image 1 and 3. And without the presence of the glowy sphere, image 2 should look almost exactly like image 1 even with bloom enabled (without blurriness). This was possible to achieve in PostFXv2. I think all that’s missing is a threshold value to filter out blurriness in low-light-intensity areas
I just did a little sanity check and observed bright colorful objects in direct contact with sunlight in real life, and there is no blurriness whatsoever surrounding them. So I wouldn’t say the current bloom is “physically accurate”
I’d say that’s pretty thoroughly blown out to white (the sphere on the left is #f3f7f8, on the right #f9f8f2. Just a few percentage points off full white.)
PhilSA you need stronger intensity of the sky and other lights. Everything is physical now, remember?
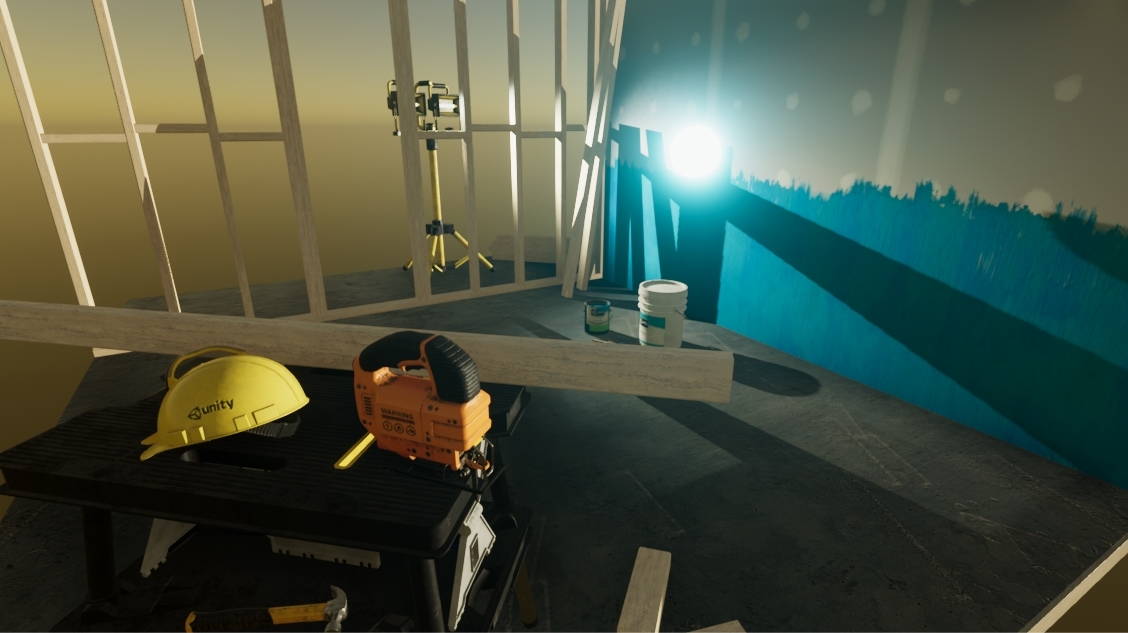
Here is the same scene, but with DirectionalLight intensity of 1000 lux (as opposed to 10 before). The sun is now so bright that you can’t even see the glowy sphere’s emission anymore:
Screenshots
Bloom disabled:

Bloom enabled:
But still, the blurriness persists on the hat and saw. I haven’t found any way to make them not blurry
Yea this is what ACES tone mapper is supposed to do. In the images I posted the scene isn’t properly exposed so the exposure has to be higher to make it look fairly lit and because of that anything that’s already somewhat bright or fairly lit will get brighter and starts becoming closer to white
@PhilSA try Bloom intensity 0.1 and scattering 0.4. This works acceptably for me (altho like mentioned, I don’t like how it works). You can always boost the emission value to make it glow on the lower intensity. Of course if you need to bake lights, high emission value may ruin the other lighting, on dynamic lighting this will not be an issue.
1 Like
So you don’t have a solution to the problem which I described and which you were ostentibly trying to solve.
@PhilSA yea the new bloom blurs the whole screen at anything above 0.1. Not sure if this will change much going forward or someone else will have to implement a bloom for a more stylized look once the PPV3 API supports custom effects.
I didn’t try to solve your issue, I just mentioned that you can use one of the other tonemapping options other than ACES to get your desired look as that one functions as it should.
You also mentioned that
Which No one else mentions this so could be a bug on your end if anything or maybe you use the wrong settings so I mentioned that that’s not the case on my end as well as supplied images to show that.
This might be true in theory, but it doesn’t seem true in practice. Unless you have experience otherwise?
The objects in the images were all blown out to white – the exact issue I was trying to work around. If you can help that would be great, but restating the problem as the solution isn’t helping.[/quote]
[/QUOTE]
@hatless To get away from the ACES look you will have to use another tonemapping method other than ACES. In HDRP you have Neutral and Custom methods to play with as well as LUT/Lookup Table. Other than that there’s nothing else right now.


ACES tonemapper will always function as it does because that’s what it’s made to do. You will always get emissive lights going to white the brighter they are, only the surrounding glow/bloom will be the actual color. This is what the Video explained above.
You will not believe how much I don’t need this explained to me.
huh… you’re right! This is with 0.05 intensity and 0.8 scatter. Looks exactly the way I want
Screenshots
No bloom:
Bloom:
Yeah don’t mind me explaining it much earlier 3 times ![]()
In any case, @hatless Keep the intensity super low and look at hdrp lit material emission options. The control was added there for precisely these reasons of artistic control (VFX and more).
Just in case you haven’t already figured it out in the meantime, there’s this setting here:

“Exposure Weight” is what I’m talking about. (I know that emission intensity is what is selected in the screenshot, should have been exposure weight, sorry about that :p)
Setting exposure weight to 0 makes it so the sphere always has the same “perceived” brightness.
So no matter how bright or dark it is, the sphere will have the same amount of glow around it.
Which is obviously completely unrealistic, but awesome for effects in games. Like the magic particles of my spells should always have the same “perceptual brightness” of course.