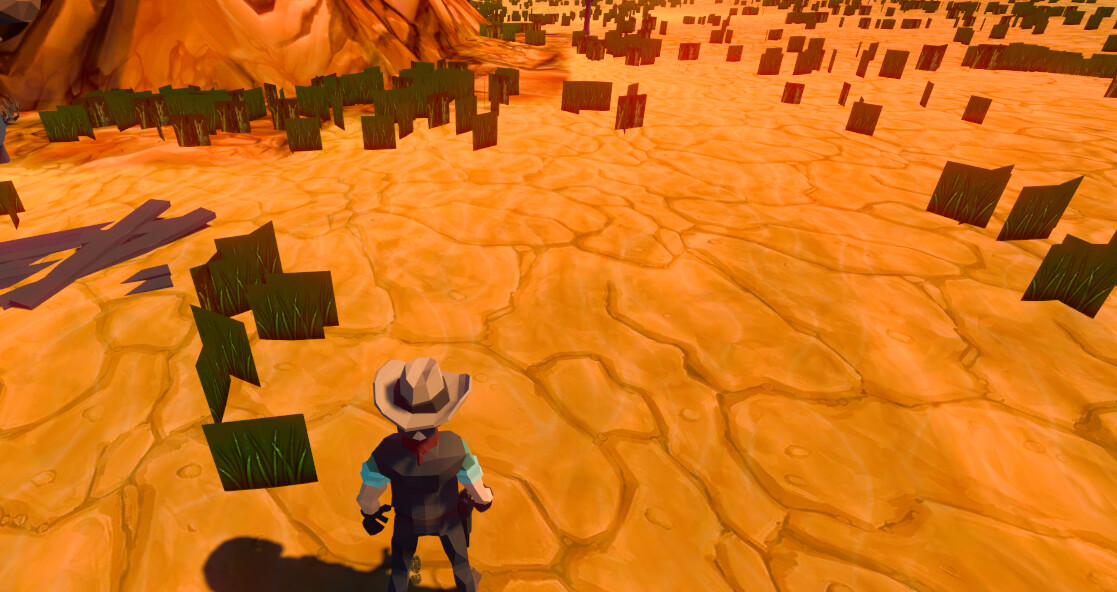
I didn’t even bother trying to fix errors because it said 500+ (buried in TONS of other cautions). Sorry I can’t provide feedback specific to your extension in this regard.
Like I mentioned already though, what happened to your one was similar to others. PlayMaker was also missing from the Window section of the editor. For both, I tried deleting the folders to re-import and etc, but it was stuck un-compiled/loaded wrong.
The easier option for me is to just rebuild / file explorer copy in stuff, since my project is only about 2 weeks old anyway.
Ok. I suspect Playmaker/Landscape Builder were just victims of the other upgrade errors. In our experience, deleting and re-importing LB is rarely going to fix anything.
I have checked the profile settings and deleted all other options other than ‘Ultra’ to ensure it’s not just the build running in super low detail or anything like that.
I don’t know where to turn to at the moment, but figured maybe Landscape Builder may be part of the issue because that’s what the grass is being placed by? Is this a shader issue maybe? Does Landscape Builder try to use non-standard shader for grass? I looked at my always load list shader list and it’s like this:
Am I missing the grass shader from this list??
Does anyone have any idea how I can try to get to the bottom of this?
I’m using Unity 2019.1.
I’m also using CTS, but as far as I’m aware that should only affect the textures on the landscape itself and not the grass, as it doesn’t even have a setting for grass (unlike the landscape textures, where you specify images and details for).
We’ve not seen this before but I’ll check it out later today. Are you using texture terrain Grass (Detail) or mesh Grass? What do you grass settings look like in Landscape Builder?
It’s set to texture grass. Also the camera is Deferred.
When I can later, I will check the grass settings. Do you mean the placement tab though? Or the terrain settings or something? I think I left the terrain type settings (the place where billboard start distances and etc are set) all default, and without looking I can’t think of how the placement settings would male a difference since it’s just where it goes, not how it’s drawn (other than texture or mesh, and yeah it’s set to texture).
I’ll get more screenshots or details later today when I can get back into the project.
Yes, the LB Texturing tab. I agree that I can’t see how any setting in that tab could be the cause. It is just using the in-build Unity terrain detail features and Unity is actually rendering the grass on the terrain. For a test, you could manually update some grass on a terrain using the Unity tools (in the same scene). You can update / overwrite your manual changes by just re-applying the grass in the LB editor.
How can I save my created procedural clearing groups so they can be used in another scene?
I would like to create them in a small scene to I can see them, before putting them into my large terrain scene.
Also, is there a way to set the height of where they will populate?
I have a group of islands and would like them to only populate out of the water and at not too close to the shore. Can that be done procedurally? with 16 terrains, it is a large job to do it manually.
How to Copy Groups to Another Scene/Landscape/Project
WARNING: This will overwrite any Groups settings in the destination landscape.
Verify that you have LB 2.1.2 or newer installed
On the Landscape tab, go to Templates
Enter an appropriate template name. You might want to add a version number to it.
If copying to another project, tick “Export Package”
If copying to another project, a package will be created which you (or another team member) can import into the destination Unity project
In the destination Project scene, on the Landscape tab, under Templates, drag the template from the Project pane (LandscapeBuilder\Templates) into the “Template to Apply” slot.
Turn off ALL import options ** THIS IS IMPORTANT **
For both procedural and uniform Groups, you can limit where the group members are placed by setting the Min/Max Height settings on the Default tab of each Group
You could then refine/override the Group Defaults per member of the Group.
Thanks so much!
I was staring right at it and must have gone cross eyed.
I knew it could be done, I just couldn’t remember how.
I appreciate the instructions too.
I wanted the locations to be random so I didn’t even know where to look. So then I could run a demo.
Diving deeper into LB and loving it!
Glad you made a manual, by the way, I printed it and it is a reference while I do my designs!
Videos are great to get up and running but a real manual allows me to keep running.
Have been using LB for some time and is working great. have been running into issues with texturing though. See attached picture of what is happening. I already found out it is not a LB problem, as it still happens on a plain terrain in an empty project without LB imported.
I hoped someone here knows the answer as I’ve gone through the manuals again and played with all the resolutions etc but no joy. No answer on the other Unity forums. Any help would be appreciated. (This is unity 2018.2.0f2).
Note: It has something to do with stretching of the UVs it seems, but using triplanar shaders did not fix the issue
What happens when you increase tiling? Also, have you tried having 2 textures with different tiling and strength so that they blend together? You could also consider using noise when texturing the landscape (in LB) to hide or mask your problem.
Hi,
2questions
I’m thinking of reshapping a bit my 4maps terrain. Its mainly flat base with mountains
1-In order to get some “plateau” effect, what would you advise as preset?
2-I can’t get the navmesh bake from terrain stencil to work. I use microsplat and i don’t see the results when i paint on the terrain with the stencil. Can this be due to terrain shader?
thanks in advance
Then to modify, you can change the “usual” stuff like Noise Tile Size (to be similar to the landscape size), Height Scale and Additive Amount
If you want to get creative, expand “Curve Modifiers and Filters”, and try changing the Output Curve Modifier Preset to Steep Double Terraced, Sharp Double Terraced, 5/10/20 Tiered Terraced, Canyon Terracing 1/2/3 etc.
Adjust Noise Offset X/Z to move the formations across the landscape
For the navmesh, is the problem with the Stencil painter or the navmesh creation (or both)?
Above is a topdown view in the stencil painter using the standard Unity terrain shader. The white area is the stencil layer I’ve painted. The small dot is the paint brush when “Paint” is enabled in the Stencil editor.
With MicroSplat as your terrain shader, what happens when you change the Colour of the Stancil Layer?
Actually both. I see the dot but doesn’t paint anything, with “paint” enabled so color doesn’t update…i will try to reimport…Just thinking that the terrain shader might hide the painting but no navmesh gets baked, so…
I just tried it with LB 2.1.2 (release version), U2018.3.1f1, and MicroSplat 2.2 (could be a little old now). Seemed to work fine for me.
Which version are you using?
Also, take a look at my scene Hierarchy. You should see some thing similar. Make sure you “save” the painted region by turning off “Paint” before clicking “Add Mesh”.
If the brush isn’t working, check for any errors, warnings or info entries in the Unity Console. You could also create a really simple project, create basic landscape, add a stencil and make sure you can paint on it ok (without importing MicroSplat).
using 2018.2.13f1 but still on LB 2.1.0 on my pc…maybe 1st thing to update!
It works in another project (on my other pc…) but without microsplat. so i thought… Now i know it’s not the issue i will repeat steps. This feature is key in my project can’t wait to play with it…