Understanding sRGB and gamma corrected values in the render pipeline

I’m trying to get a firm understanding of working in linear color space - not just the theory and definitions, but the underlying values as they go from an sRGB or linear texture in memory, through shaders and the frame buffer, to the screen and final pixel intensities that enter our eyes.

Here are some resources I’ve found while researching:

Example #1
Let’s begin with a simple test, to determine if my understanding is correct:


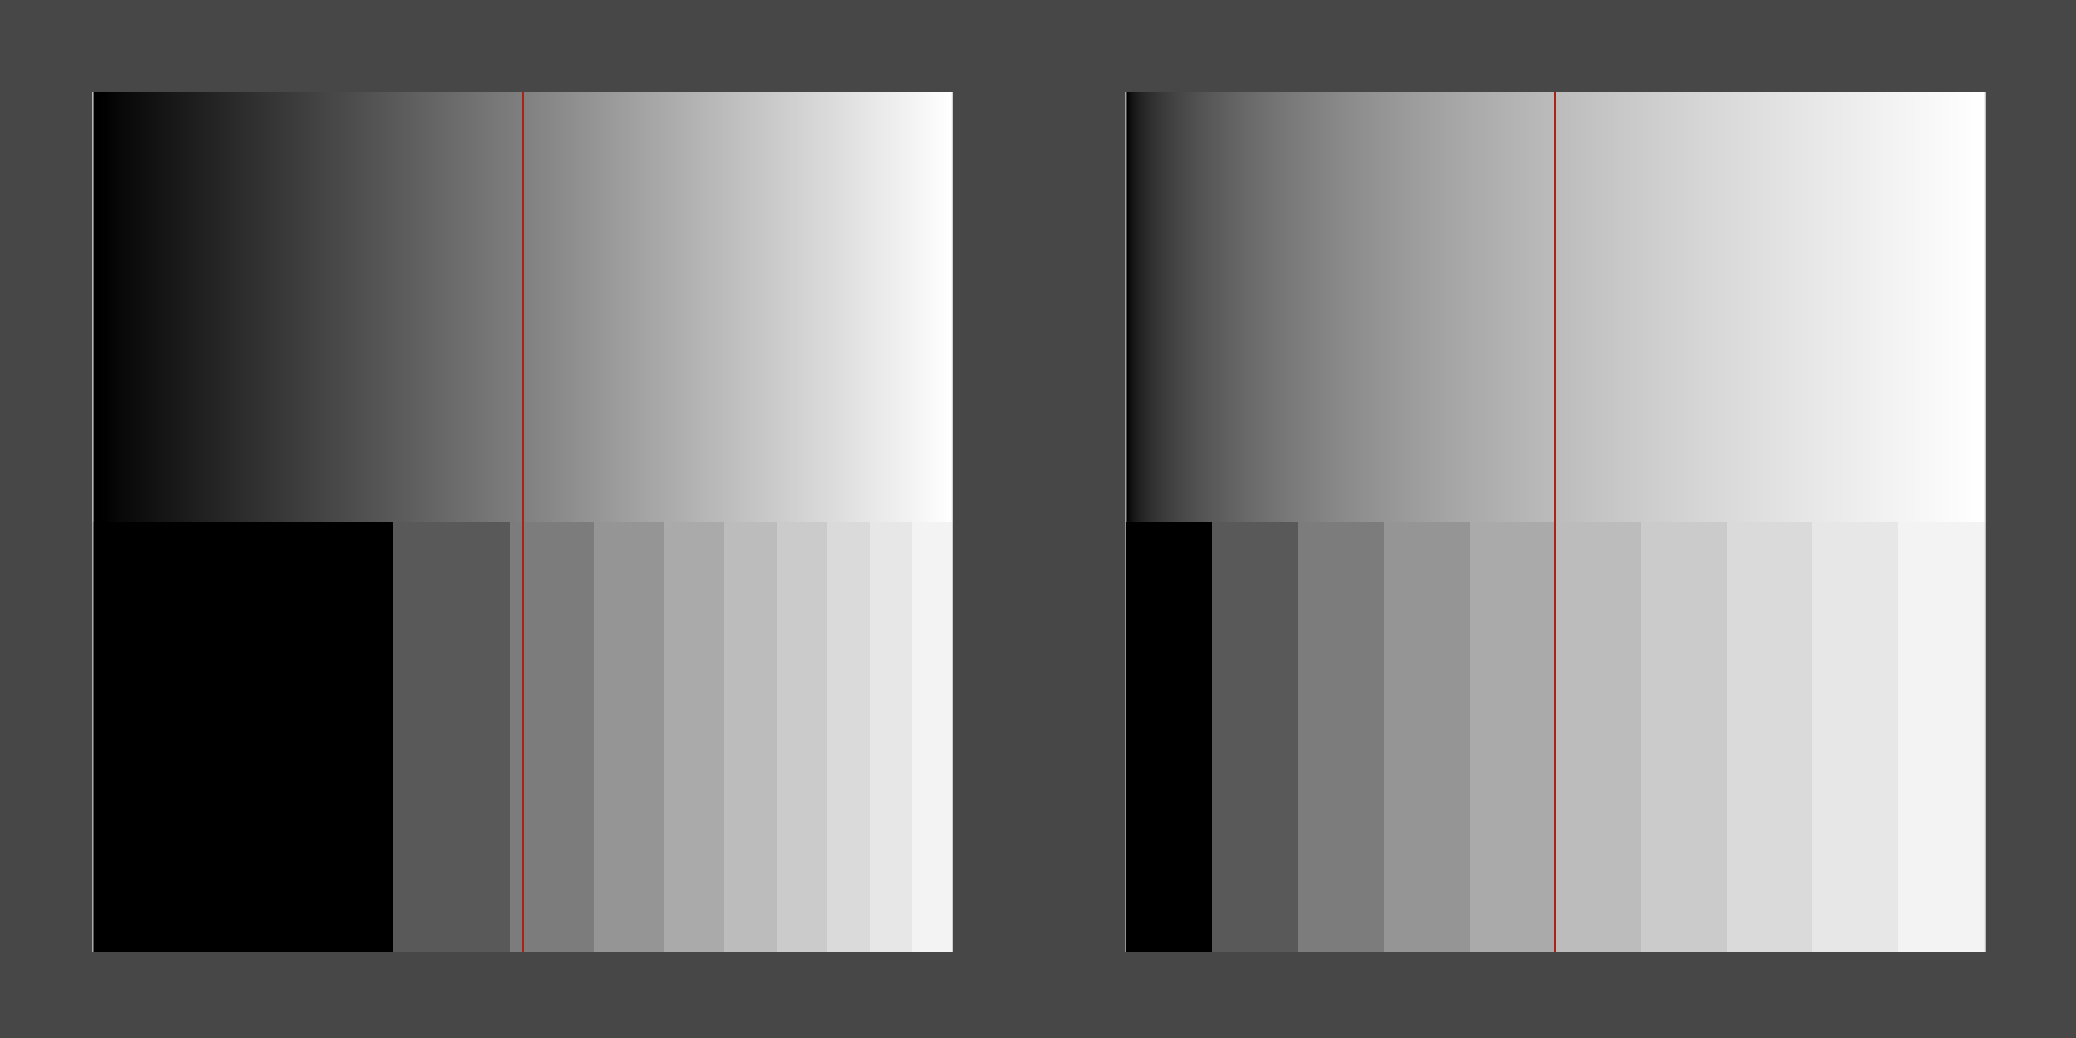
A gradient texture rendered with a custom shader under Gamma (top) and Linear(bottom) color spaces, and imported as an sRGB (left) and linear (right) texture.

Above is a gradient texture drawn with a custom shader under various settings. The shader truncates the color value to one decimal place (i.e. 0.1, 0.2, 0.3…) in the bottom half, and draws a red line to mark the center of the texture.

The texture was generated by script, is 256x256 pixels, and simply contains a linear gradient (i.e. the RGB values increase left-to-right from 0-255), exported to the project’s assets folder via EncodeToPNG(). Since the original asset is now a PNG, it has sRGB gamma correction built-in, correct? What does that mean exactly for the stored color values, do they still increase linearly from 0-255? Does it make sense to tell Unity this is a linear texture (i.e. uncheck “sRGB (Color Texture)”) or is an sRGB texture whether I like it or not by virtue of being stored in PNG format?

I’m also unsure of the actual visual result expected in the above test - I understand the idea that our eyes perceive light non-linearly (ex. a light that appears half as bright as another is actually only about 22% as intense), but does that mean the above example of a linear texture in linear space (bottom-right) is accurately increasing in pixel intensity linearly (i.e. the middle is half as intense as the right) or am I overestimating the effect, and that gradient has simply been gamma-corrected twice, making it too bright?

Example #2
While following the Catlike Coding tutorial linked at the top, I ran into another source of confusion; a marble texture is multiplied by a grayscale “details” texture, which brightens/darkens the marble when viewed up close. After switching the project to linear color space, the marble goes dark - the details texture is still set to sRGB, and so the “middle gray” that was previously sampled as 0.5 in the shader, is now sampled as about 0.22 - if I understand correctly, this is because the “middle gray” in the texture is only “middle” as perceived by our eyes, but in fact about 22% as intense as white in the linear color space, so when Unity samples the texture and finds 127, the sampler believes this is a gamma-corrected value and converts it to a linear light intensity, correct?

My main point of confusion here was in finding that the solution is not simply to uncheck “sRGB (Color Texture)” and allow Unity to import the details texture as linear, but instead to modify the calculation in the shader - why do these yield different results?


Incorrect fix: disable sRGB sampling


Correct fix: modify shader math

I expected these results to be the same - that is, I expected that simply disabling sRGB sampling would result in Unity importing the texture in the linear color space, such that when it is sampled by the shader and finds the value 127, it now understands this is already linear and gives the value 0.5 - but instead, while the overall brightness appears to be correct, the effect is somewhat muted/blurred.

The correct solution, as shown in the tutorial, is to keep the texture as sRGB and modify the shader instead, i.e. the “middle gray” values are read in as ~0.22 but then multiplied by unity_ColorSpaceDouble instead of simply 2 to cancel out the gamma-correction. That makes sense to me, but why is that different than removing the gamma-correction during importing instead of in the shader?

I’ll leave it at that for now, if anyone can provide clarity/insight/corrections, it will be greatly appreciated!

1 Like

That last link you posted goes pretty deep into all of this. You might try reading through that a few times to get your head around it.

But lets start with a single texture and shader.

In Gamma color space rendering, the sRGB setting doesn’t do anything. A color channel value of 127/255 is ~0.5 (actually 0.498 and change), and a shader output of 0.5 will end up on screen as a value of 127/255, and that appears half as bright as 255/255. There are no (obvious) conversions between color spaces, so everything just “makes sense”.

In Linear color space rendering, the sRGB setting does something. If the texture is set to linear (sRGB is disabled), then 127/255 is ~0.5 in the shader as before in gamma color space. If the texture is using sRGB, then 127/255 is ~0.21223 as the sRGB to linear conversion is applied when the texture is sampled in the shader. If you output 0.5 from the shader, then the on screen color is 188/255. If you output 0.213 from the shader, then 127/255 is the on screen color. This is because there are color conversions happening when you sample an sRGB texture, and color conversions happening when displaying on screen (or when writing to the render texture).

Part of the issue you’re having is understanding the color conversion itself and what it means to move between the two color spaces. It’s not as simple as multiplying one value by another.

A common approximations of using a power of 2.2 or 2.3, or even just 2.0, might help you understand a bit more. Lets pretend the conversions from gamma to linear and linear to gamma are pow(x, 2) and sqrt(x).

Now let’s imagine you have a texture with a 64/255 “0.25” grey set to “sRGB” and you want to add 0.25 to it to make a middle grey. And remember, the values below are not actually using the real sRGB conversions for simplicity, so the values are not what you’ll see in a real shader.

Gamma space looks something like this:

float tex = tex2D(_Tex, uv).r; // roughly 0.25
float value = 0.25;
return tex + value; // gamma 0.5

texture 0.25 + shader 0.25 = gamma render buffer 0.5 = perceived 0.5
Nice and simple.

For linear space that looks like:

float tex = tex2D(_Tex, uv).r; // roughly linear 0.0625
float value = 0.25;
return tex + value; // linear 0.3125, gamma 0.559

(gamma texture 0.25 → linear 0.0625) + shader 0.25 = linear render buffer 0.3125 = gamma & perceived 0.559
The texture is being converted from gamma space 0.25 to linear space 0.0625 when it’s sampled, but we’re adding 0.25 in linear space to it, meaning the output stored in the buffer is 0.3125. But how do we get to a perceived 0.559? Well, the linear buffer needs to convert back to gamma space for display. The square root of 0.3125 is 0.559, so it’s too bright.

The obvious solution would be transform the shader value of from the linear 0.25 to gamma space 0.0625 before adding it, but that’s still wrong. Now that looks like:

float tex = tex2D(_Tex, uv).r; // roughly linear 0.0625
float value = 0.0625; // pow(0.25, 2.0)
return tex + value; // linear 0.125, gamma 0.354

(gamma texture 0.25 → linear 0.0625) + shader 0.0625 = linear buffer 0.125 = perceived 0.354
which is way too dark!

The correct solution is:

float tex = tex2D(_Tex, uv).r; // roughly linear 0.0625
tex = sqrt(tex); // linear to gamma conversion, 0.25
float value = 0.25; // keep in gamma space
float col = tex + value; // 0.5 in gamma space
col = pow(col, 2.0); // convert to linear, 0.25
return col; // linear 0.25, gamma 0.5

We’re adding the texture and value in gamma space, then converting back to linear space for output. You can skip the sqrt bit by having the texture disable “sRGB”, thus the value you sample is already the “gamma space” 0.25.

So, let’s go back to your overlay marble texture example. It should be noted that the solution you used is still wrong, just less so than it was before. The cheap overlay approximation used in shaders is the so called “2x mult” one; multiply a base texture by 2x the overlay texture. In gamma space this means an overlay of 0.5 leaves the texture alone, and anything above that over brightens the base texture. As you noted in linear space this doesn’t work since the overlay texture’s 0.5 is now 0.212 in the texture, so multiplying by 2 doesn’t get it to the needed value of 1.0 to keep the base texture looking unchanged. The result is a muted, darker overlay. What you’re missing is the brightest areas are also too dark still. Even though 1.0 is 1.0 in both linear and gamma, 2.0 in gamma is really 5.278 in linear! This means while using a linear space texture corrects for the 0.5 middle grey, it doesn’t correct for the top not being bright enough.

The use of unity_ColorSpaceDouble is a bit of a hack. In linear color space, it’s 4.59479380. That is the value needed to convert the linear space color middle grey of 0.212 to 1.0, and push the 1.0 to close to the real 5.278. Good enough that the fact it’s still wrong isn’t super obvious. The real correct solution is just like I showed above, but with the real conversions.

// sample sRGB textures, getting color values that are converted into linear space
fixed4 base = tex2D(_Base, uv);
fixed4 overlay = tex2D(_Overlay, uv);

// convert linear space colors back to gamma space
base.rgb = LinearToGammaSpace(base.rgb);
overlay.rgb = LinearToGammaSpace(overlay.rgb);

// do the 2x mul overlay approx in gamma space
base.rgb = base.rgb * overlay.rgb * 2.0;

// convert back to linear space
base.rgb = GammaToLinearSpace(base.rgb);

That will get you exactly the same blend as you had in gamma space rendering, but it’s a good bit more expensive than just multiplying by 4.595.

12 Likes

Thanks for the detailed explanation! I’ve got a clearer means of visualizing what’s really happening in my mind. I’ve read your answers in that other post many times, and they were a huge help - I was just misunderstanding some details.

I understand that the sRGB toggle does nothing while the project is in gamma space - but why is that? If you’re in gamma color space, and you uncheck that to tell Unity a texture is in linear color space, shouldn’t it then do inverse gamma correction when sampling that texture? I.e. 127/255 in linear space would be converted to ~0.734 in gamma? Why does it just read it as if it were a gamma-corrected sRGB texture regardless?

Out of curiosity, when the project is in linear space and you toggle sRGB sampling, does Unity actually import the texture differently (i.e. does the texture data actually change) or is it the same texture at run-time, only sampled differently?

As for the marble overlay example, I’ve realized the step I missed: I’ve put together some graphs of each of the explored options.

You can see immediately that Case 3 (simply disabling sRGB sampling for the overlay texture) is totally incorrect - I failed to understand that doing so may provide the texture values without conversion (i.e. “middle gray” = 127/255) but the math is still being performed in linear space when I want to be multiplying the base texture in gamma space to achieve the desired result. These linear space results are then converted back to gamma before display on the screen, resulting in the red function curve shown. This also explains the muted/blurred look, as the brightest colors in the overlay are the most inaccurate, white pixels only reaching ~1.35x instead of 2x.

Indeed, as you explained, the perfect solution (Case 4) is converting back to gamma space to apply the doubling, then back to linear for the frame buffer, which then converts back to gamma for display - while the reasonable approximate (Case 2) is faster but isn’t quite perfect due to the use of the approximate gamma function, instead of the exact one used in the sRGB format.

Non-sRGB textures aren’t so much “in linear color space” as much as they are linear data values.

sRGB ON means the texture is a color value stored in sRGB space and potentially needs to be converted if the current rendered color space doesn’t match.

sRGB OFF means 0.5 in the texture should 0.5 in the shader regardless of the color space being rendered in. Sometimes that’s because it’s a color image in linear color space (which is how many HDR image formats are stored), and sometimes that’s because it’s non color data like a normal map. The onus is on the user (or the tools) to make sure the values stored match the color space being rendered if it is indeed a color value.

Sort of, but mostly no.

For your basic 24 bit or 32 bit textures (ie: 8 bits per channel) no conversions happen to the data. The texture is just marked as being sRGB or not for the GPU to do the conversion on sampling. The reason we use sRGB to begin with is because it stores color data in a way that best matches our visual perception systems so that the limited precision of the data can be better utilized. If it was stored in linear color space with 8 bits, there’s limited precision in the darker areas leading to more obvious banding and loss of detail and too much precision in the brighter areas leading to details we can’t perceive. Your original post’s bottom left image is a perfect example of this, where the darker stripes are huge compared to the brighter ones.

Where Unity does change the data is when using HDR images. As noted above most HDR image formats are stored in linear color space as 16 bits or 32 bits per channel floating point textures. These by the nature of floating point numbers already have more precision in the darks than the lights, so no special color space handling needs to be done like 8bpc textures to prevent banding. When you import these into a project using linear color space these textures are used as is as the data is already in that format, and sRGB is not enabled. For a project using gamma color space these textures are converted from linear to gamma space by Unity and the texture the GPU gets is pre-transformed into gamma space, also with sRGB not enabled. The reason for this is because the sRGB setting only works on the low bit depth formats, GPUs ignore it for floating point texture data. It also leads to some annoyance for some of us who want to pack data into hdr image formats as Unity does this conversion regardless of if you have sRGB enabled on HDR textures or not!

4 Likes

hello
I just read your very in-depth explanation, and I have some questions. First of all, I’m very new to color spaces in Unity and I’m interested only in color calculations themselves, not shader programming.
To put it simply, I want to render a large number of objects of a different solid color each (no texture necessary) and operate mixing (and splitting) of these colors, two by two, in a way that leads to a natural-looking result (as in mixing light). This sounds very straightforward, but in unity’s RGB space (either 0-1 or 0-255, had no idea until now that the two are not exactly the same thing) it’s not.

I’m considering using either linear space or XYZ colors or both. I’m also not sure if unity’s RGB values are by default in sRGB color space or not. I mean in the gamma space. I understand that they are.

But my main question is: I had already learned elsewhere that the 0-255 (or 0-1) RGB numbers are square root of the actual accurate values, and used in that way for convenience of storage. And therefore, that adding, let’s say, color1.r and color2.r in a way that is supposed to look realistic would be something like

if (result.r > 1f)
result.r = 1f;
//the last two lines are added to keep the result within the meaningful range of (0,1)```

now, what you're describing for the conversion between linear and gamma space (namely, from linear to gamma and back to linear) seems to be the exact opposite of that.

While I'm not sure if it makes sense for me to use linear space, I would like to understand it and experiment with it. So here's the question: is the above formula a conversion from gamma to linear and back again? And if so, would working in linear (with no conversion, just addition - or perhaps averaging) automatically create more realistic color mixing?

Thanks.

edit: now, having written this, I realize that perhaps these two are the same algorithm, because numbers between 0 and 1 are essentially fractions, and pow / sqrt work in reverse. Which would mean I simply wrote the algorithm wrong, taking it from somewhere else, where it was used for 0-255 values probably. 

I wonder how the averaging would work wit this algorithm. Divide by 4 / by sqrt(2) instead of just by 2?

By default Unity’s color values, both Color and Color32, are assumed to be in sRGB color space by various parts of the rendering system, but they themselves are just vector values with no inherent color space. Color32 is 4 byte values (hence the 0 - 255 range), and Color is 4 float values. The later also has handy functions for converting the value from linear to sRGB, or sRGB to linear. Again, it doesn’t know or care what color space the Color value is, it’s just applying the transform functions to the RGB values of the vector. You can also easily convert from Color32 to Color, but the 0 - 255 range of the Color32 is mapped to a 0.0 - 1.0 range in the Color, and vice versa, with values above 1.0 or below 0.0 being clamped when converting to Color32.

That’s not correct. As I stated above, using pow(x, 2.0) and sqrt(x) are approximations. Bad approximations. My specific comment above was:

Pretend they’re the conversions, because they’re not, they’re just cheap approximations. For shaders the “real” conversions are those LinearToGammaSpace and GammaToLinearSpace functions. Technically those are also just approximations, they just happen to be much, much better ones that are nearly indistinguishable from the real math for all but fairly dark values.

The real math is in that sRGB Wikipedia link I posted above. But really you don’t need to care about that because the Color class uses the exact conversions when you use the .gamma and .linear methods.

So that brings us to the base question.

The answer is “how do you want it to work?”

You can use the built in lerp function to average two color spaces in sRGB or linear space. Neither is more correct.

// "sRGB space" blending
Color blendedColor = Color.Lerp(color1, color2, 0.5f);
// "linear space" blending
Color blendedColor = Color.Lerp(color1.linear, color2.linear, 0.5f).gamma;

A lerp of 0.5f is going to produce the same results as (color1 + color2) / 2.0f if you want to do that instead. It doesn’t really matter.

Or another popular option is covert them to HSV first and average those values:

float H1, H2, S1, S2, V1, V2;
Color.RGBToHSV(color1, out H1, out S1, out V1);
Color.RGBToHSV(color2, out H2, out S2, out V2);
Color blendedColor = Color.HSVToRGB((H1 + H2) / 2f, (S1 + S2) / 2f, (V1 + V2) / 2f);

Again, they’re all options and none of them are wrong or more correct than the other. Generally averaging in sRGB space gets results closer to what people expect from Photoshop. Averaging in linear space gets slightly more pleasing results. And “averaging” in HSV space gets prettier results (though I might say this is transitioning between colors rather than averaging).

4 Likes

Thank you. I will have to keep experimenting with all this.

So in the end do you save textures in Linear or sRGB space?
For what I understand, textures that need to give raw values need to be Linear, like Normals, Alpha, Height, etc.
But should also Diffuse be Linear or is it better to have it in Gamma space?
I think that raw values give the largest color space, as any conversion from that point can only remove color space, to match another color space, you can’t for sure add data when you work on some data: during rework, you can only lose data.
The point is: will Gamma look better once rendered or not?
Will it be rendere faster?

Sorry I just got this now: “Again, they’re all options and none of them are wrong or more correct than the other. Generally averaging in sRGB space gets results closer to what people expect from Photoshop. Averaging in linear space gets slightly more pleasing results. And “averaging” in HSV space gets prettier results (though I might say this is transitioning between colors rather than averaging).”

I think I’ll work with Linear for everything then.

I’ll leave the questions here though, for anyone wondering.