Hello! I am trying to learn about Unity HDRP lighting, in particular, how to bake lighting for additional detail and to help with performance.
I have taken the “Basic Indoors (HDRP)” scene as the basis of my test scene, and added a building prefab. The building meshes are all configured as follows:
Cast Shadows = On
Static Shadow Caster = True
Contribute GI = True
Receive GI = Light Probes
All mashes are “Static”
Outside and within the building I’ve placed some Spot Lights and Point Lights. Lights are configured as follows:
Mode = Baked
Baked Shadows Enabled = True
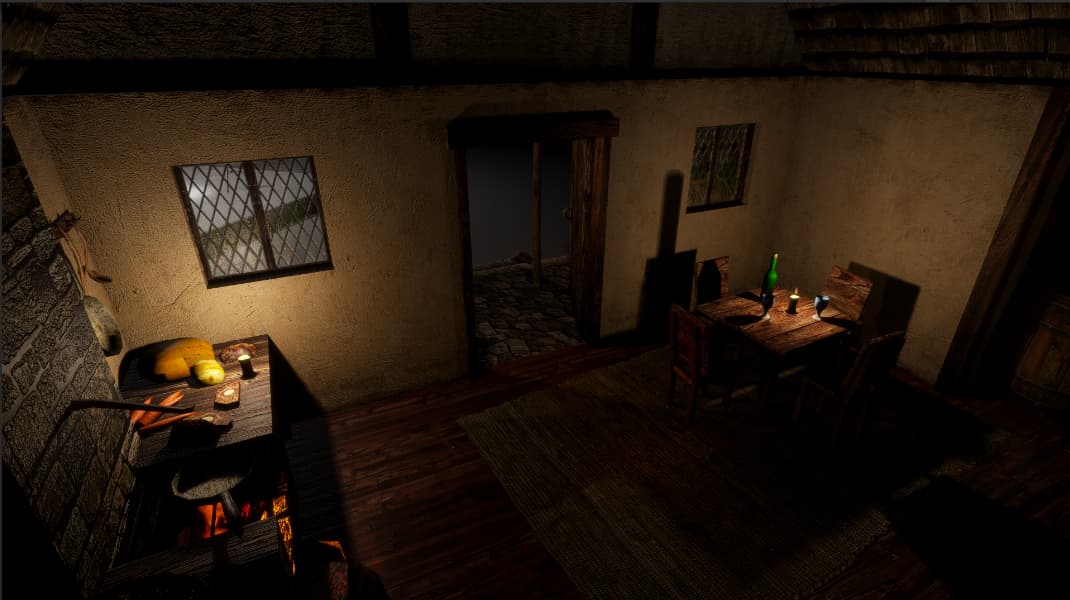
In the editor and in run-time, lighting looks good:
The “glow” from the stove fire, and the lovely reflections from the tables and surfaces have all gone.
I know that baked lighting is not going to give me the same impact as realtime, but I’m sure I can get better results than this. It’s definitely a me/skill issue, but lighting is so daunting, I just don’t even know where to begin.
I think I’m getting somewhere, and learning quite a bit in the process!
I’ve changed the larger MeshRenderers in the scene, such as the walls, furniture and floor, with Receive GI = “Lightmaps” - I’ve now come to understand that Probes do not do shadows. and that lightmaps are necessary for baked shadows. Small MeshRenderers that I want to cast shadows, like the chairs, cups, and bottles, I’ve set Cast Shadows" to “On”. For every other MeshRenderer in the scene, I’ve set Cast Shadows to “Off”. This greatly reduces the number of shadow casters, which hugely improves performance in real time lighting for a start.
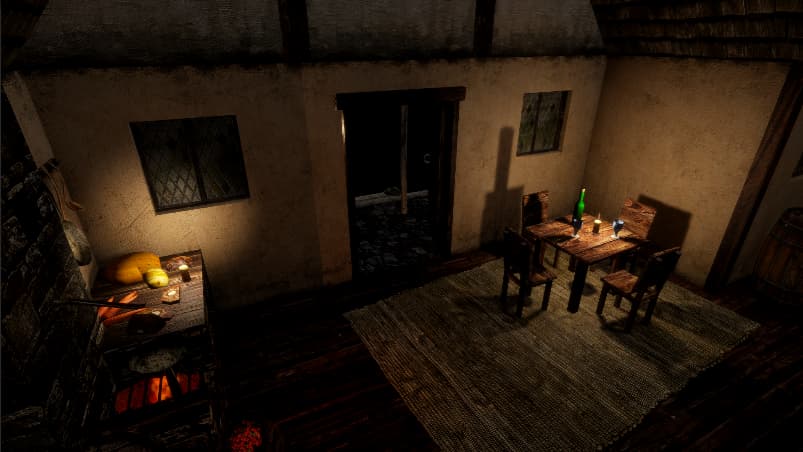
I’ve enabled Shadowmask in my HDRP asset, set the Scene Lighting Mode to “Shadowmask”, and set the Point Lights to Mode = “Mixed”, with Shadow Mask “Enabled” and “Update Mode” to “On Enable”. Baked the lighting again:
I’m just curious, if you’re baking direct lighting why bother using Adaptive Probe Volumes? Seems like Light Probes would be a better solution for a static environment.
APV is better for character rendering would be a reason.
If all lights are baked to APV the character would appear as if lit by realtime lights. With out APV the whole character would appear lit from a single point. It would look entirely wrong.
As for the subject of the thread, consider increasing the samples with an apv adjustment volume. Samples are crucial to making sure the probes look consistent.
On the left the character is largely flat cause they’re lit by sampling a single point, on the right they get shadow from the darkness of the stairs and indirect light from the window.
It’s as if there’s a point light there but there’s not.
I’m a bit confused by what you mean? Light Probes can interpolate between different lights.
There are no real time lights being used here.
That’s one thing I didn’t understand about APV, they say they use ‘bricks’ (octree) to distribute probes efficiently, I don’t see why that can’t be done with light probes though.
The plan is to have a player and NPCs moving around in the environment. I understood APVs would impart indirect lighting on those dynamic characters. I was hoping then that baking, combined with the APV, would give me a balance of performance and nice looking dynamic lighting. I’ve found “Shadow Casters” to be a big FPS challenge, so figured Shadowmask baking would be a good thing for indoors, where there’s lots of static geometry. It seemed logical that “if it doesn’t move, bake it”.
I must admit, I do find HDRP pretty confusing! So many settings, so many similar sounding things. I thought APV were analogous to Light Probes, but without the hassle of manual placement?
Also, the HDRP sample scene uses them in a static environment, so I figured it must be useful, otherwise why would Unity have included it!
As to what I thought to use them, I was also thinking to a future plan of different times of day in my project, and figured APV baking sets might be a way to have multiple lighting bakes that I can interpolate between to support that. I also read about Sky Occlusion in APV, that I thought might help when I introduce an outdoor, open world into the mix. But then, I guess that wouldn’t work with my baked lighting and shadows.
My biggest issue is that Unity lighting docs are incredibly technical. Even the famous lighting guide just has me overwhelmed within a few pages. I really need an idiots guide, with some basic explanations of terms and some very high level typical use cases with comparisons of pros and cons of each. And I know that lighting IS complex, and a science / art, but for me it’s barrier for entry is just a little too high!
Light probe data is set per renderer, so it doesn’t support procedural geometries unless you allocate the probes individually and draw these geometries one by one.
LPPV is similar to APV, but it’s (3D textures) still set per renderer, so it has the same limitations.
When using APV, we can access all light probe data (3D textures) on GPU. This allows procedural geometries to receive GI and doesn’t break batching.
There’re other improvements in APV over Light Probes (the word “Adaptive”), but I’m not an expert on that.
I’d recommend watching this video to get a better idea of the differences without things getting too technical.
The key takeaway is that APVs are designed for Baked Indirect Global Illumination. Which means you’re expected to still use a direct light and screen space ambient occlusion.
On the other hand, Lightmaps will give you both baked Direct and Indirect lighting, with Light Probes providing dynamic indirect lighting. APVs have a slightly higher performance cost, but lower memory footprint.
The way I see it, APVs and Light Probes are designed for different use cases. Which lighting technique you choose depends on your target platform.
High end mobile devices and desktop: APV + Realtime Direct Lighting + Post Processing Effects.
Low end mobile and WebGL: Lightmaps + Light Probes + ‘Fake’ Shadows.
I also don’t consider “automatic placement” to be a bonus as this is trivial to create for light probes as well.
That object is lit based on a single point on the model, it is not lit per pixel. Meaning the model is lit the same top to bottom based on where it’s center is. If you were you stretch the model very tall it would look no different, without light fall off.
If the center of the model is in shadow the whole model will render in shadow, if the center of the model is lit the whole model will be lit.
Actually they said that APV is not a replacement of lightmaps, but light probes.
So we can also choose Lightmaps + APV (per-vertex) on low end devices (shader model ≥ 4.5).
In terms of quality, per-vertex APV should still produce more natural GI than light probes (without LPPV), because the probe sampled at each vertex can be different.
I think the problem is that APV needs SM 4.5, which means no WebGL support
For me it entirely replaces light maps since I only used light maps for indirect lighting not shadows. it’s much less detailed, but general visual cohesion for dynamic objects is is massively improved.
Plus scenario blending is much easier than light map blending.
I’m interested in the use case discussion. My project is not targeting mobile, but I am keen to try as much as possible to have things looking gorgeous, but also be playable on lower end systems. In my head, it’s my duty to squeeze as much as possible out of the players system. I’ve found that players expect not just high fidelity, but responsive, smooth gameplay. So targeting 60FPS over 30FPS is one of my key goals, without mandating high end GPUs. I think recent articles about player preference of “performance” over “quality” modes on consoles supports this.
That’s why I think stuff like baked lighting data and shadows has some place in my use case, alongside real time lighting and screenspace effects and postprocessing. My project has a framework for me to apply granular graphics setting at runtime to give plays the best possible chance of playing and enjoying the game. Obviously, I want to do that in a controlled way, so as not to compromise the overall visual integrity of the game.
But that’s kind of where I’m at, and why I’m really keen to explore all the options, pros and cons, and techniques and tricks available in Unity 6.
Indeed you can ask APV to lit per-pixel and not the whole dynamic model from a single anchor point. However, APV is not mandatory for that, and considering it is not yet production ready, there is a safer alternative available.
With classic light probes, you can achieve per-pixel dynamic lighting by using a Light Probe Proxy Volume that follows your dynamic model.
As for your baked scene, there is a lot to say and none of it is simple. You seem to underestimate the importance of Reflexion probes so I suggest you take a more serious look at how they affect your scene. Also you seem to think that mixed light are always better, when sometimes you need to have two lights, one baked and one realtime, to control each component, especially the shadowing.
Finaly, relying on baked results to lit the dynamic object often result in a lack of specular reflexions, because the baked results are not very directional and lack shadows. I suggest you keep in mind that having realtime lights is important to precisely light your dyunamic object and get more reflexion and shadows.
One things that I personnaly use is studio lighting like in any youtube video. You first light the environement, then you “add” light from realtime sources that only affect your dynamic objects, using the render layers. This allow for great control, perfect model-on-model shadows computations, specular where you want them, etc. This is not very PBR but no AAA movie, youtube or video-games are.