
The Shader Graph and World Building teams are excited to announce that beginning in Unity 6.3, it’s now possible to create terrain shaders using Shader Graph! By creating terrain shaders in Shader Graph, artists and designers with no coding experience gain a huge amount of flexibility in defining the appearance and behavior of terrain materials. This has been one of the longest requested features on Unity’s World Building roadmap and we’re excited to finally announce its release.

The Unity Terrain system is a powerful tool with a deep set of features for sculpting terrain, painting on material layers, and adding details like rocks, foliage, and trees. However, the shader it uses has a few deficiencies:
- The base terrain shader that ships with Unity can potentially be too expensive to render on mobile devices.
- There’s no way to customize the appearance or behavior of terrain material layers beyond the few available parameters.
- Existing terrain layers tend to exhibit tiling artifacts
- The transition between the foreground terrain material and the background terrain basemap is a hard edge. In order to make it less harsh, it needs to be pushed way back into the distance so it’s not noticeable. But the further back it’s placed, the more expensive the terrain is to render.
Previously, all of these issues could be improved by altering engine source code, but now artists and designers can use Shader Graph to resolve all of these and push terrain rendering way beyond what was previously possible - all without writing any code.
Along with the release of Shader Graph support for Terrain, the Shader Graph team has also created a large set of sample shaders and subgraphs that demonstrate the new tools and make it easy to get started with terrain shaders. With these samples, you can:
- Use customized terrain layers with 3 different methods for breaking up terrain tiling artifacts. So you can choose the method that best fits your performance budget.
- Use a customized two-texture packing scheme for terrain layers which significantly reduces the cost of terrain rendering.
- Use the included Distance Fade subgraph, which blends out the hard transition line between foreground terrain and background basemap. With the hard line gone, you can move the transition closer to the camera and make the terrain cheaper to render.
- Apply effects such as triplanar projection for projecting terrain textures on steep slopes, or parallax occlusion mapping for adding realistic, close-up detail.
- Create terrain shaders that apply materials automatically based on terrain altitude and slope angle instead of manually painting them.
- Apply a terrain rendering technique that cuts terrain performance costs by over 50% and should enable terrain rendering on a large set of mobile and XR devices.
How It Works
Shader Graph’s support for terrain comes in the form of two key components:
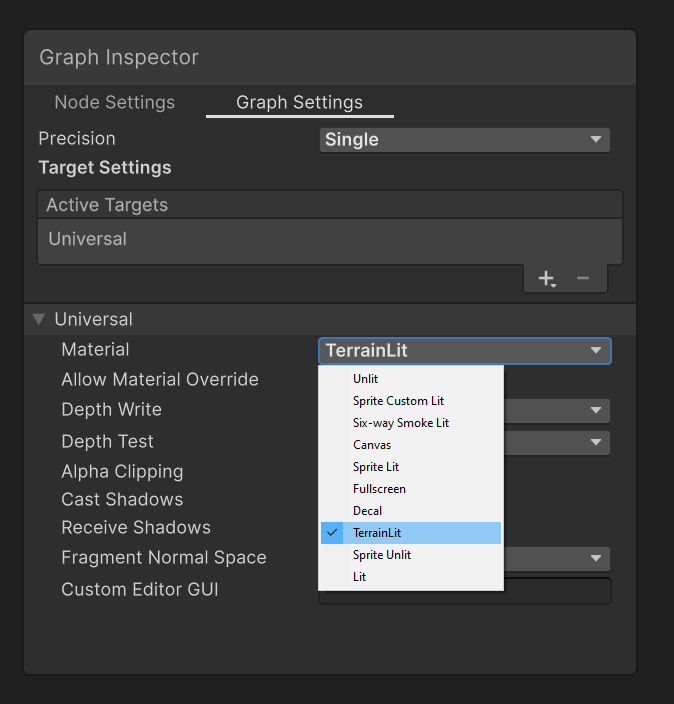
A new TerrainLit Material Type in the shader’s Graph Settings. When you make a new shader, select Create->Shader Graph->(HDRP or URP)->Terrain Lit from the list of options in the Project window’s right-click menu. Or convert an existing shader to TerrainLit by opening the shader’s Graph Settings window and setting the Material type to TerrainLit. The TerrainLit material type setting ensures that keywords and code structure are formatted for terrain compatibility.
A new node that can be added to your graph called Terrain Texture. This node allows you to bring in and sample the textures that the terrain is using for each layer - Diffuse Map, Normal Map, and Mask Map, as well as the Layer Masks texture that is used to blend the layers together.
This new node also has output ports for all of the parameters available on the terrain layer such as Normal Scale, Color Tint, etc.

With these two components, you can access all terrain-specific data in the graph and then use all of Shader Graph’s functionality to define how the data is used. Instead of being locked into pre-defined material layers, you’re free to define the layers yourself as well as defining how the layers are combined and blended. Of course, the sample content comes with a large set of pre-defined layer types as well, so you’re also welcome to just use the ones we’ve already created for you.
What’s In The Samples
The Shader Graph Terrain sample includes the following elements:
- 18 example terrain shaders that include variations of texture packing, tile break-up, parallax mapping, detail mapping ,etc

Note: If you’re wondering what CHNOS, CNM, and CSNOH are, those sets of letters are indicating the type of texture packing that the Shader is using. CNM is the standard type and stands for color, normal, and masks. CSNOH is a 2 texture packing scheme where color and smoothness are stored in the first texture and normal, occlusion, and height are stored in the second. More details are available in the documentation for the sample.
- 14 different types of terrain layer subgraphs

- 3 different methods for breaking texture tiling artifacts

- Dozens of subgraphs that make it faster and easier to build terrain shaders
- Examples of triplanar projection, parallax mapping, detail mapping, and other techniques for terrain
- A sample scene that puts all of the sample terrain features on display
There are multiple ways to use this sample content:
- You can use the shaders directly in your project to get instant results.
- You can learn how the terrain layer subgraphs work from the sample shaders and use the included subgraphs to build your own custom shaders.
- You can learn how the shaders and subgraphs work from the samples and then build your own shaders that are completely custom based on the performance and feature requirements of your project.
However you choose to use the samples, we hope they will speed up the process of creating terrain shaders and help you get exactly the results you’re looking for.
How To Import
In Unity 6.3, the terrain shader features are automatically supported. If you’d like to import the new terrain sample content, follow these steps:
- In the Editor, open Package Manager.

- In the Package Manager window, select the Shader Graph package.

-
Select the Samples tab.
-
Finally, select the Import button to the right of the Terrain Shaders sample to bring the new terrain shader sample set into your project.
With these steps completed, the Terrain Shaders sample will show up in your project under Assets/Samples/Shader Graph//Terrain Shaders.
After importing the samples, get started by opening the sample scene:
Assets/Samples/Shader Graph//Terrain Shaders/Scenes/TerrainURP or TerrainHDRP
Conclusion
We hope these improvements will help you create more convincing terrain materials, tune the cost of the terrain to fit your performance budget, and provide more power and flexibility in the creation of environments. We would love to hear your feedback! Feel free to ask questions and tell us what you think here in this thread.