This article is based on the Unite 2024 talk Everything you need to know about Build Profiles in Unity 6 by Thom Hopper, Staff Technical Product Manager at Unity.
What you’ll find in this post:
- An overview of the new Build Profiles window in Unity 6
- The Build Profiles workflow and customization options
- A short overview of the Build Profile API
- What’s next for Build Profiles
What is the Build Profile workflow
The Build Profile workflow is a new way to configure builds in Unity 6. This new workflow supports multiple configurations for any platform, each with different settings.
This new workflow is found in the Build Profile window (File > Build Profiles). This window replaces the Build Settings window from previous versions of Unity. Both the new Build Profile workflow and the workflow you are already familiar with are still supported within this new window. Having both workflows in Unity 6 ensures that your existing projects and build scripts will work out of the box.
In this article, we’re going to focus only on the new Build Profiles workflow. If you want to learn more about the differences between the classic workflow and the Build Profiles workflow, make sure to check out the first part of this Unite 2024 talk.
Let’s start building with the new Build Profiles workflow!
Creating a new Build Profile
First, to access the Build Profiles window in Unity 6, navigate to File > Build Profiles in the Editor.

The Build Profiles window in Unity 6
You can create your own custom build profiles enabling you to configure settings for specific platforms, scenarios, or testing needs.
As an example, you might want to define a build profile that includes only development tools, or debugging-specific scenes that only have a subset of scenes for a demo or beta version build.
To create your own Build Profile, click the Add Build Profile button.

Add Build Profile button in the Build Profiles window
That will open the Platform Browser window where you’ll find all the supported platforms.

The Platform Browser window
For this example, let’s add a build profile for Windows by clicking Add Build Profile in the Platform Browser.

The New Windows Profile in the Build Profiles window
If you select New Windows Profile you’ll see the option to switch profiles and you are able to configure the Platform Build Settings as well as being able to Build and Run.

The Build and Run button in the New Windows Build Profile window
Build profiles are assets in your Unity project. You can rename them to fit their purpose, and you can share them in your version control system of your choice with your team. You can always keep local profiles for yourself if you want.

The New Windows Build Profile as an asset in the Unity project
Like all assets in your project, you can store them wherever you want but, by default, when they’re created by the Build Profile window, they’re added to a folder in the Settings section of the project under a sub-folder called Build Profiles (Assets/Settings/Build Profiles).

You can add existing Build Profiles from the Platform Browser window, and you can also copy them from another project. You can duplicate them or copy and paste them in the Project window. You can copy default profiles by right-clicking and selecting Copy To New Profile and then modify them as needed.
Build Data
In the new workflow, you can customize the Build Data to have a completely custom Scene List for each of your profiles. This allows the content of your build to vary when you’re using different build profiles, such as limiting build times when testing specific issues, for subsets of your game’s content, or creating demos or vertical slices.

The Build Data feature in the Build Profiles window
Scripting Defines

The Scripting Defines option in the Build Profiles window
Another benefit of Build Profiles is the option to use Scripting Defines. You can set these Defines to change the way that your build works when you’re building for a specific profile or when that profile is active in Editor Play mode. These Scripting Defines are additive, so they are in addition to the ones you find in Player Settings. You only need to add the ones that you want to customize for this Build Profile’s behavior.

An example of Scripting Defines causing a recompile when switching profiles
Note: If you have custom Scripting Defines on a profile, switching to or from that profile can cause a recompile. In the image above, switching from the classic workflow to the Windows debug profile will cause a recompile and domain reload.
That’s because we have custom Scripting Defines on the Windows Debug to enable DEBUG_THINGS. Switching profiles to the Build Profile name just “Windows” won’t cause a recompile as there’s no custom Scripting Defines on this profile.
Switching from one of these Build Profiles to the other will cause a recompile for the same reason as they don’t share the same Scripting Defines.
Platform Build Settings

The Platform Settings section in the Build Profiles window
The Platform Build Settings enables you to specify if the build is a development build, enabling options such deep profiling support, script debugging, and more.
You can set up a group of profiles that contain different settings for different purposes. Since they’re assets in your project, you can share them with your team. They can use them by name without your team members having to configure these settings themselves.

The Player Settings Overrides section in the Build Profiles window
In Unity 6 it’s possible to add an override for the project’s Player Settings to a specific profile. This will let you configure a complete set of Player Settings that are then used by the Editor when building the profile.

Player settings customization: Icon, Splash Image, and more, in the Build Profiles window
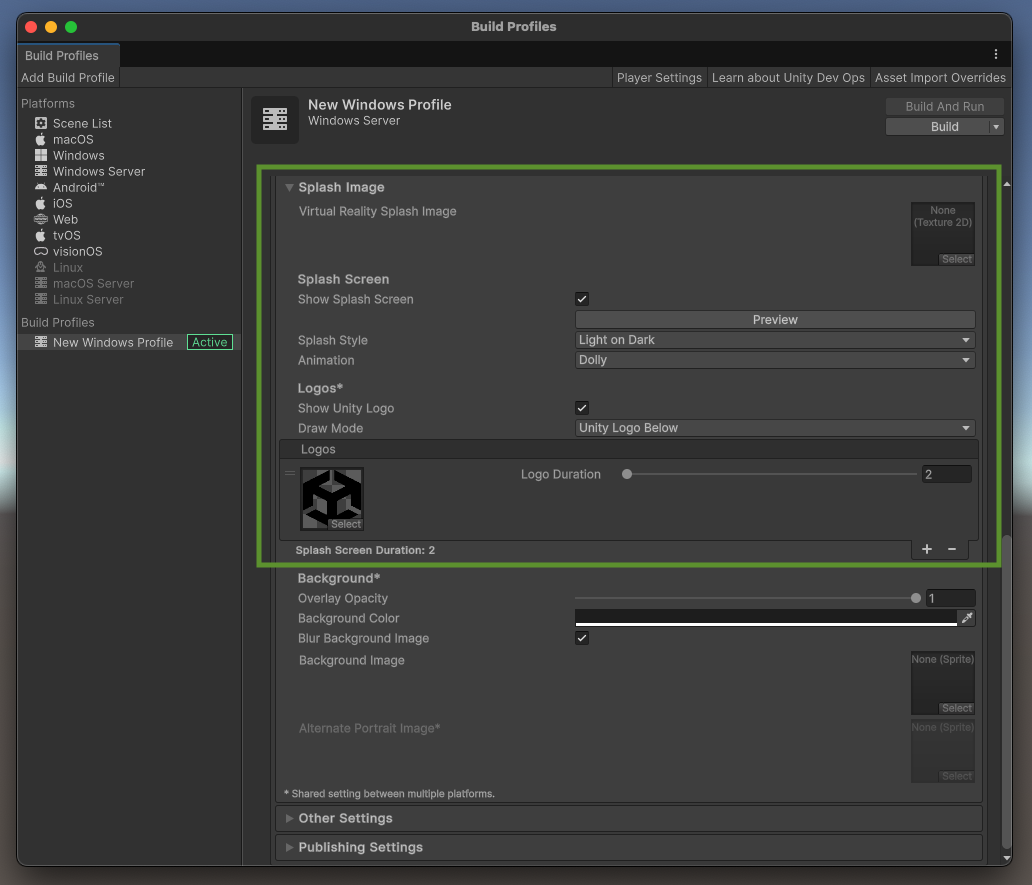
Splash Image customization settings in the Build Profiles window
The Customize player settings button allows you to override the settings found in Player Settings, specifically for that build profile. You can configure your Icon, Splash Image, and even set different publishing settings when you’re targeting different store fronts, for example, for Android devices.
Note: When switching profiles that also change Player Settings, you might notice that changing a setting requires an Editor restart.

Player Settings changes that might require an Editor restart
In the example above, the incremental garbage collector and enabling or disabling Graphics Jobs settings usually require an Editor restart.
In the classic workflow toggling these settings requires a restart, so we persisted with that behavior for build profiles. Due to having customizable inactive build profiles, you might see this prompt when enabling a build profile for the setting to take affect.
You might also see this restart prompt when you enable a build profile, remove player settings and resetting them to Global.
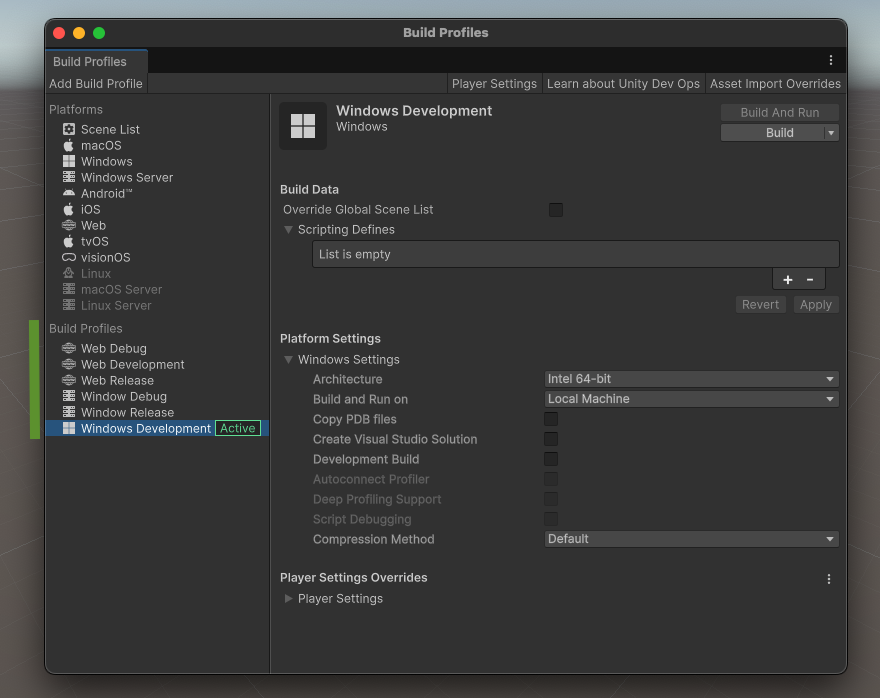
Examples of different types of Build Profiles (development, debugging, release)
The image above shows an example of six build profiles, with three targeting web platforms and three targeting Windows platforms for all various development needs. Make sure to give them an indicative name, so that you know which one to choose depending on the type of build you want to work on.
You can add as many profiles as you need for any of the platforms that you have access to.
Build Profile API
The new Build Profiles workflow introduces an API that allows you to interact with Build Profiles directly in your build scripts. You can use Build Profiles as containers for your build settings, even when implementing custom behavior before or after a build. This ensures you can use the same profile and settings whether you’re building manually within the Editor or automating builds on a build machine.
The API supports creating, switching, and configuring your Build Profiles from your scripts. And, because switching platforms from within a script in batch mode can cause issues, we’ve added a Command Line argument to let you activate a Build Profile when launching the Editor in batch mode.
The code below is an example of how you can launch a build using a known Build Profile. You can add an Overload for the BuildPipeline.BuildPlayer method that takes a BuildPlayerWithProfileObject into which you can put your Build Profile, the Output path, and any settings you want.
API: Building a specific profile
using UnityEngine;
using UnityEditor;
using UnityEditor.Build.Profile;


public class EditorScript
{
   [MenuItem("Example/Simple Build")]
   public static void SimpleBuild()
   {
       var buildProfile = AssetDatabase.LoadAssetAtPath<BuildProfile>
           ("Assets/Settings/Build Profiles/Windows.asset");


           BuildPlayerWithProfileOptions options = new BuildPlayerWithProfileOptions();
           options.buildProfile = buildProfile;
           options.locationPathName = "BuildExample/Out.exe";
           options.options = BuildOptions.None;


           BuildPipeline.BuildPlayer(options);
   }

}
If you want to learn more about the Build Profile API, including checking if a Build Profile is active, tune in from 14:01 in this Unite 2024 talk and make sure to check this section in the Documentation.
What’s next for Build Profiles
If you’re curious about what’s coming next for Build Profiles, head to the Unity 6.1 Beta is now available post and the Beta release notes to read all about it.
More resources
If you want to learn more about what’s next for the Unity Engine, make sure to check out The Unity Engine Roadmap talk from Unite 2024.
Additionally, if you have any feedback or questions for the team make sure to check out the Build Profiles space on Unity Discussions.

Thanks for reading. We hope you find this article helpful!