
The AI navigation package makes it easy to implement pathfinding in your Unity projects, so that characters can intelligently move around the game world.
However, even with many options available, there can be a few pitfalls. This quick troubleshooting article aims to provide solutions to some of the common problems and questions when working with Unity’s NavMesh system.
Let’s dive in!
How to view the AI Navigation option in Unity
First, you have to make sure that AI navigation is installed, as it’s not part of the default Editor. To check if it’s installed go to Window > Package Manager under Unity Registry and look it up on the list under Package Manager.

If you want to learn more about the AI Navigation system there are a few helpful scene demonstrations in the Samples folder which can be downloaded from the Package Manager.

How to create a NavMesh
Go to GameObject > AI > NavMesh Surface.

By clicking this option, you’ll create a GameObject that has the NavMesh Surface component attached. This GameObject can be switched “on” or “off”, like any other GameObject, to enable or disable a NavMesh surface at any point.

It will use the selected Agent Type to define the values used to create the NavMesh surface. This NavMesh surface will only be used by the selected Agent Type. If you have several NavMesh agents in your scene, you’ll need to create several NavMesh surfaces, each targeting a different Agent Type. This is a big difference compared to the built-in Navigation system used in previous versions of Unity prior to 2022.3.
Click Bake to bake the NavMesh surface. You can click Bake again at any point to rebake the NavMesh surface, or press Clear to delete the NavMesh surface data.
Previous versions of Unity (2022.2 and below) using the built-in Navigation system required GameObjects to be marked as Navigation static for them to be included in the NavMesh surface bake. With the newer AI Navigation system, you no longer need to mark objects as Navigation static.
How to view the NavMesh in your scene
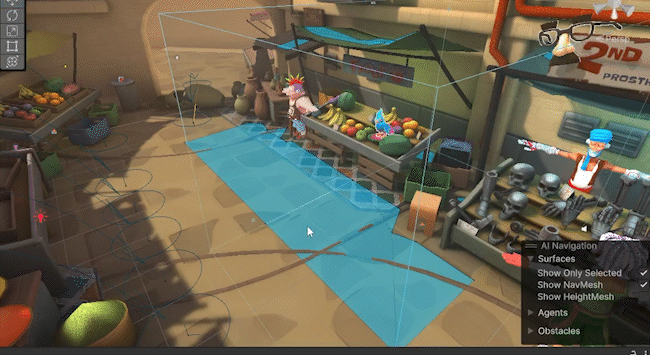
After installing the AI Navigation package you’ll see a GUI panel at the bottom right of your Unity window. From here you can switch “on” or “off” on the NavMesh and HeightMesh display and, also, only show the selected NavMesh if you’ve baked several in your scene.

If you still don’t see the NavMesh, make sure you have Gizmos enabled in your Scene view.

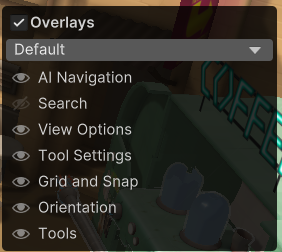
Press the apostrophe sign ‘ on your keyboard to bring up the Overlays menu. From here you can switch “on” or “off” on the AI Navigation GUI panel.
How to create a clean NavMesh
Depending on the Step Height of your agent, you may find that the NavMesh surface can get a bit too complicated, with some of it reaching up to smaller objects closer to the ground. You might have unwanted NavMesh islands on top of tables, boxes, etc., where the character can’t walk.
You can easily create a few NavMesh surfaces for each character. One for the ground, one for the steps, and another one for ramps or any areas to climb up on.
First, go to the Navigation tab and set your agent’s Step Height to zero and the Max Slope to zero.

Now rebake your NavMesh Surface to make it less complex.

You can change your agent’s Step Height and Max Slope for other areas such as steps and ramps before baking those.
Use the Volume option under the Collected Objects section to bake the steps NavMesh only in the area of those steps.
How to choose what objects to exclude from the NavMesh surface
There are numerous ways to include or exclude objects when creating a NavMesh surface. In the NavMesh surface component, part of the NavMesh GameObject in the Hierarchy, there is a section called Object Collection.
In the dropdown list, there are four options that allow you to control which objects will be included or excluded.

All GameObjects
As the name suggests this will include all the GameObjects in your scene. This is the default option.
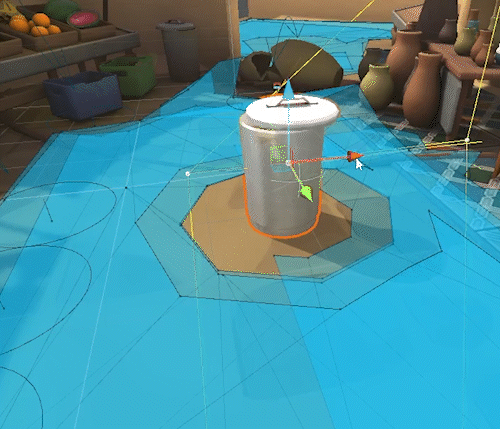
Volume
This option allows you to define a box Volume area and bake the NavMesh surface only in that area. This is great when you need to constrain an AI agent to a small, specific area.
Click on the Edit Volume button to click and drag the resize points at the edges of the box Volume to resize it.

Once you’ve defined the Volume size, click Bake to create the NavMesh surface. If you resize the Volume, click Bake again to recreate the NavMesh surface.
The NavMesh surface after defining the size of the Volume
Current Object Hierarchy
When this option is enabled, it will use the objects that are switched on in your Hierarchy. Any objects that are switched off will be ignored.
NavMeshModifier Component Only
This is helpful if you know you might need to rebake the NavMesh surface several times as you work on your game. You can add a NavMeshModifier component to any GameObject you want to be included in the NavMesh surface. Any object that doesn’t have this component will be ignored.
Include Layers
A new layer can be created to store objects you want to include when you create the NavMesh surface. By default this is set to “Everything”, which contains all the layers, but you can select just a single layer.
This is not necessary if you’re using another method than All GameObjects, but it’s another way you can be selective about which objects to include or exclude when you create a NavMesh surface.
How to create more than one type of NavMesh Agent
Go to Window > AI > Navigation.
From this panel you can add as many agent types as you like by clicking on the + icon below Agent Types. You can modify each agent’s values.
You’ll need to create a NavMesh surface for every new agent type.
Now you can create several NavMesh surfaces and each can be used by a different agent type, so that different characters can take different paths.
If you want the character to drop from heights, or jump over objects, add values greater than zero in the Generated Links section.

When using the NavMesh Surface component, you’ll now see that you can select different agents from the Agent Type dropdown list:

If Drop Height is greater than zero it will automatically drop gizmos in your NavMesh surface after baking to show where agents can drop from one surface to the next.
Make sure that the Generate Links checkbox is checked for these to be included.

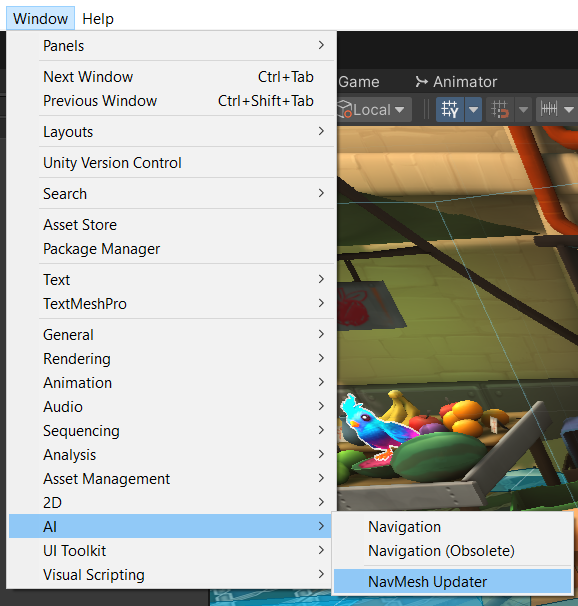
Upgrading from Unity 2021 LTS and the built-in Navigation package
If you’re using Unity 2022 LTS, or Unity 6 Preview, and you want to upgrade a project created in a previous version of Unity, such as Unity 2021 LTS, then you’ll need to update the built-in NavMesh surface to use the newer AI Navigation system.
Here’s how you can do that:
Go to Window > AI > NavMesh Updater.
This converts the baked NavMesh to use the NavMesh component on a GameObject added to the Hierarchy. It also updates objects that are marked as “NavMesh static” to use the newer NavMeshModifier components. You can choose any scene or all scenes in the window and click Convert Assets.
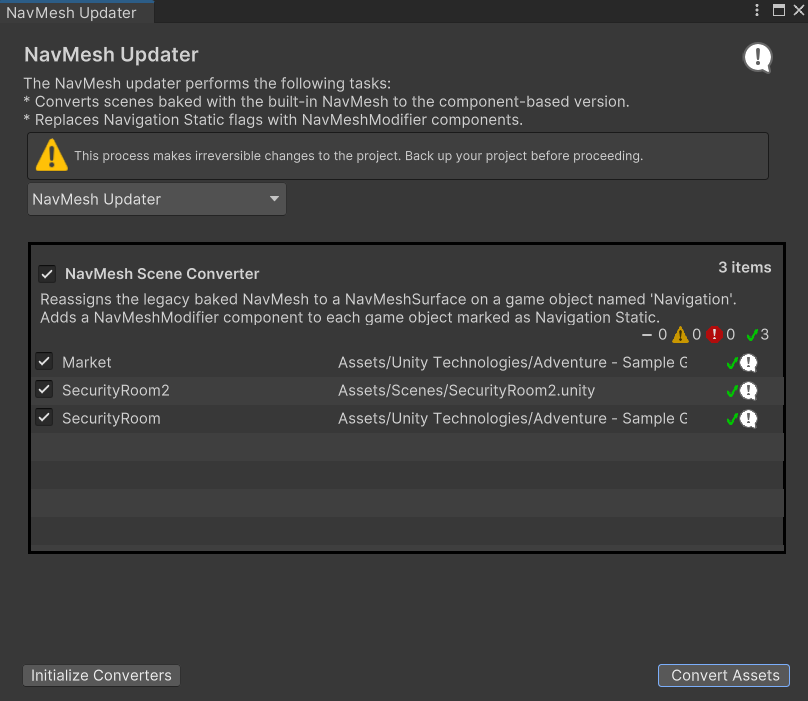
The NavMesh Modifier component Gizmos will appear on all the objects marked as “NavMesh static” and the NavMesh surface will create holes surrounding these objects.
The NavMesh surface itself will now be contained in a GameObject within the Hierarchy and you can clear or rebake it from there if needed.
How can moving objects cut holes in the NavMesh?
Select the moving object and add a NavMesh Obstacle component. You can change the Radius and Height of the obstacle’s shape. Check the Carve checkbox to carve a hole in the NavMesh surface.
If it’s a moving object, leave the Carve Only Stationary box unchecked. The hole in the NavMesh surface will now follow the object.
If you destroy the object the hole in the NavMesh surface will disappear.

The NavMesh obstacle component in the Unity scene.
The NavMesh Obstacle component will carve holes in all the NavMesh surfaces.
How to add jumps to the NavMesh surface
There might be areas in your scene where you want your agents to jump over.

Create an empty GameObject and add a NavMeshLink component. This is used to control the agent’s jumping.

Position this empty GameObject over the area you want the agent to jump over. You’ll need to adjust the values of the NavMeshLink component.
You’ll see the Gizmos for the jump. When the two circles appear, one at every end, it means that it’s touching the NavMesh.

You can then adjust the Start Point and End Point positions.

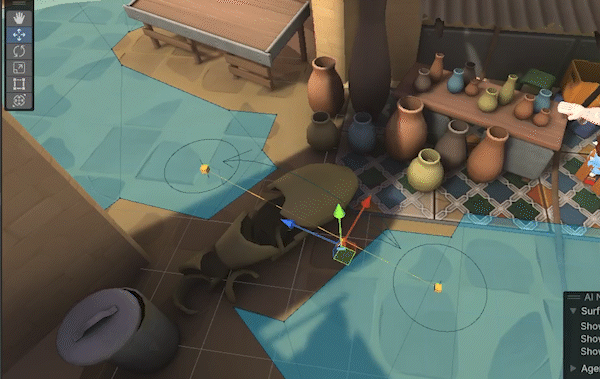
Adjusting the Start Point and End Point in the Unity scene
The agent will appear to just move faster over this jump area.
The jump itself needs to be handled by code. However, to make this easier, there’s a script included in the AI Navigation Samples that will handle the agent jumping.
Add the Agent Link Mover script to the character and you can choose from a range of jump styles from the Method dropdown list.

We hope you found this article about the AI Navigation package in Unity 2022 LTS and above helpful and that you can use some of these tips in your own Unity projects. Let us know if you have any feedback on some of these tips, or how we can better expand this article to cover more best practices.
Thank you for reading!
