Custom pixelization render pass for a selected layer mask

The artstyle of my project requires a pixelization effect on a selected group of objects (pickups, powerups, UI elements).

Here is a simillar effect from the game Prodeus

Originally I have tried creating a bunch of cameras that would render selected layers onto a low res render texture and then render all of them with the main camera. There were two problems with this approach:

  1. Each camera cuts a significant chunk of performance
  2. Complicated setup

Custom render pass seems like a perfect solution (I don’t know about the performance, but at least the setup will 100% be simpler), but all tutorials/stack overflow questions seem to be using some older version of RenderGraph API

This is my code so far:

using UnityEngine;
using UnityEngine.Rendering;
using UnityEngine.Rendering.Universal;
using UnityEngine.Rendering.RenderGraphModule;

public class PixelizationRenderFeature : ScriptableRendererFeature
{
    [System.Serializable]
    public class CustomRenderPassSettings
    {
        public LayerMask layerMask;
        public RenderPassEvent renderPassEvent = RenderPassEvent.AfterRenderingTransparents;
        public Material material;
        [Range(1f, 15f)]
        public float pixelDensity = 1f;
    }

    public CustomRenderPassSettings settings = new CustomRenderPassSettings();

    class CustomRenderPass : ScriptableRenderPass
    {
        public Material material;
        public float pixelDensity = 1f;

        public CustomRenderPass(CustomRenderPassSettings settings)
        {
            profilingSampler = new ProfilingSampler("Pixelization Pass");
            renderPassEvent = settings.renderPassEvent;
            material = settings.material;
            pixelDensity = settings.pixelDensity;
        }

        public override void RecordRenderGraph(RenderGraph renderGraph, ContextContainer frameData)
        {
            if (material == null)
            {
                Debug.LogWarningFormat("Missing Blit Material. CustomRenderPass render pass will not execute.");
                return;
            }

            const string passName = "Pixelization Pass";

            var cameraData = frameData.Get<UniversalCameraData>();
            var resourceData = frameData.Get<UniversalResourceData>();

            TextureHandle srcColor = resourceData.activeColorTexture;

            var descriptor = cameraData.cameraTargetDescriptor;
            descriptor.width = Mathf.Max(1, (int)(cameraData.camera.pixelWidth / pixelDensity));
            descriptor.height = Mathf.Max(1, (int)(cameraData.camera.pixelHeight / pixelDensity));
            descriptor.depthBufferBits = 0;
            descriptor.msaaSamples = 1;

            TextureHandle pixelatedRT = UniversalRenderer.CreateRenderGraphTexture(renderGraph, descriptor, "PixelatedRT", false);
            
            UnityEngine.Rendering.RenderGraphModule.Util.RenderGraphUtils.AddBlitPass(
                renderGraph,
                new UnityEngine.Rendering.RenderGraphModule.Util.RenderGraphUtils.BlitMaterialParameters(srcColor, pixelatedRT, material, 0),
                passName
            );
            
            UnityEngine.Rendering.RenderGraphModule.Util.RenderGraphUtils.AddBlitPass(
                renderGraph,
                new UnityEngine.Rendering.RenderGraphModule.Util.RenderGraphUtils.BlitMaterialParameters(pixelatedRT, srcColor, Blitter.GetBlitMaterial(descriptor.dimension), 0),
                "Final Blit to Screen"
            );
        }
        
        public override void OnCameraCleanup(CommandBuffer cmd)
        {

        }
    }

    CustomRenderPass m_ScriptablePass;

    public override void Create()
    {
        m_ScriptablePass = new(settings);
    }

    public override void AddRenderPasses(ScriptableRenderer renderer, ref RenderingData renderingData)
    {
        renderer.EnqueuePass(m_ScriptablePass);
    }
}

AS far as I understand, it takes the rendered color texture from the camera, copies it onto a lower resolution texture and then copies it back onto the main frame. Feel free to correct me if I’m wrong.

What I don’t understand is how instead of taking color from the camera I can render all objects on a specified layer mask instead and then use that result for downscaling
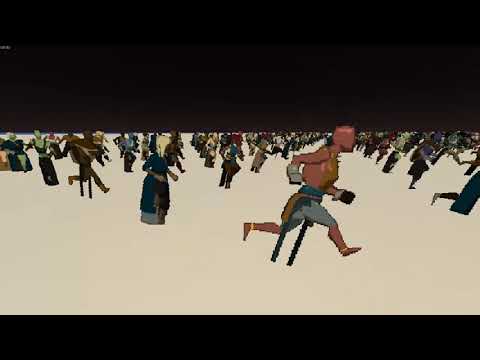
If I recall correctly, Prodeus simply takes the 3D models and generates sprites from it by rendering them once from predefined angles such that they look like old-school sprites like seen in classic Doom.

Perhaps that’s also a solution for your use-case. Of course the models aren’t rendering every frame but rather can be prerendered in the editor or at runtime when the game boots up. There are “3d to sprites” assets on the store and probably a couple free ones too.

I need something a bit different than just good old doom approach ahaha. There are some limitations of this approach that may look nice in a game like Prodeus, but are a bit different from what I am looking for (limited number of directions, framerate, light interactions)

There is a tutorial by the creator of this asset on how to achieve this effect (I’ve lost the link to it :/) as well as this video aslo showing exactly how to make what I am looking for.

he problem is that RenderGraph API received some updated that made these materials almost entierly outdated.

It should be possible to create a pixelation shader (with Shader Graph) and just apply it to materials for objects that are supposed to be pixelated. Maybe check if you can find a simple pixelation shader tutorial.

I spent a lot of time working on something like this a few years ago and still use the system to this day for pretty much all character sprites now (even in 2D games). The problem with the video that is linked (that the creator also mentions) is that it won’t stay pixel-stable when you change distances. Thus it breaks the illusion of being a sprite and it becomes obvious it is just a 3D model being rendered at low resolution. The creator of that asset also states as much and requires the model to not change distance from the camera in order for it to work. I came to the same conclusion that the creator of the video you linked did: It’s hard to do efficiently in Unity but you’re going to want to use additional cameras and render textures. There’s probably some real fancy way to do it using shaders and render passes only but I’ll admit the math for that sort of problem is so far over my head that it might as well be on another planet. And when I talk to ‘shader folk’ they get real confused when I say that I want to do ‘real time pre-rendering’ so I just gave up with that and went with render textures and cameras.

In my case I ended up with a dynamic system that would allocate, activate, and deactivate resources as needed. It worked by creating render textures of 2048x2048 along with an associated camera. The texture was logically sliced into 32x32 tiles and each character that could be drawn would request a number of these tiles to be assigned as their own. Each frame the character would then have it’s model positioned in front of the off-screen camera such that each would be seen within the tiles allocated to them by the camera. This way, each frame, the camera would render all of the characters at the same time. You just had to be sure that each character request enough tiles or they might bleed over into neighboring sprites. Then each character could easily calculate the UVs of this master texture that mapped into their own tiles and use that to apply that section of the rendertexture to a quad for displaying the final sprite. A bit of a nightmare to get synced at times but it works well enough.

I added a few tricks to speed things up as well. When there weren’t enough tiles left for a new character I would dynamically create a new rendertexture and camera (all hidden behind an abstraction layer so that I didn’t need to know when this happened). When characters were no longer in view of the camera or were disabled they would be removed and a swap-back process was used to ensure the minimum number of cameras and render textures were used. Any previously allocated ones were deactivated. With this, I was able to get about 300-400 characters with sprites at a resolution of 96x96 on screen without requiring too many cameras or render textures.

A final trick was to use what I called a ‘deposter’. Kind of a play on the term ‘imposter’. In this case it did the opposite of a normal imposter. When a character was far enough away the LoD system would disable the sprite which freed up tile space (as mentioned above with the swap back) and I would just render the character’s model but using a special shader that completely flattened it and applied the quantized rotations. Since the characters were far enough away you couldn’t tell that they were no longer pixelated and rendering at the natural resolution of the screen. Doing this let me bump it up to a few thousand sprites.