I’m not sure what is wrong with your setup, but you can try to use this C# script that has been made by @Julien-A. Be noted that it’s not a formal solution but is more an example or boilerplate.
BufferBinder.cs (3.5 KB)
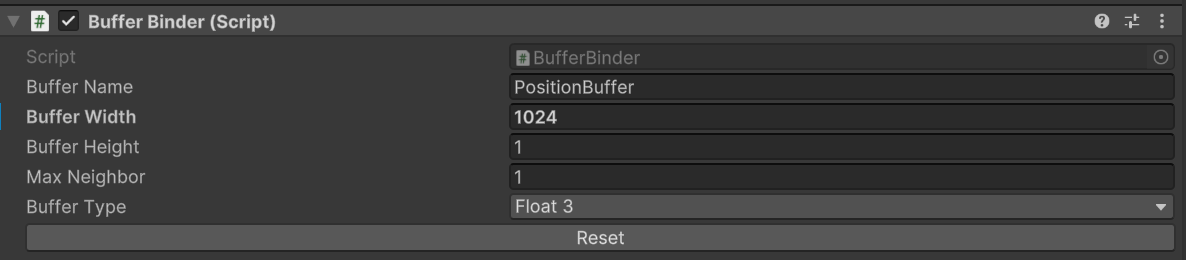
Nevertheless, I found this script pretty useful. Just drop it on a game object, set the name of your Buffer, it’s size and Type.
Alright, now let’s get back to this “Finding the closest triangle” problem  .
.
First, we want our particle to collide with the animated skinned Mesh. This can be done thanks to a real-time SDF solution like mentioned above. Or, another solution is to use the Depth Buffer Collision. Depth buffer is easier to set up, doesn’t require custom script, and you can easily collide with several skinned Meshes. Now it has some precision drawbacks with the moving camera, and you can’t collide with what you can see like the back of the skinned Mesh (if looking at the front…).
Here I’ll stick to SDF collision, but you can take a look at colliding with the depth buffer in this post.
Thanks to the Hit Collision, let’s try to find the Closest Triangle index. For this, we’ll use custom HLSL to run over the Triangle of the collided skinned mesh to find the closest one from the hit collision.
Disclaimer: This involves for-loop iteration per particle, which isn’t recommended on the GPU.
Here is the general plan:
- Spawn sticky particles on each triangle of our animated skinned Mesh.
- Each frame, Store the Skinned Mesh position by updating a buffer with the current particle position.
- Upon collision, spawn new decals particles at Impact position.
- in the initialize context, Read the Buffer and find the Closest triangle index and store it.
- in the update context, use this Triangle index to sample the Skinned Mesh Position and stick to it.
Finding the closest triangles will involve a for-loop over all our Mesh triangle. So first, let’s create a proxy version so that it’s a little more optimized.
Creating a proxy mesh:
Creating a proxy mesh is often useful when doing character VFX. This allows typically allows for better performances and can be used to encode some information. Here, creating a proxy mesh allows:
- Reduce the number of triangle to iterate upon.
- Having a nice a uniform triangle distribution, which isn’t always the case with characters.
If you want more details about uniform skinned Mesh sampling or creating a proxy mesh, you can take a look at this previous post.
For this task, I’m usually using Houdini, but I’m pretty sure that it’s doable with Blender.
First, I scatter uniformly N-number of points that will correspond to our Mesh Triangle density.
Those point inherit all information from the skinned Mesh including normal, bone Weight etc.
Then Triangles are instanced on each point. This results in a skinned triangle point cloud.
With this proxy mesh, we’ll be able to reduce our Loop number to something more reasonable, as our Mesh has around 17k triangle! For this breakdown, I’ve reduced it to 1024 triangles. 
Store the Skinned Mesh Position in a Buffer
-
We first need to create and bind the buffer. For this, I’m using the script mentioned above.
The buffer name is set to"Position Buffer" and the X size to the number of triangle of our Proxy Mesh (1024). The type is set to Vector3 as we’ll store Position
-
Create a System in VFX Graph that spawns N-number of particles depending on you Skinned Mesh triangle count.
-
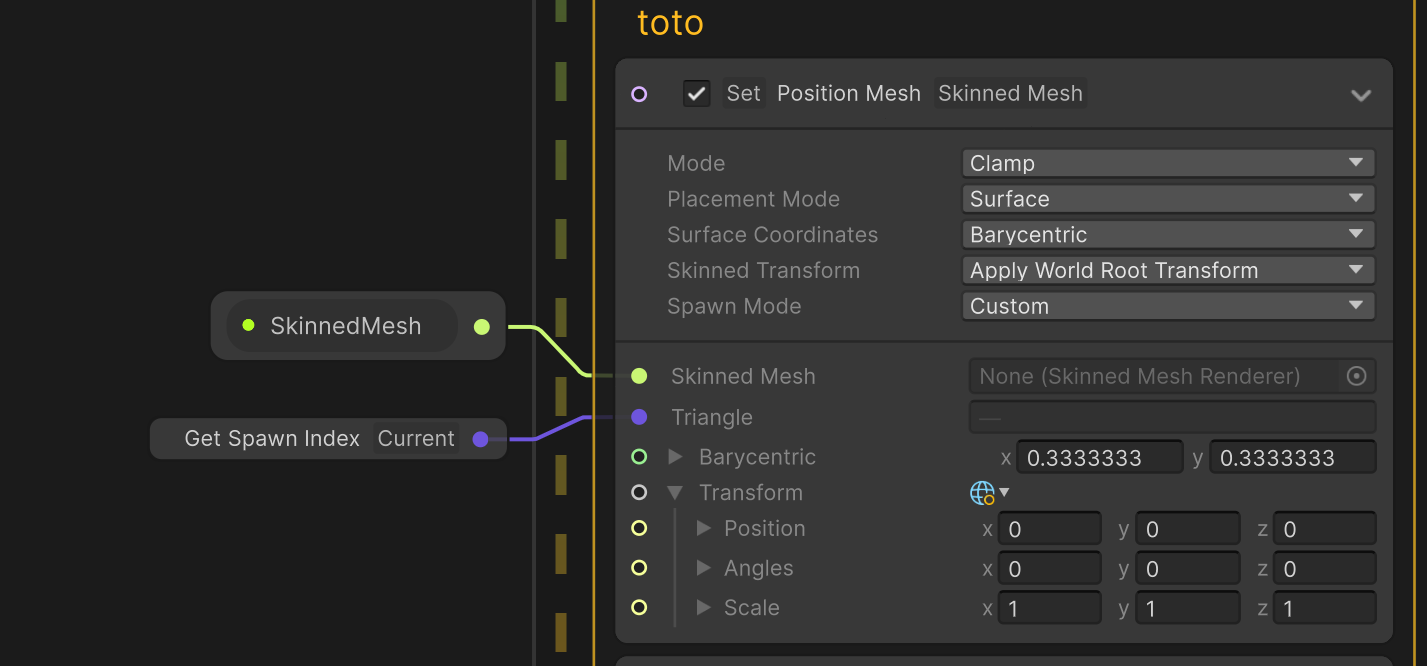
In the Update Context, Set the position of your Skinned Mesh Triangle thanks to the particles SpawnIndex.
-
Write the Position to the Position Buffer thanks to Custom HLSL. The code is pretty simple, and is about declaring the buffer and setting each index with the particle position:
//declare the Buffer.
RWStructuredBuffer<float3> PositionBuffer;

//The function with the Input Index and Float3.
void updateBuffer(inout VFXAttributes attributes, uint index, float3 writteData)
{
//Writte the position in each buffer index by using particle position and their index.
    PositionBuffer[index] = writteData;
}
This system in place allows writing the skinned Mesh in the Buffer to be accessed by other systems.

Colliding with the Skinned Mesh:
This has been already covered in the previous post, so to summarize, a system spawns particles that collides with a Dynamic SDF representation of our Skinned Mesh (not the Proxy). Upon collision, particles are killed and spawn new Particles at Impact position.
Finding the Closest triangle Index:
It’s time to find this closest triangles 
- Particles are spawns at their parent’s position.
- in the InitContext, we’re creating a new custom HLSL operator to find the Closest triangle in our update PositionBuffer.
#ifndef CLOSETRIDEF
#define CLOSETRIDEF

// include the BufferHelper.hlsl that contains the Buffer declaration.
#include "HLSL\HLSL_BufferHelper.hlsl"


int findClosestTriangle(in float3 samplingPosition)
{
// allow to get the Size/length of our Buffer. This will represent our number of loop iteration. In our case 1024.
    uint size, stride;
    PositionBuffer.GetDimensions(size, stride);

// This variable will store the closest Triangle index. We initiate it at -1.
    int closestTri = -1;
// This variable store the Min distance found . We start with a big number.
    float minDist = 100000;

//each new spawn particles, will once at their init stage iterate over all the Buffer Indices.
    for (uint i = 0; i< size; i++ )
    {
    // Check the distance between the HitPosition and the current Position at Buffer Index
        float dist = distance(samplingPosition, PositionBuffer[i]);
    // If this distance is smaller than the previously found minDist set the closestTri index and minDist.
        if(dist < minDist)
        {
            closestTri = i;
            minDist = dist;
        }
    }
    // When the loop is over return the Closest triangle index found.
    return closestTri;
}
#endif
- This Index is stored in a custom attributes to be used in the Update Context:
Almost done, let’s use this Closest triangle index 
Sticking Particles to the skinned Mesh:
- In the update context, create a Set position Skinned Mesh.
- Make sure to set the Placement to Surface and reference your Proxy Skinned Mesh.
- Use your Custom Triangle Index attribute to know which Triangle to sample.
- If you select the block, you can ask it to orient your particles to the Mesh Surface with the Apply orientation:
Having fun with the Output Particle Decal
Congrats, everything is properly set up !!!  You can now play with your decals, and be creative with it.
Now, even if the particles decals are properly sticking, we can still see some minor stretching, but it’s not that bad. Now, as said earlier, I wouldn’t consider this as production-ready solution.

It can also work with Depth Buffer collision instead of SDF. Here, I’m using the Main Camera position and vector for the initial position and velocity of the projectiles particles.

Now, to make it viable, finding the “closest triangle” really requires an acceleration structures.
I hope this will still be interesting. Don’t forget to have fun.
P.S: I’m joining a small package that should contain the simple scene and the VFX properly setup for Unity 6 and HDRP. Everything is easily reproducible on URP. Although it can work only with the depth collider, the prefabs will have references to the demo team real-time SDF baker. Make sure to install it thanks this information.
VFXG_StickyDecals.unitypackage (2.6 MB)